Note: By entering a value of 0, the system will continue to show the pop-up or send the email indefinitely until the required action is completed.
#### Reset Notifications The Reset Notifications checkbox is available for each alert type in the configuration panel. When this checkbox is selected and the configuration is saved, the system deletes the notification history (send log) for that alert type on the selected course. This means: All users who had previously received this alert — including those who had reached the maximum number of repetitions — will be eligible to receive it again. The repetition counter (sent\_times) is cleared for all users associated with this course and alert type. The alert cycle restarts from scratch as if no notification had ever been sent. This is useful, for example, after updating the course content or extending the course deadline, when it makes sense to re-notify users who had already been informed.Note: Reset Notifications only affects the selected alert type for the selected course. Other alert types and other courses are not affected.
## Pop-Up Alert When the Pop-up delivery method is enabled for an alert, the system checks at each user login whether any active alerts apply to that user. If so, the pop-up will appear at the next login. The pop-up presents two action buttons: - "Enter": Redirects the user directly to the course. The alert is recorded as sent and the repetition counter is incremented. - "Remind me later": The alert is recorded as sent and the repetition counter is incremented. The pop-up will appear again at the user's next login, provided that the number of days configured in Interval days has elapsed since the last display.Closing the pop-up (×): Dismisses the pop-up for the current session only, without incrementing the repetition counter or updating the last-send date. The pop-up will reappear at the next login unless an action is taken by clicking one of the buttons
If user is enrolled to multiple courses requiring notifications, multiple popups might be displayed at the same time: [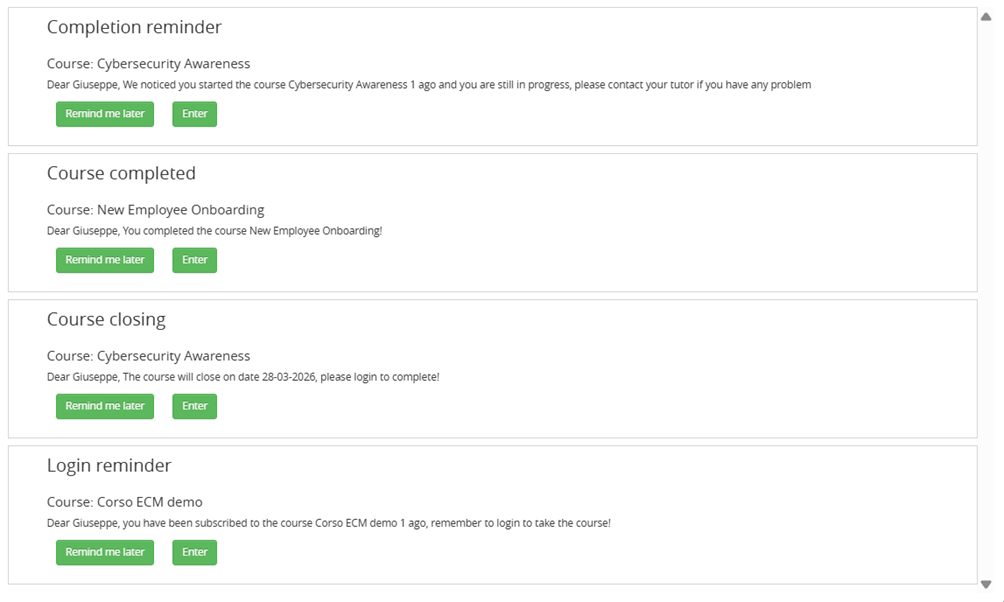](https://bookstackprod.s3.amazonaws.com/uploads/images/gallery/2026-04/0C2NFSNlI3bxe04l-image.png) ## Notification Log A log of all the notification sent to users can be accessed: - Whithin a specific course alert settings, showing all the notifications sent for that specific course - Whithin the plugin global settings, showing all the notifications sent for all the courses [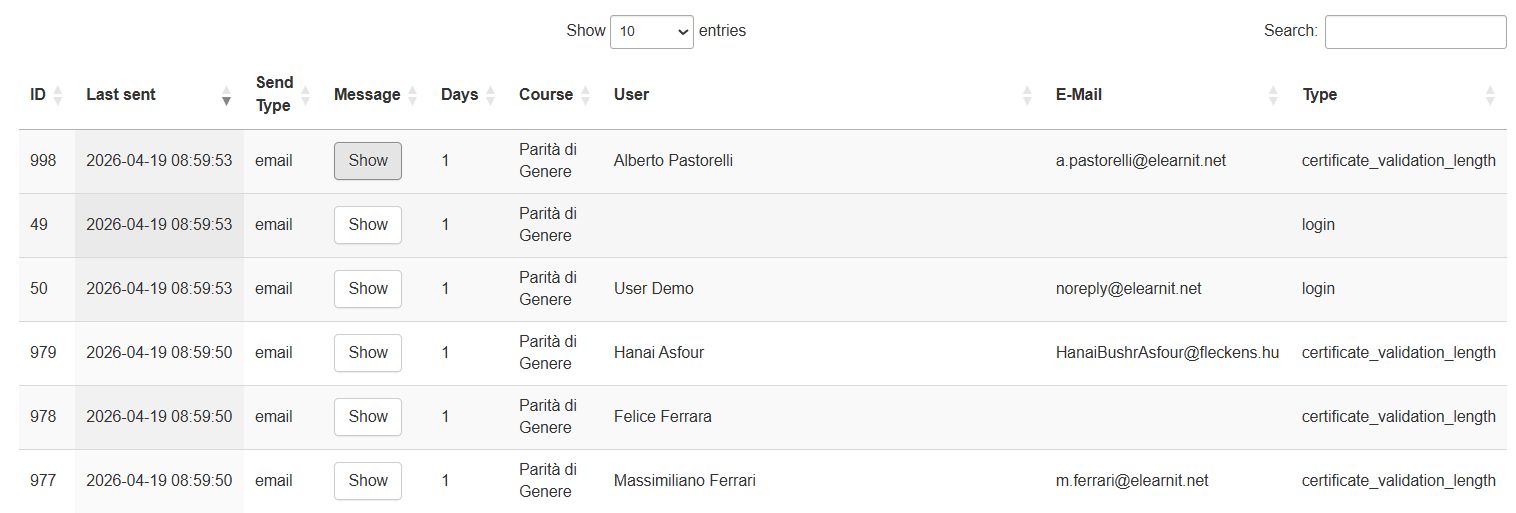](https://bookstackprod.s3.amazonaws.com/uploads/images/gallery/2026-04/Ch2qt1nuIeapq7eM-image.png) ## Sending Criteria ### Global Sending Criteria Before sending any notification, the system always checks: 1. Active user: the user account must be active 2. Active course: course status must not be archived, deleted, or suspended 3. Maximum number of sends: if set to 0, sends without limit; otherwise stops at the configured number 4. Minimum interval between sends: does not resend until the configured number of days has passed since the last send ### Specific Sending Criteria #### Login Reminder Purpose: reach enrolled users who have never opened the course. Users receive the notification if: - They have never made their first access to the course - They have no completion date recorded - They have been enrolled for at least X days (X is configurable) - Their enrollment date is valid - Their enrollment status is not one of: Suspended, Pending, Deleted, Overbooking #### Completion Reminder Purpose: prompt users who have started the course but have not yet finished it. Users will receive the notification if: - They have made at least one access to the course - Their enrollment status is exactly In progress (1) — no other status is accepted - They have no completion date recorded - Their first access was at least X days ago (X is configurable) #### Course Closing Reminder Purpose: notify enrolled users that the course has an upcoming end date. Users will receive the notification if: - The course has a defined end date (not empty) - The end date is still in the future - The end date falls within X days from today (X is configurable) - Their enrollment status is not one of: Suspended, Pending, Completed (2), Deleted, Overbooking #### Course Completed Purpose: notify the user that they have completed the course. Users will receive the notification if: - They have a completion date recorded - Their enrollment status is not one of: Suspended, Pending, Deleted, Overbooking #### Certificate Expiry — Retraining (Certificate Validation Length Reminder) Purpose: notify users that the certificate obtained upon course completion has expired, prompting them to retrain. This notification is managed by the Retraining module and is only available when that module is active on the platform. Users will receive the notification if: - They have completed the course (certificate obtained) - The certificate has a validity duration configured on the course - The certificate validity period has elapsed since the completion date # Doko ## Plugin Installation, removal and update ## Global settings Plugin settings are available under *Admin > Settings > Plugin Manager > Doko > Settings* [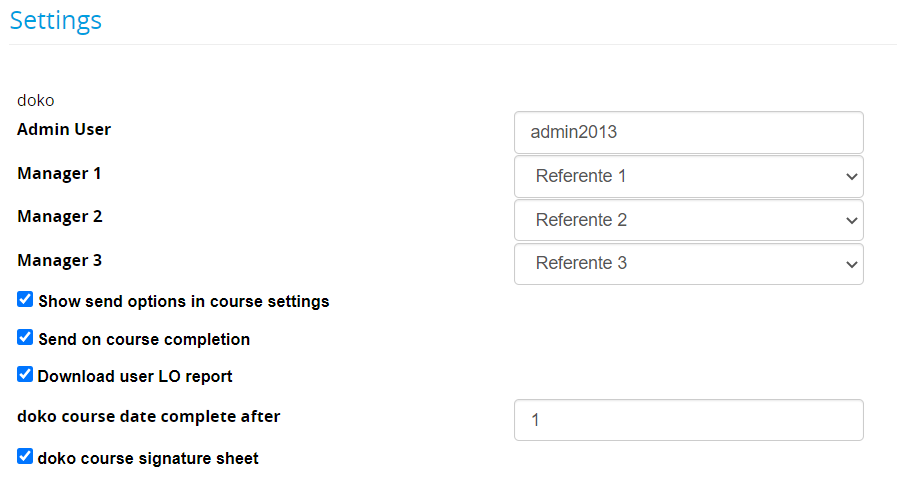](https://bookstackprod.s3.amazonaws.com/uploads/images/gallery/2024-06/Ppm0M5d6RMCAo2IX-image.png) - Admin User: set a superadmin username to be used for cron automation (only needed if you are using cron to send emails) - Manager: set up to 3 custom user fields containing extra recipient emails - Send on course completion: a zip package containing the certificate and the selected documents will be automatically sent to the selected recipients - Download user LO report: enables the generation of a PDF report for each user - Doko course signature sheet: enables the creation of a signature sheet to be printed for each course - Custom fields: select course and edition customfields to be added to signature sheets header ## Using Doko ### Doko “Package” When a user completes a course, Doko creates a zip package containing several documents: - Course Certificate - LO Report - Printout of final test answers - Detailed course trackings: a XLS file reporting the details of user \[Immagine\] The package is available in two ways: - **Automatic Mailing** to the student and/or his managers (See course settings) - **Manual download** from the users stats page in course teacher/stats area: [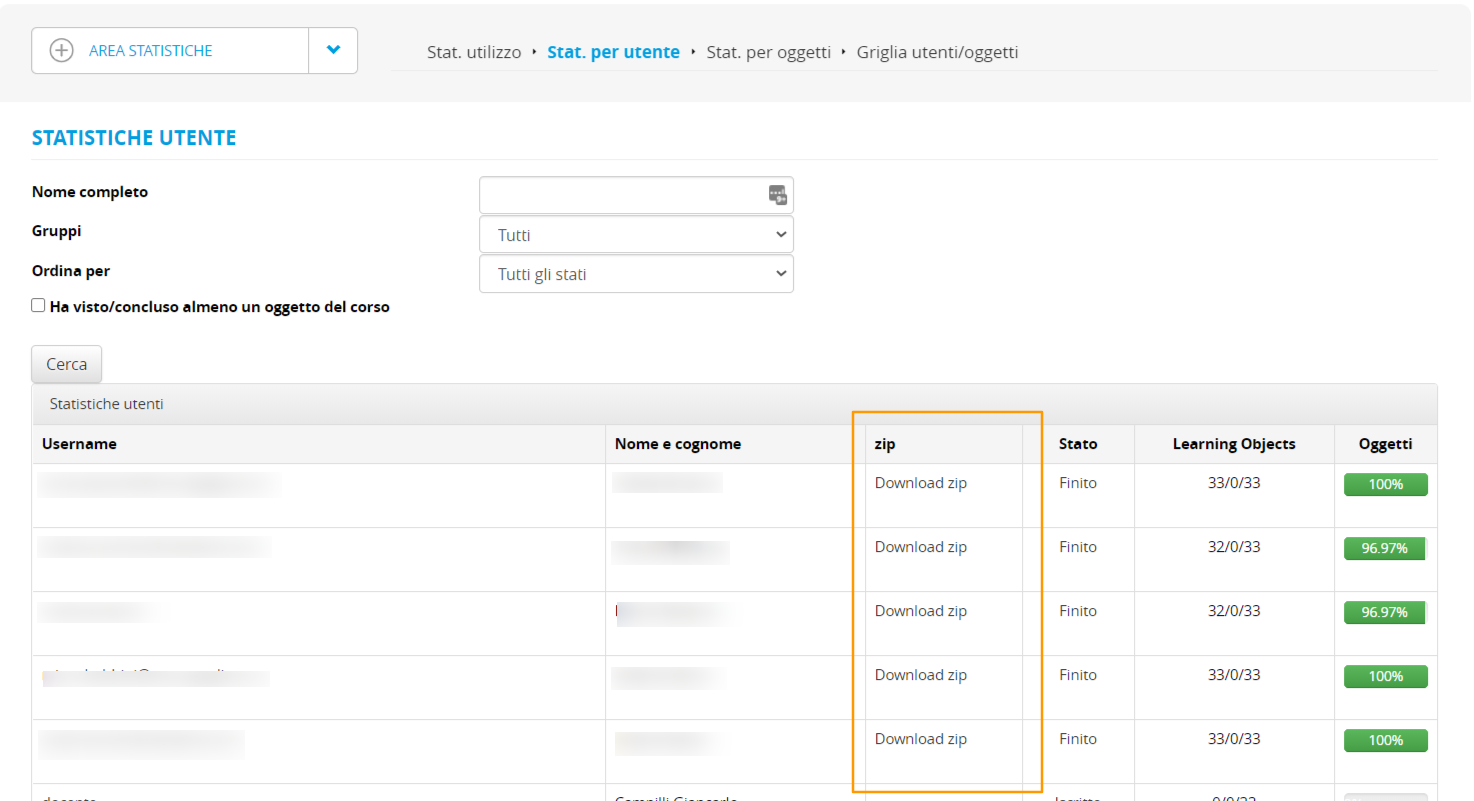](https://bookstackprod.s3.amazonaws.com/uploads/images/gallery/2024-06/d9uQVYsarg5y5GOF-image.png) The .zip file includes: 1. the certificate in a .pdf format 2. the .xls reporting with the user’s tracking data (the same that can be found under the users-object grid) 3. A test printout, with the detail of the answers given by the user in the final test [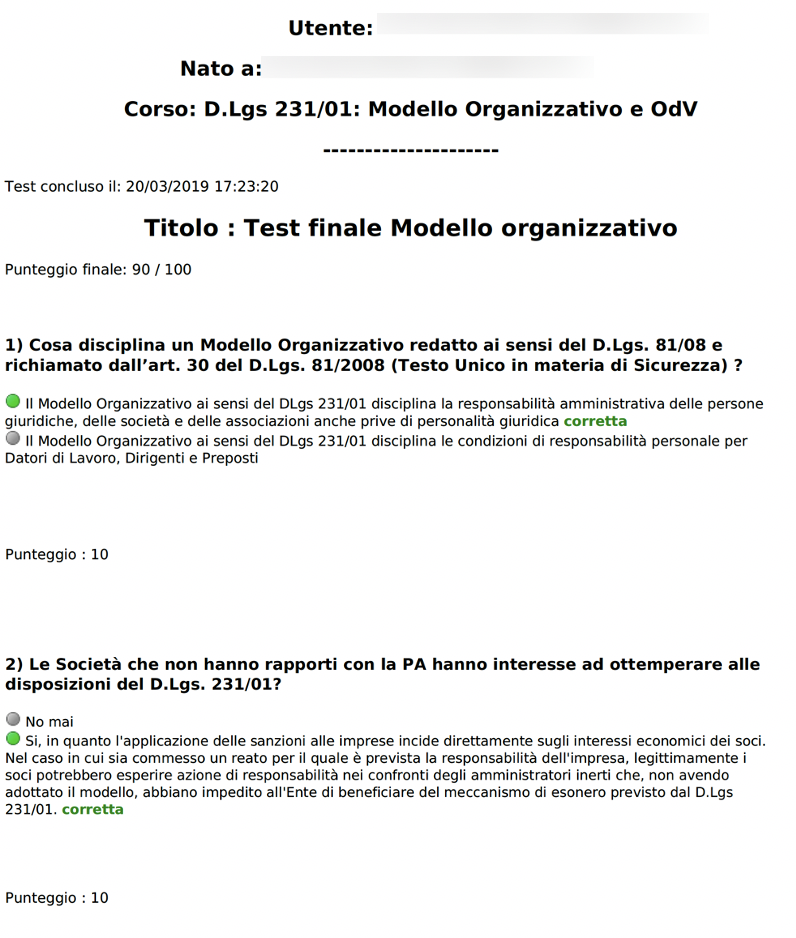](https://bookstackprod.s3.amazonaws.com/uploads/images/gallery/2024-06/0ZCOVkdZfYy1Ua8N-image.png) [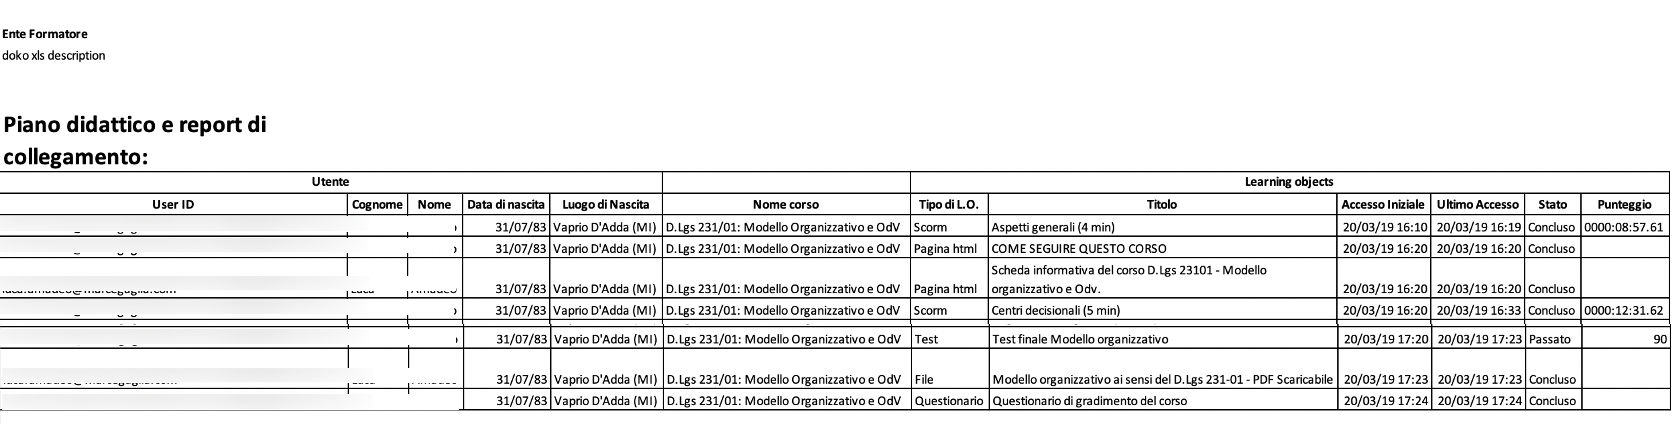](https://bookstackprod.s3.amazonaws.com/uploads/images/gallery/2024-06/z5FtrC7bG3K8t3od-image.png) ### Course Settings The plugin adds a new section in the course creation or editing wizard. It’s called “course certificate delivery” and it appears under “documents upload”. If you expand this section, these are the settings you can configure: - **e-mail settings and recipients** → dropdown menu, where you can decide to send your documents to - nobody - student only - student and managers (if you have set them under “configuration”) If you send without selecting the other options, your e-mail will include the user’s certificate and the print-out of the tests completed by the user. You can also include other documents, see below: [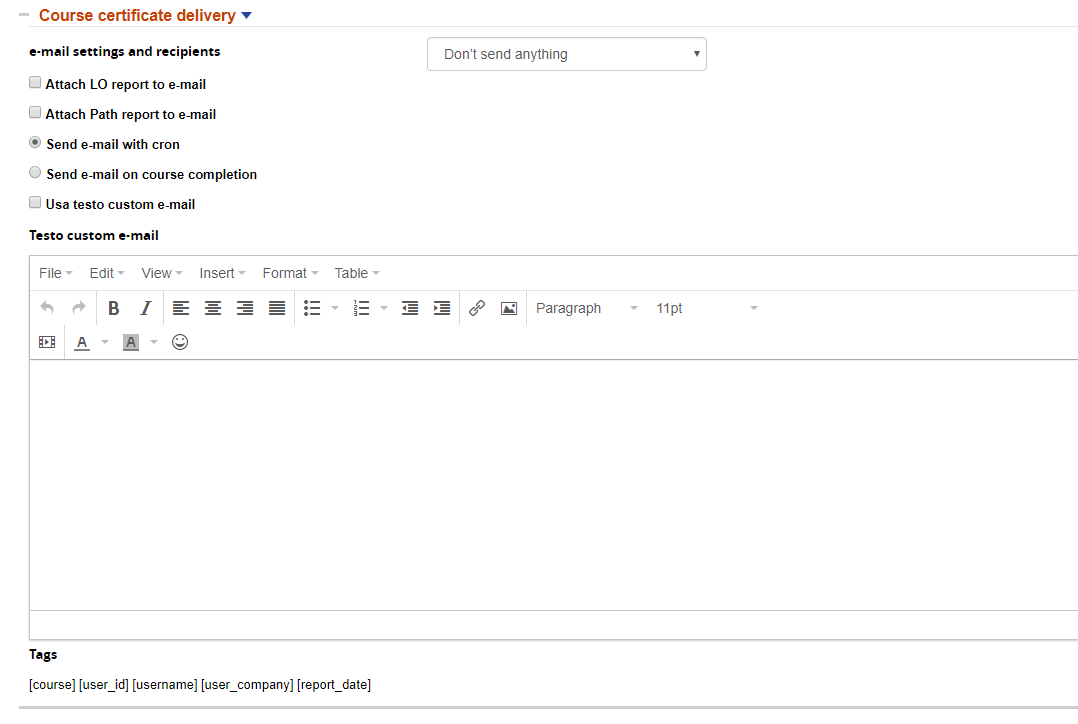](https://bookstackprod.s3.amazonaws.com/uploads/images/gallery/2024-06/spJ7XdtRoC1UM71o-image.png) - **attach LO report to e-mail** → this allows you to automatically export the Excel file related to the users-object grid for that user and that course and to attach it to the e-mail - **attach Path report** → it allows you to attach a PDF file with the same information as above. This is meant for financed projects, it can include static information. Finally, the e-mail can be sent either upon course completion (once every time a course has been completed) or with a cron (once a day). ### Custom Text If you don’t flag “use custom text”, the e-mail will be sent with the text that you set under language management. If you flag it, then you’ll be able to have a different customized text for every course. You’ll also be able to use the tags that you see in the image above, dynamically customizing the text with the user ID, the date, the company, and the course name. ## LO Report A pdf document reporting the completion status on LO, that can be printed and signed by the student This can be inserted in the doko package, or manually generated for each student from the course subscription management page: [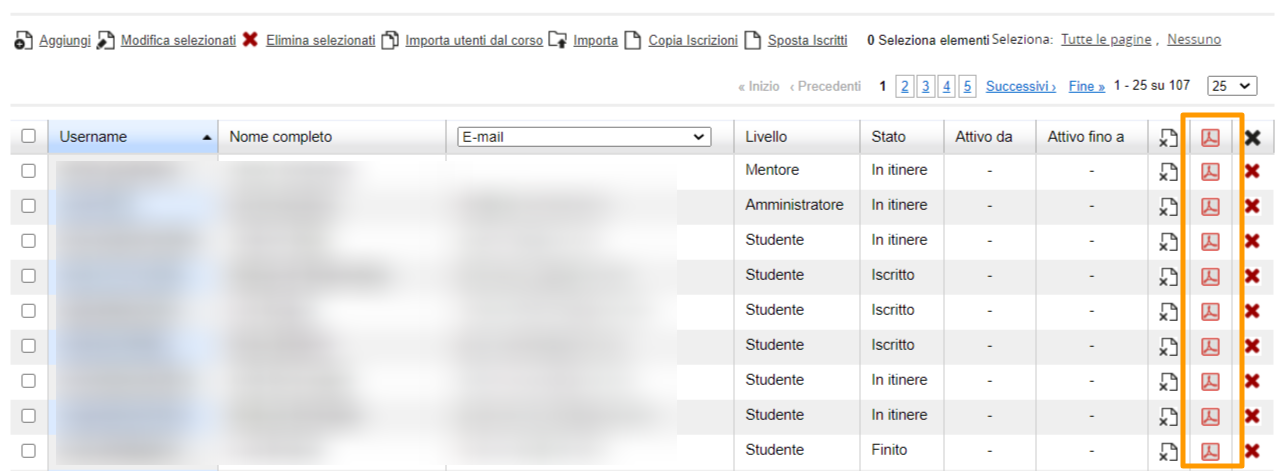](https://bookstackprod.s3.amazonaws.com/uploads/images/gallery/2024-06/Rqqr3NCRJTQlm9mp-image.png) ## Signature Sheet This feature generates a PDF document to collect students signatures in classroom courses. The Signature Sheet can be downloaded clicking on the new icon in the course list: [](https://bookstackprod.s3.amazonaws.com/uploads/images/gallery/2024-10/6SjyjmdwBjA0EyDV-signature-sheet-icon.PNG) ### Settings By default, the signature sheet will add the course logo as a header. You can set a custom header and footer in course settings: [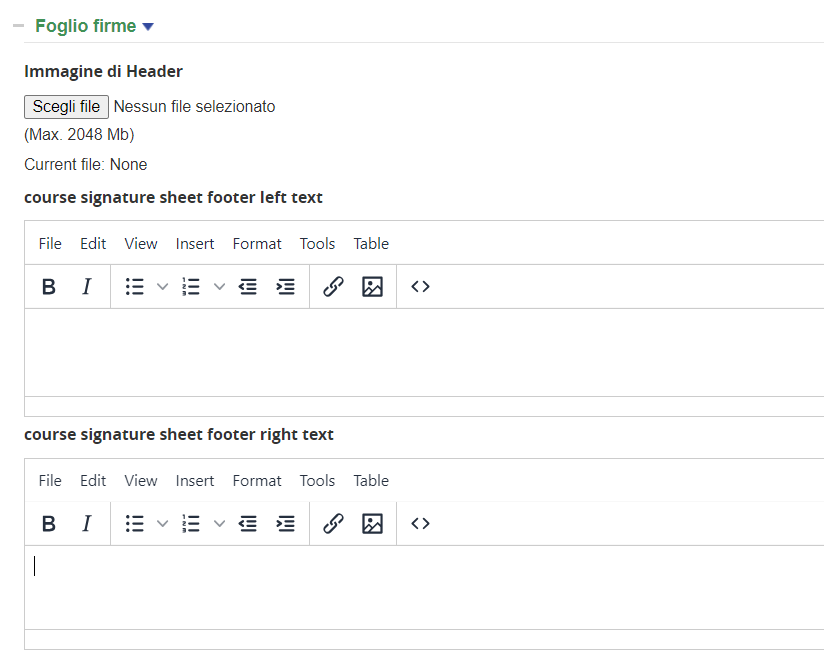](https://bookstackprod.s3.amazonaws.com/uploads/images/gallery/2024-10/s2iKe1ZlwPtFGxnP-signature-sheet-settings.PNG) Adviced size for the header image is 720x100px If no header image is set, course and sponsor logos will be used instead. A default header image can be named course\_signature\_sheet\_header\_image.jpg and uploaded via FTP under /files/Doko/signature - Header Image: upload a banner header image - Footer Left - Footer Right # Landing Generator ## Plugin Description The Landing Generator Plugin allows the creation of a custom login and registration page for each course, featuring: - Dedicated URL - Add registering users to a specific Org Chart node - Enroll users to the course - Choose Standard or Advanced registration, to display either the standard registration form or just the fields associated to the selected node - Direct login to the course - Display course and sponsor logo on the login/registration page - Add custom styles to the page ## Global Configuration The plugin requires the Forma API’s to be enabled and fully configured under *Administrator > Settings > General Configuration > API & SSO* Check the official forma documentation for details on the [API configuration](https://docs2.formalms.org/books/reference-guide/page/system-configuration) ## Features Plugins features are available inside the standard menu edit form. Go to: *Admin > Elearning > Course* And click to edit your course Plugin Settings will be available under the tab “course landing”: [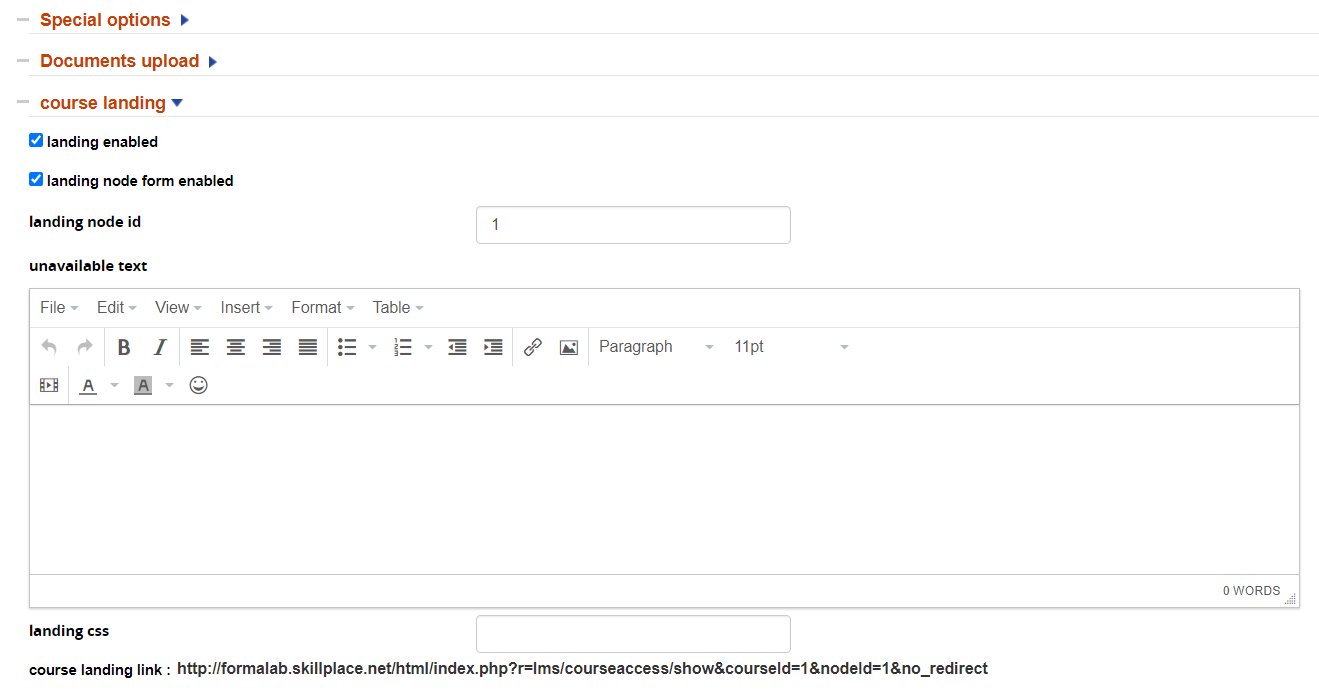](https://bookstackprod.s3.amazonaws.com/uploads/images/gallery/2024-06/PFNsOFAIjCDppqPB-image.png) - **Landing Enabled**: activate or deactivate the landing page - **Landing node form enabled**: use custom node fields instead of the standard registration form - **Landing node ID**: insert the ID of the node to be used for user registration and field selection (see note below) - **Unavailable Text**: Enter a text to be displayed when the course is closed or unavailable to user - **Landing CSS**: add a stylesheet class for the landing page - **Course landing link**: URL of the landing page Notes: 1. platform registration must be enabled 2. to retrieve the node ID, go to user management, right-click on the “assign users” icon and copy/paste the link URL to your notepad. The node ID will be the last number in the URL, i.e: http://testing.formalms.org/testing/appCore/index.php?r=adm/usermanagement/assignuser&id=***4*** ### Multiple Templates and URL The landing generator only creates landing pages with the default URL. But if you simply change the part of your URL before the /index.php and replace it with the desired, different, URL it will also work with your other templates and URL’s. \[Your Platform URL\]/index.php?r=lms/courseaccess/show&courseId=1&nodeId=1&no\_redirect Finally, it’s a good idea to use **URL shorteners** ## Landing Page Layout This is an example of how your login/registration page will look like. If you inserted the course logo it will display on the left, and if you inserted the sponsor it will display on the right. [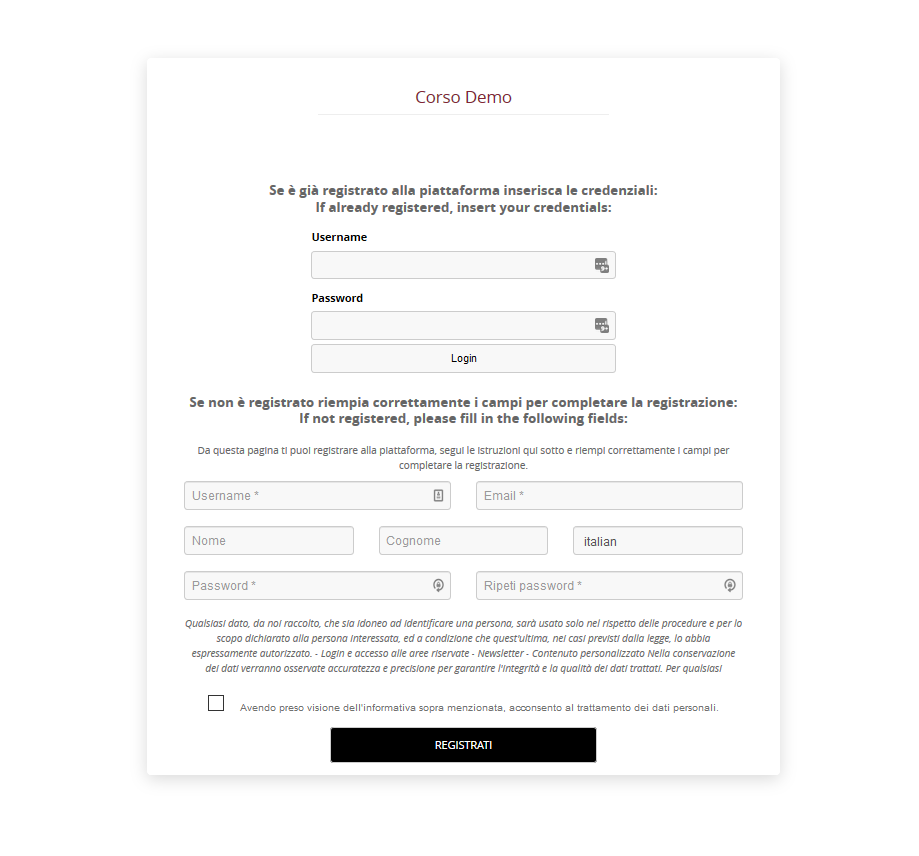](https://bookstackprod.s3.amazonaws.com/uploads/images/gallery/2024-06/ywOT1RwPpstBWiXJ-image.png) # Lotify ## Setup and Configuration ### Plugin Settings [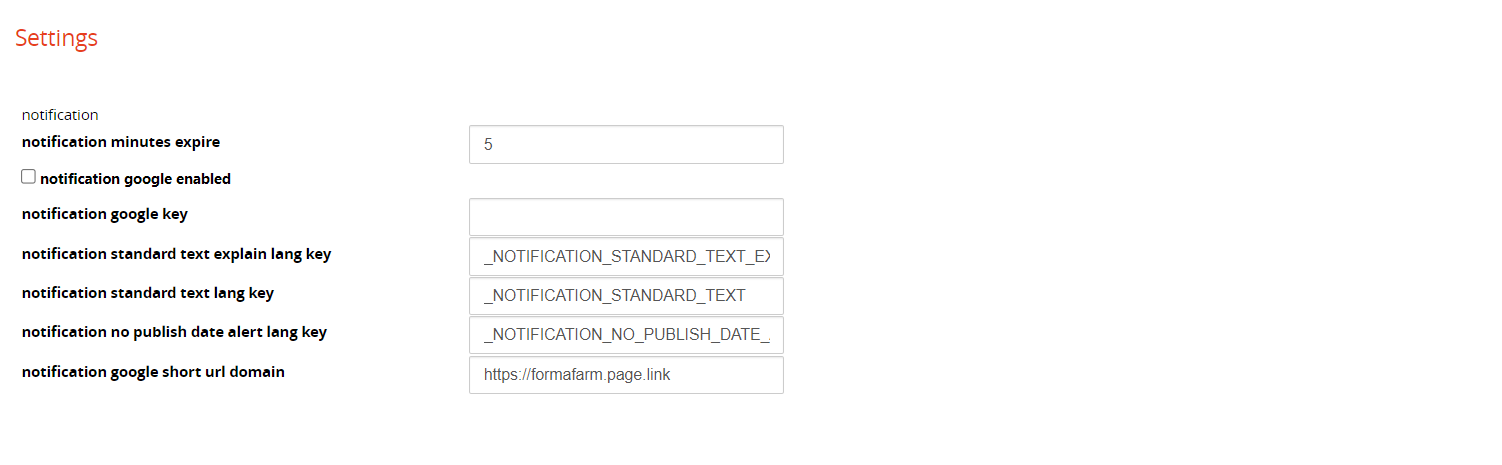](https://bookstackprod.s3.amazonaws.com/uploads/images/gallery/2024-07/NjpG5ZcVlzWWPCmv-image.png) **Notification minutes expire**: notification expires if not sent within the amount of minutes set. Note: if set to 0 all notifications will be suspended. **Notification Google Enabled**: enable the use of Google short URL services ### Platform Settings Some settings are needed on your LMS and on the plugin for the correct functioning of the shortlinks that allow direct access to the LO’s and that are sent together with the notifications: 1. Enable Single Sign-On on your platform, from the settings > System settings > Forma API & SSO [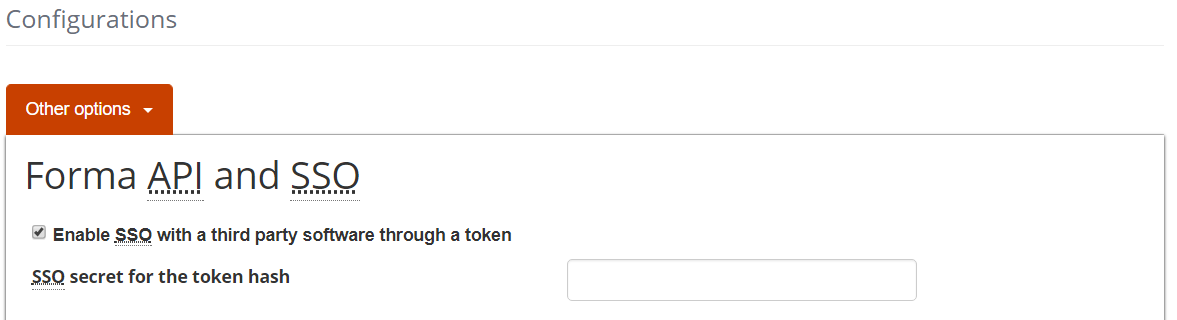](https://bookstackprod.s3.amazonaws.com/uploads/images/gallery/2024-07/GZaOMRnSFZ5s8yZU-image.png) 2. Insert your Google API Key in the plugin configuration panel *Configuration > Plugin Manager > Lotify - Settings.* If you don’t have an API Key, you can get one here: [https://developers.google.com/maps/documentation/embed/get-api-key](https://developers.google.com/maps/documentation/embed/get-api-key) ### Text message (SMS) Service To enable text message (SMS) notifications, configure your LMS with the credentials of your service provider, under: *Settings > System Configuration > Settings > SMS* [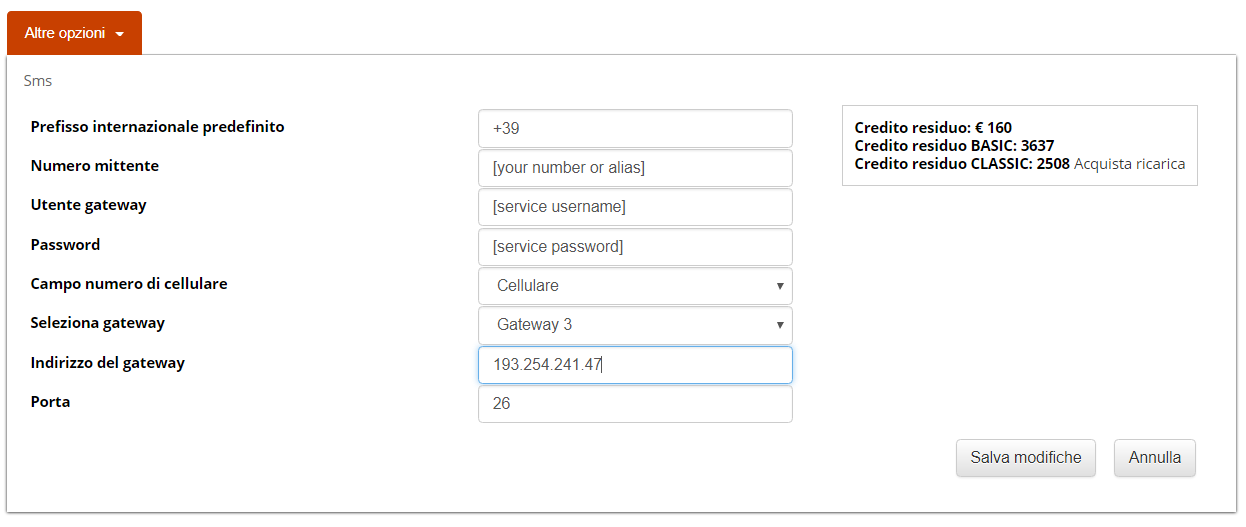](https://bookstackprod.s3.amazonaws.com/uploads/images/gallery/2024-07/XdAJk1zRqh0lUL5Z-image.png) Note: Forma Lms is natively configured to work with [www.skebby.it](http://www.skebby.it/). This feature will be removed in Forma 4.x ### Cron Job You need to set up a cron job on your server, to allow the system to properly work, launching periodically this URL: *\[platform\_url\]/plugins/Notification/Cron/cron.notification.php* ## Standard notification The plugin adds a new icon to the Learning Object Management panel: [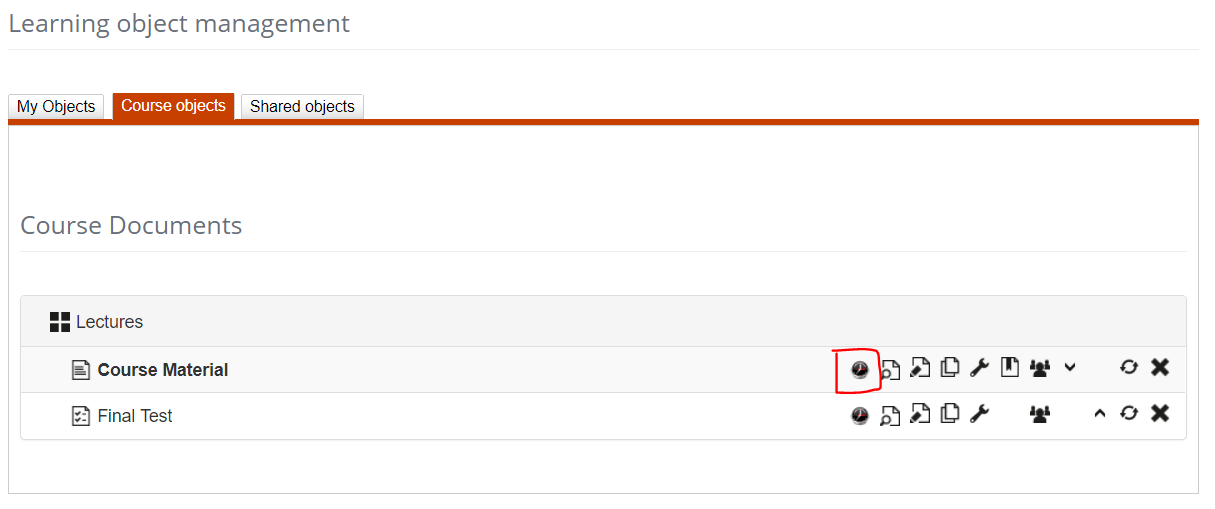](https://bookstackprod.s3.amazonaws.com/uploads/images/gallery/2024-07/VESfbzcqvx6lkJ47-image.png) Clicking on this icon, you are taken to the settings panel where you can control the notifications for every LO: [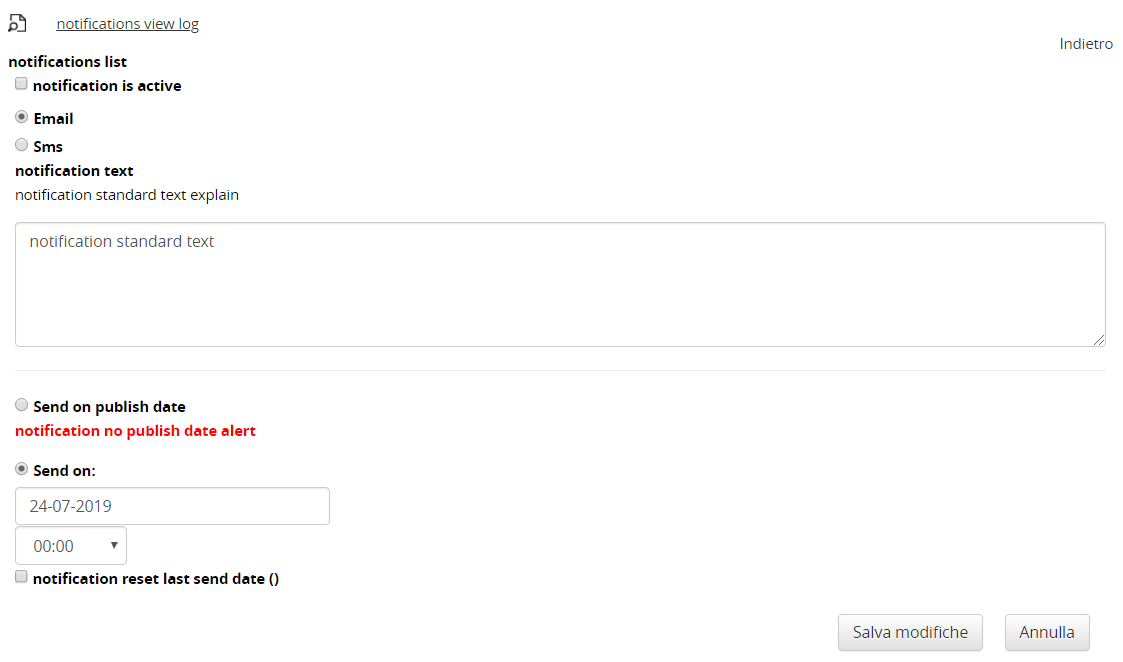](https://bookstackprod.s3.amazonaws.com/uploads/images/gallery/2024-07/NmqwzeAbcohhYvpN-image.png) **Notification View Log**: from this link you’ll be able to extract a log of the notifications you sent **Notification is Active**: enables the sending of the notifications for this LO. The notifications will be sent upon the publication date you set in the properties of the object itself. If you didn’t set a date, the notifications will be sent upon saving the form. You can send notification either by e-mail or by SMS (text message to a mobile phone). **Notification Text**: insert here the notification text. It’s possible to customize your text with the following placeholders: \[URL\]: direct link to the LO, different for every user (see related paragraph) \[USERNAME\]: userid \[USER\_COMPLETE\_NAME\]: first and last name \[COURSE\_NAME\]: course name **Send on publish date**: the notification will be sent on the day set as “start publishing date” in LO properties **Send on**: lets you set the day and time for sending the message **Reset last send date**: by selecting this option, upon saving, the last send date will be reset. Use this option if you want to re-send the notification to users who have already received it.**NOTE: EMAIL SENDER** The e-mail sender will be the same that you set in the general settings of your LMS for general notifications.
**NOTE: SENDING CONDITIONS** Users that completed the course or the LO will be excluded by the notification
### Sending a short url The short-url inserted in the notification messages with the \[URL\] tag allows to directly open the object, bypassing the login to the LMS and the access to the course. The process happens in a way invisible to the user. Every link is unique for a specific user. The link generated this way could also be used by other people who are not the user the link has been sent to. It’s important to: - tell users not to share the link with other users, in order not to compromise the course stats - avoid using this method for evaluation tests, since there is a risk users would share the link with other users - configure the LO properly, for example: make it visible just one time or until it’s completed ## Advanced notification For the TEST objects there is an advanced settings feature that allows you to manage text, planning and recipients of your notifications. ### Adding a new notification 1.From “Learning Object Management” panel click on “edit test”: [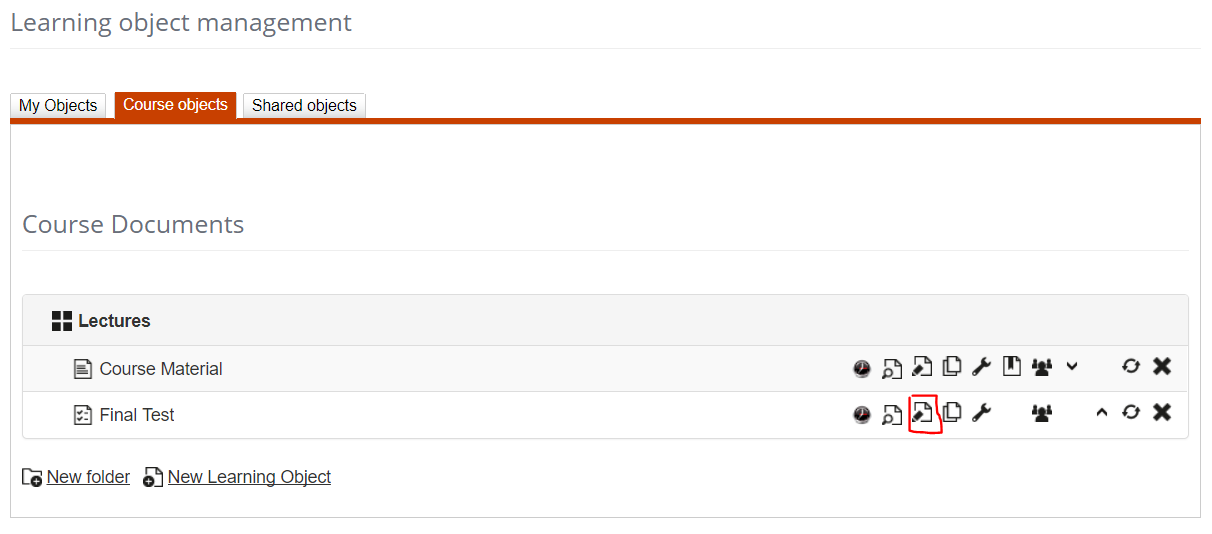](https://bookstackprod.s3.amazonaws.com/uploads/images/gallery/2024-07/5Zt4dTOGqILvpOp8-image.png) 2\. Click on “Notification Management”: [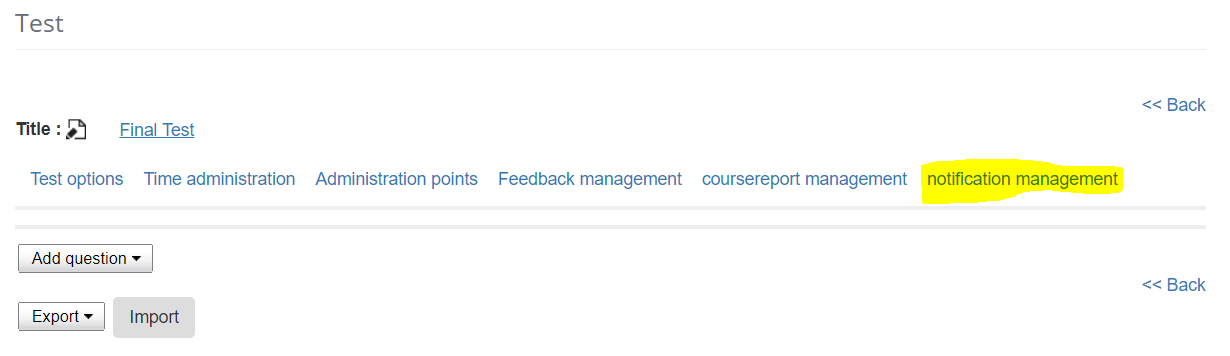](https://bookstackprod.s3.amazonaws.com/uploads/images/gallery/2024-07/wu1QoGWkeduuP2bG-image.png) 3\. Add a new notification: [](https://bookstackprod.s3.amazonaws.com/uploads/images/gallery/2024-07/VgV7CN9RXYmVlJFO-image.png)4. Notification settings: [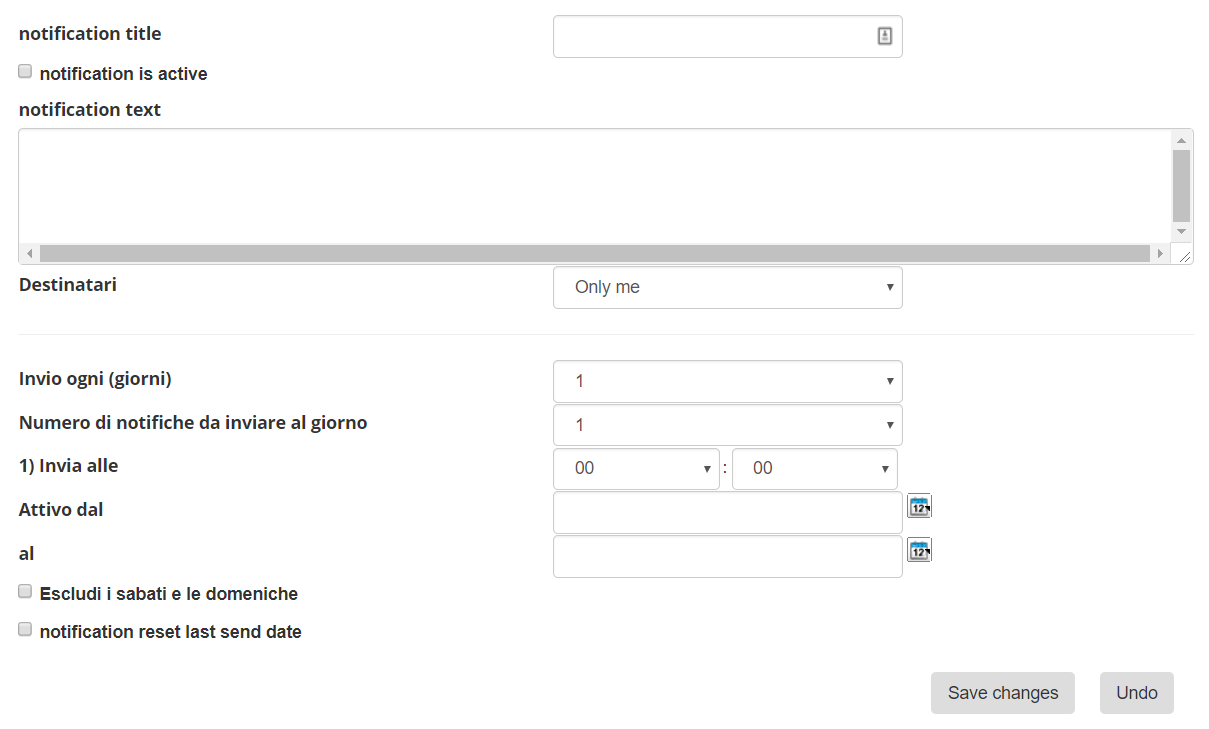](https://bookstackprod.s3.amazonaws.com/uploads/images/gallery/2024-07/XwanzmV9N1TP9ERo-image.png) ### Scheduling Notifications Lotify allows for a very flexible scheduling of notifications: [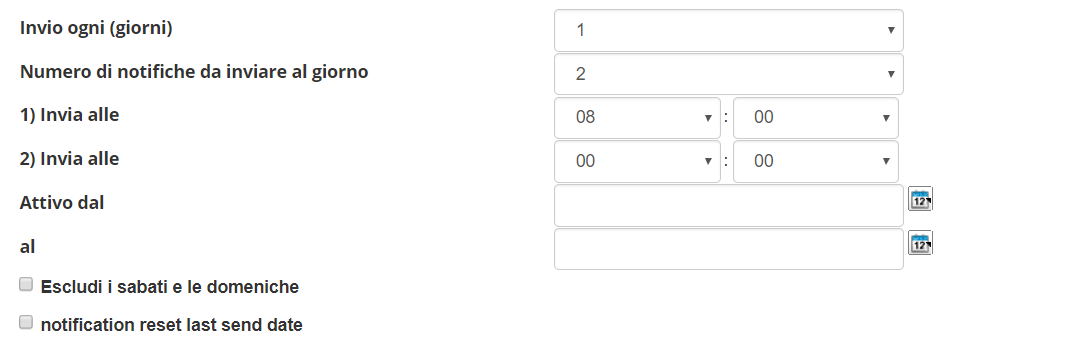](https://bookstackprod.s3.amazonaws.com/uploads/images/gallery/2024-07/6CqV3sG50RkuEUPY-image.png) **Send every:** lets you choose the frequency, from 1 (every day) to 7 (every week) **How many notifications a day:** self-explanatory, for every sending you have to specify a time **Time:** at what time the notification will be sent **Active from – to**: You can set your notifications to be sent only from a specific date to a specific date **Exclude Saturdays and Sundays:** self-explanatory **Reset last send date:** resets the last send date, so you can resend your notifications even to users who have already received them ### Setting the recipients When you create a new notification, you can choose if you want to send it: - To yourself only: useful for testing or to send personal reminders - All: sends to all users who are enrolled to the course - Selected: after saving the notification, you’ll be able to choose the recipients [](https://bookstackprod.s3.amazonaws.com/uploads/images/gallery/2024-07/6Rh7XaJ92NMpF7xM-image.png) This option is only available upon creating a notification. Then you’ll be able to edit it from the user's icon: [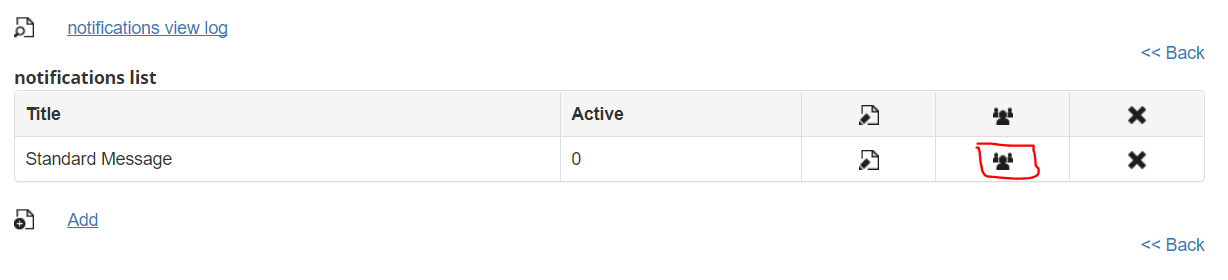](https://bookstackprod.s3.amazonaws.com/uploads/images/gallery/2024-07/euN1Q2sQXjcTB1xk-image.png) ## Troubleshooting ### A User didn’t receive a notification 1. Verify that in the user profile there is an active e-mail address and/or a correct mobile phone number 2. Check the user status on course and learning object: only users with status “subscribed”, “In progress” or without a completion date will receive the notifications 3. Check the plugin setting for “notification minutes expire” is not set to 0 (zero) 4. Verify if the notification log has some errors (see paragraph 2.1) ### Resend a notification to a user If a user didn’t receive a notification or has canceled it by mistake, it’s not possible to resend it directly from the system, but you can do as follows: 1. Access the notification settings panel (see 2.1 and 2.2) 2. Open the notification log. The log lists all the cron call, sorted by time. Look for the notification text you want to resend and copy it. Please find the right user and the right text, because short-urls are personal 3. Send the user the text you copied with a direct e-mail or text message ### The system asks for a password If the user is asked for a password after clicking on the shortlink, it might be that the user was set to force the change of password upon first access. In that case, inform the user about how to reset password or give him a new one. ### Send Conditions Notifications are NOT sent in these cases:Note: do not remove the first line @import url('templedit.css'); which is added when you first save the template
#### Color Legend Below is a small legend of the color entries that can be set to help the user set their own style.We have set the various fields with different colors to make their display clear.
[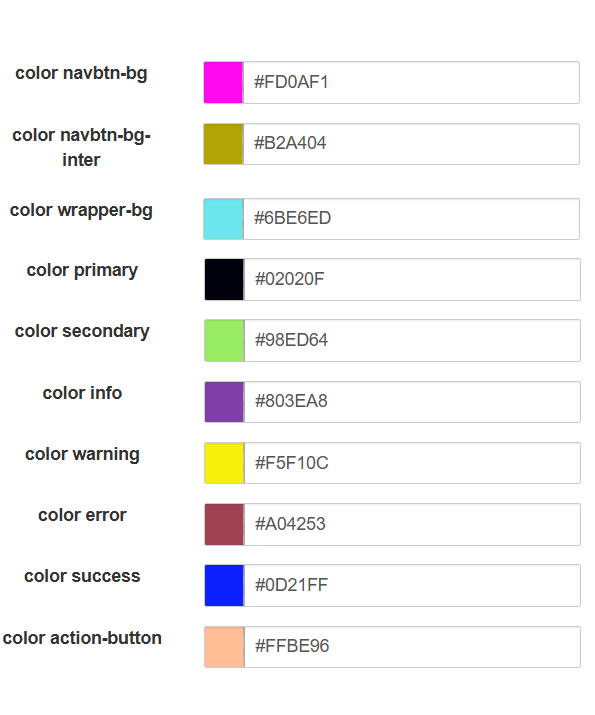](https://bookstackprod.s3.amazonaws.com/uploads/images/gallery/2024-11/d8xIOvbfdppC0afz-legenda.png) 1\. color navbtn-bg: indicates the tabs found on the course home page 2\. color navbtn-bg-inter: indicates the color of the tabs when they are selected or when you move the mouse over them 3\. color wrapper-bg: indicates the background color of the course filter on the home page 4\. color primary: indicates the color of the main elements of the model, i.e. titles and texts 5\. color secondary: indicates the color of the secondary texts (e.g. section titles on the administration welcome page 6\. color info: indicates the color of the texts of the titles of the sub-sections on the administration welcome page 7\. color warning: indicates the color of the completion check mark for learning objects, specifically when they have been started and not completed 8\. color error: indicates the color of the completion check mark for learning objects, for example when you take a test and fail it 9\. color success: indicates the color of the completion check mark for learning objects when they are successfully completed 10\. color action-button: indicates the color of the 'Create new' button in the course's learning object management to create a new LO [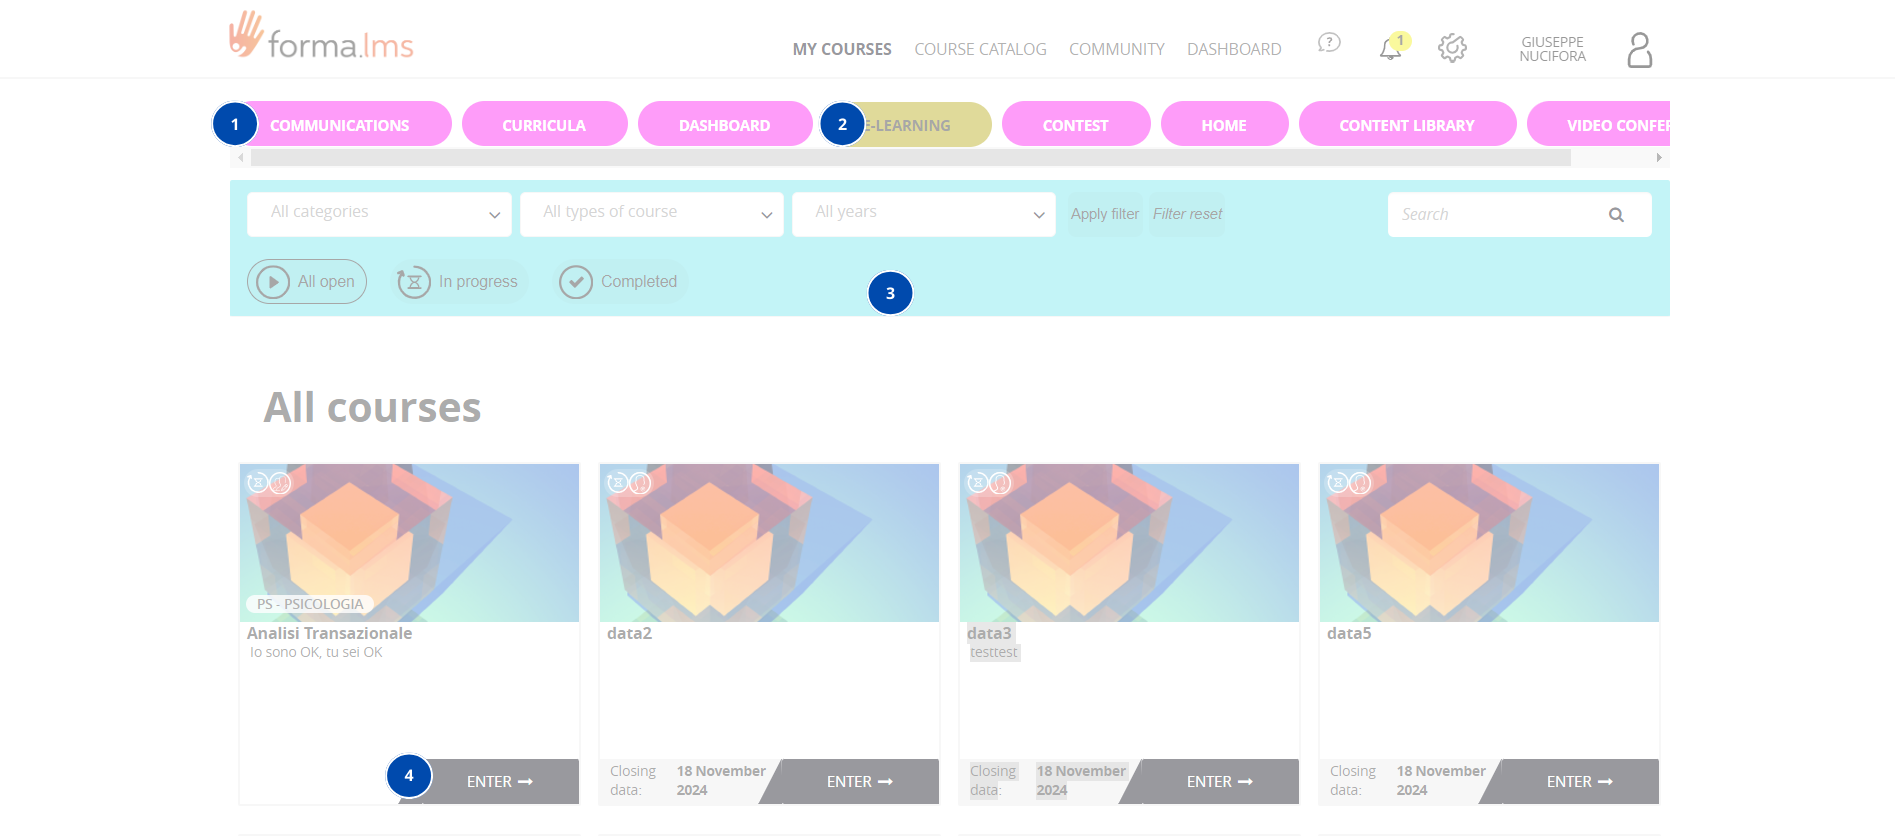](https://bookstackprod.s3.amazonaws.com/uploads/images/gallery/2024-11/LiEWoEASE2nYJLOf-1-2-3-4.png) [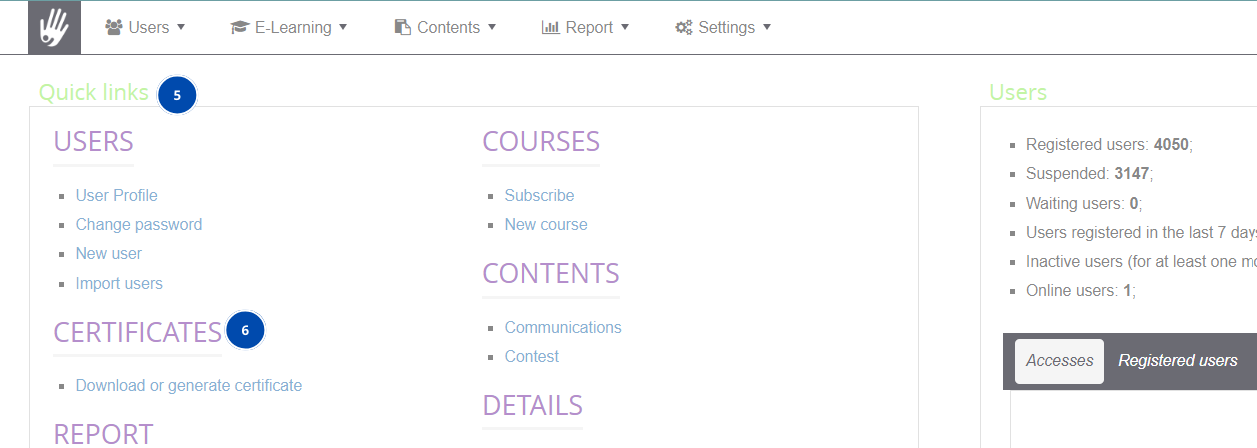](https://bookstackprod.s3.amazonaws.com/uploads/images/gallery/2024-11/eEbLfDn7xawf0Xf3-5-6.png) [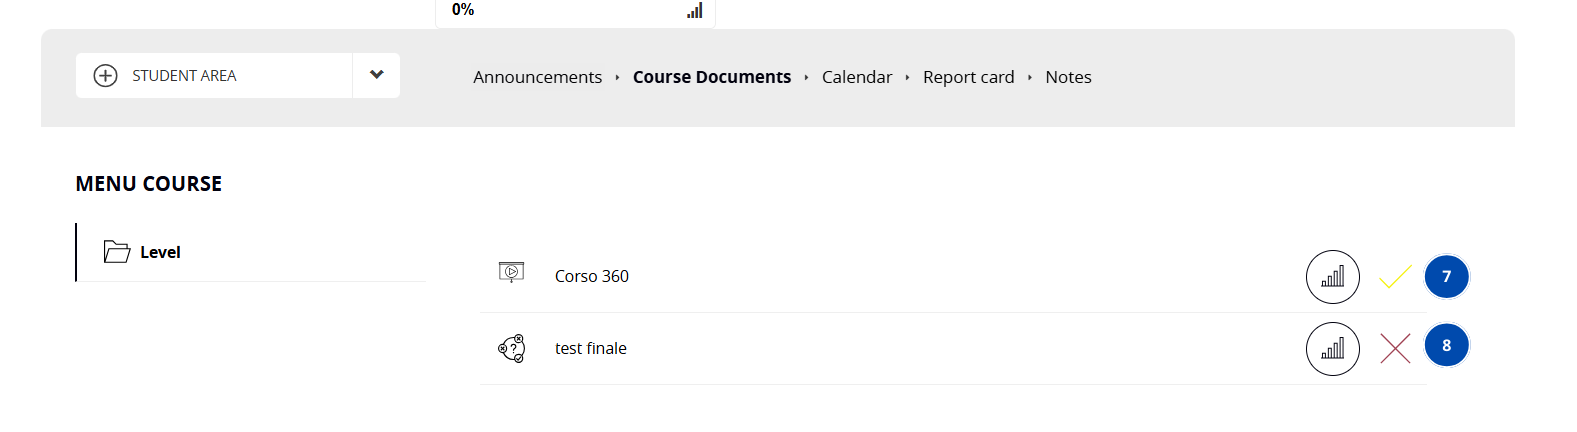](https://bookstackprod.s3.amazonaws.com/uploads/images/gallery/2024-11/TlPaDcxWNrbCcJzu-7-8.png) [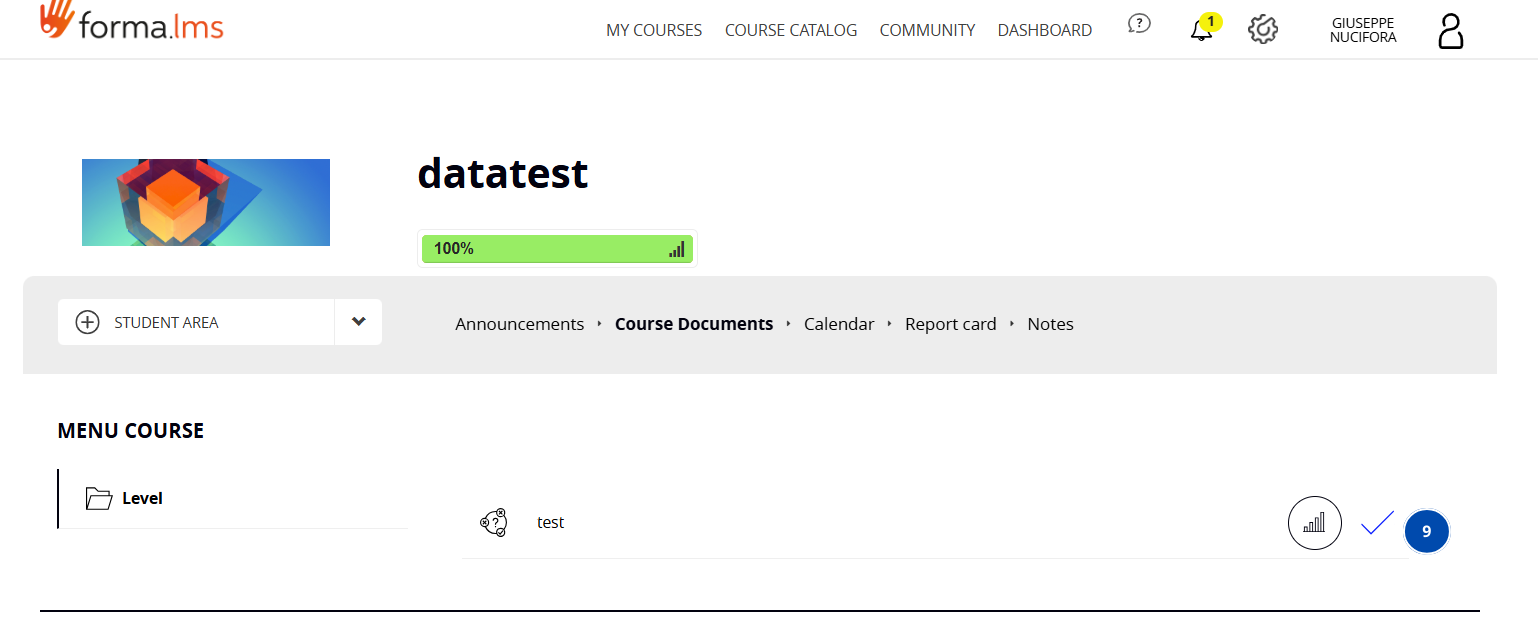](https://bookstackprod.s3.amazonaws.com/uploads/images/gallery/2024-11/3YwTTU1oeCHBIInc-9.png) [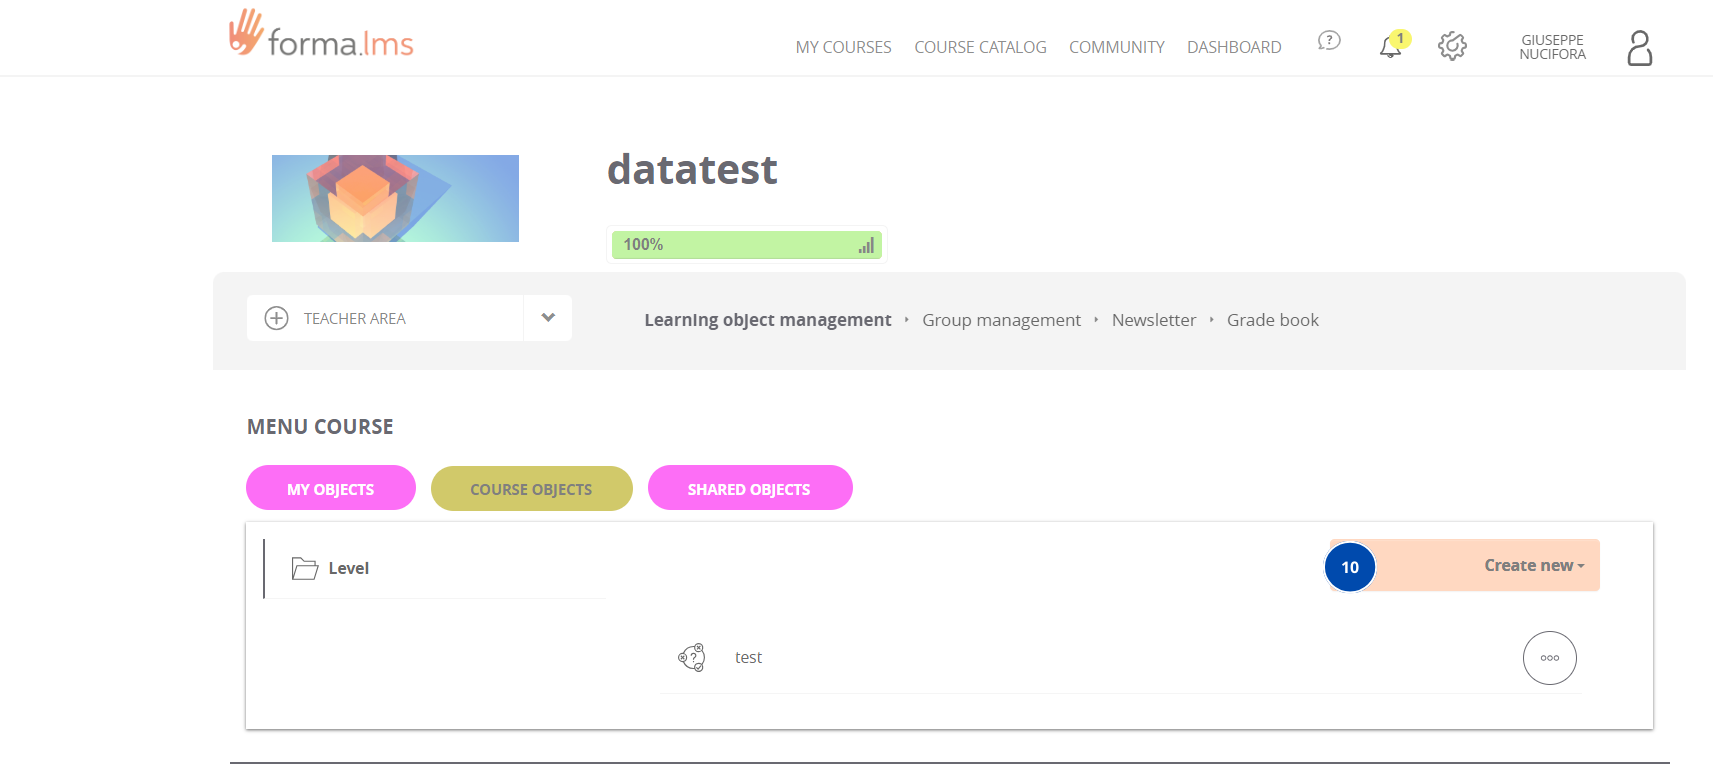](https://bookstackprod.s3.amazonaws.com/uploads/images/gallery/2024-11/6efxlvtwbCzjA7kR-10.png)The legend above is intended to guide the user in setting up their own style for the platform, the images used serve as examples and it is possible to find any tabs, banners, etc. in other parts of the platform.
# Extended Domain Settings The "**Extended Domain Settings**" plugin is an advanced tool for multi-domain management of the e-learning platform. It allows you to configure and manage multiple platform instances under different domains, each with their own customized settings. The plugin extends the standard domain settings with most of the options you have for the global platform configuration, this way **each domain will behave as an independent platform.** For each of your client you will be able to setup different registration modes, home-page settings, SSO token, and much more [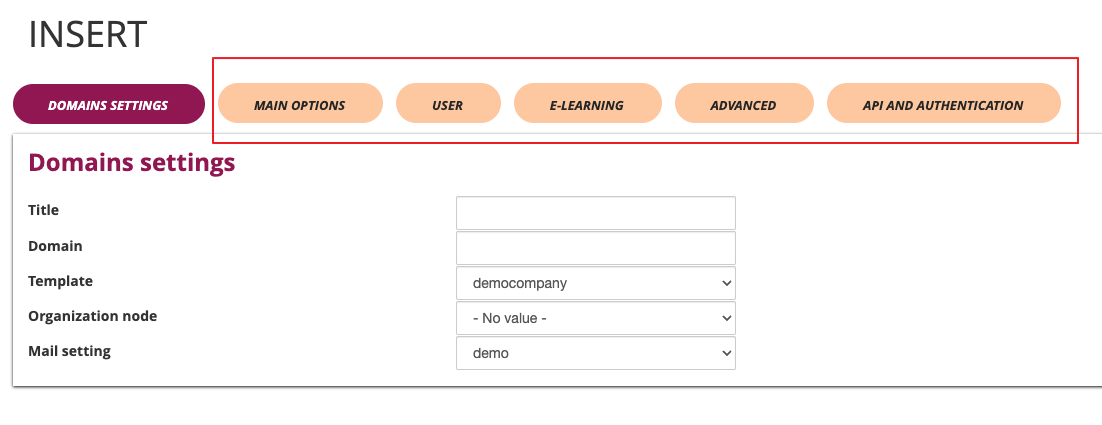](https://bookstackprod.s3.amazonaws.com/uploads/images/gallery/2025-07/MLnPKL0d8JRhUI1L-image.png) ## Plugin Configuration ### Access to Configuration The plugin is accessible through the administration panel: 1. Access the administrative panel 2. Navigate to the "System Configuration" section 3. Select "Domain Settings" 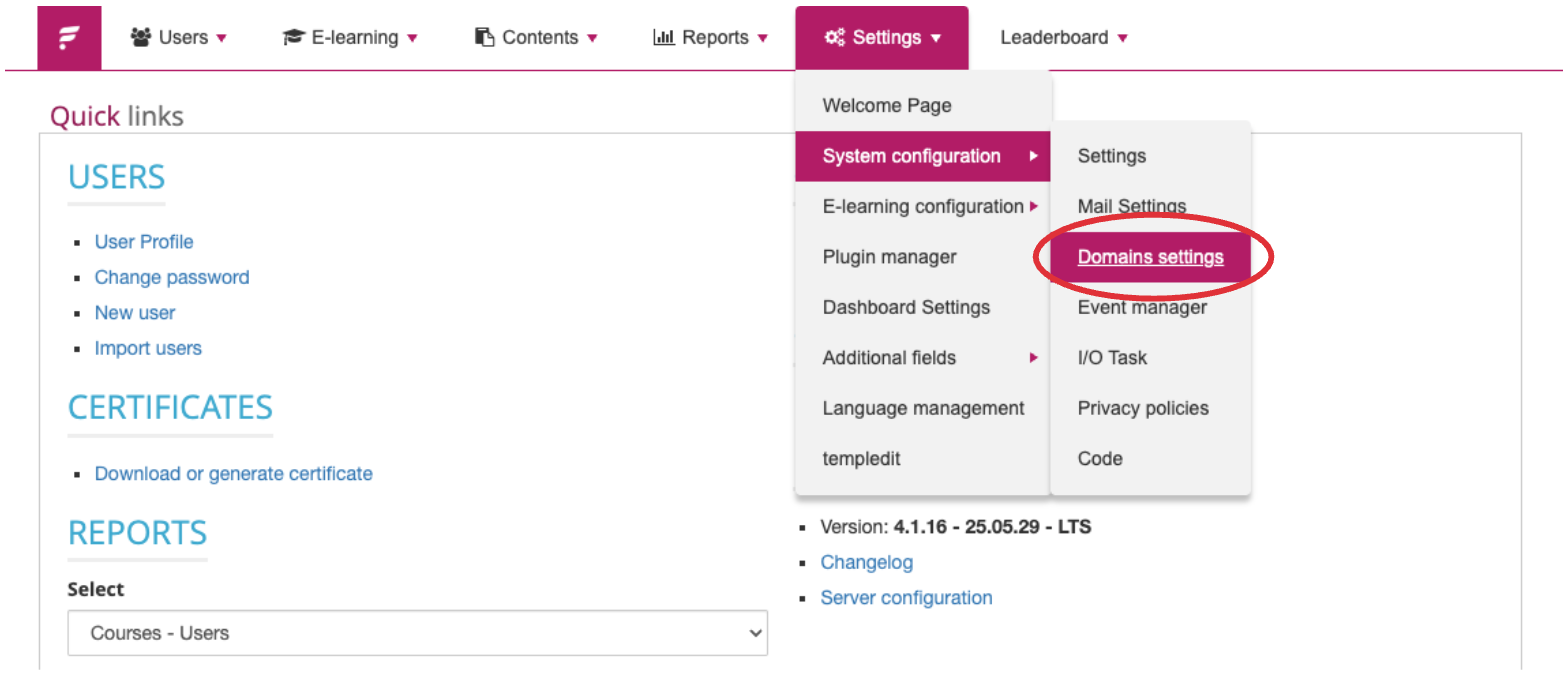By default domains will inherit the global platform settings, and any configuration change made to a specific domain will override the default ones
## Domain Profile Management ### Creating New Domain Profile To create a new domain profile: 1. Click on the "Insert" button (green) 2. Fill in the required fields: - Title: Profile identifier - Domain: Complete domain URL - Template: Select the appropriate template for this domain - Organizational node: Associate a specific orgchart node for the users that will self-register to this domain - Mail Profile: Configure specific email settings for this domain 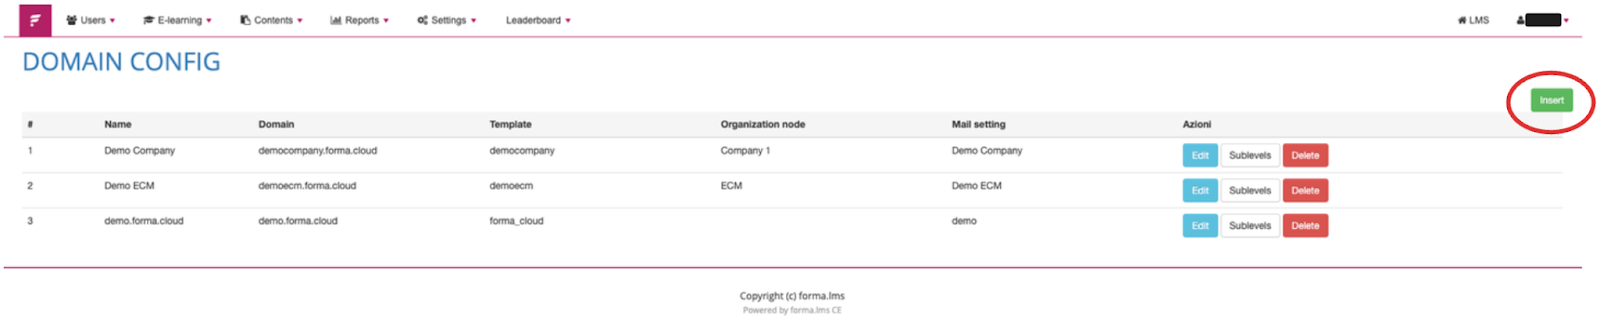 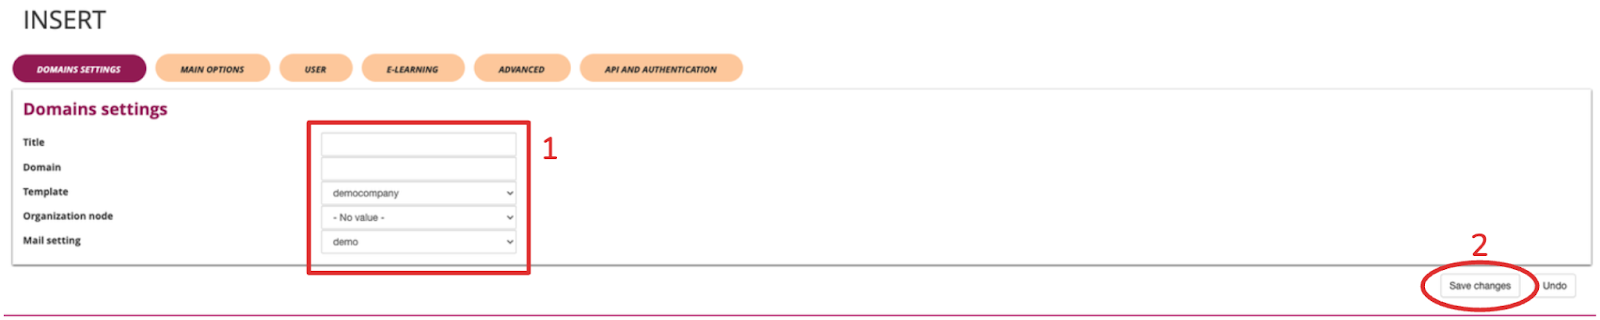To add a new domain to your Forma Cloud check our **[Email & DNS settings documentation](https://docs.forma.cloud/books/services/page/email-dns-settings)**
### Edit an Existing Domain Profile To modify an existing profile: 1. Locate the profile in the list 2. Click on the "Edit" button (blue) 3. Update the necessary fields 4. Click "Save changes" to confirm  ### Profile Deletion To delete a profile: 1. Locate the profile in the list 2. Click on the "Delete" button (red) 3. Confirm the operation  ## Advanced Configuration ### Domain Settings #### Title and Branding - Title: Platform name customization - Domain: Main URL configuration - Template: Graphic layout selection - Organizational node: Associated hierarchical structure - Mail Profile: Specific email configuration 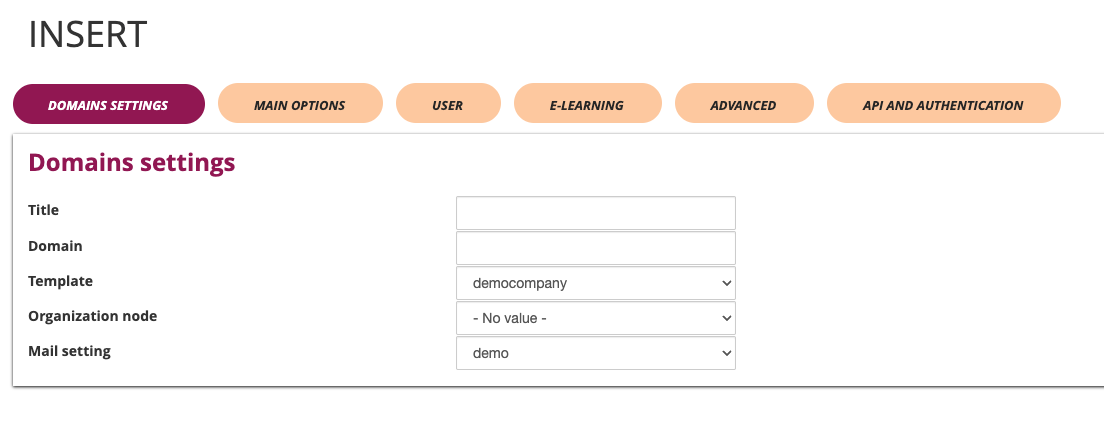 #### Main Options ##### Language and Localization - Default language: Main language selection (e.g., Italian) - Page title: Browser title customization - Site properties: Copyright and property information 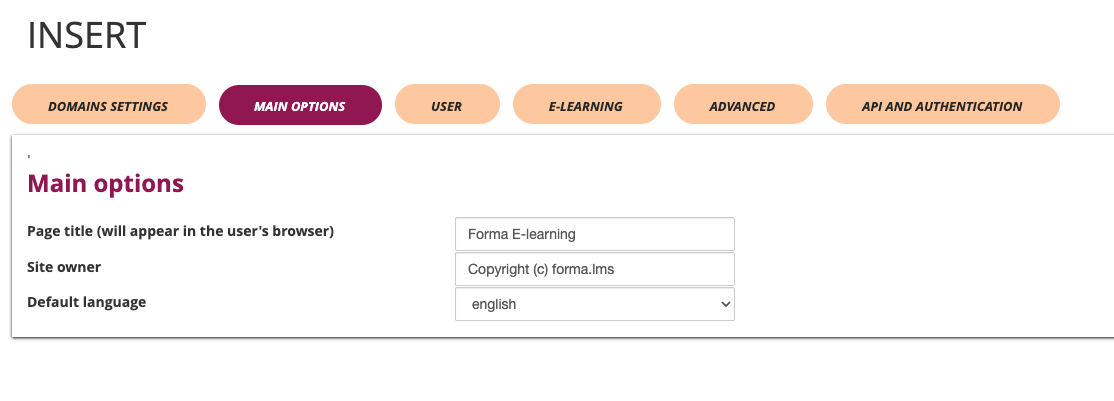 ### User Management #### Access Configuration - Required checkboxes: Definition of mandatory fields for the profile - Profile edit URL: Configuration path for profile modifications - Profile edit options: - Allow complete modification - Allow only password modification - Disable profile modifications - Redirect to external page 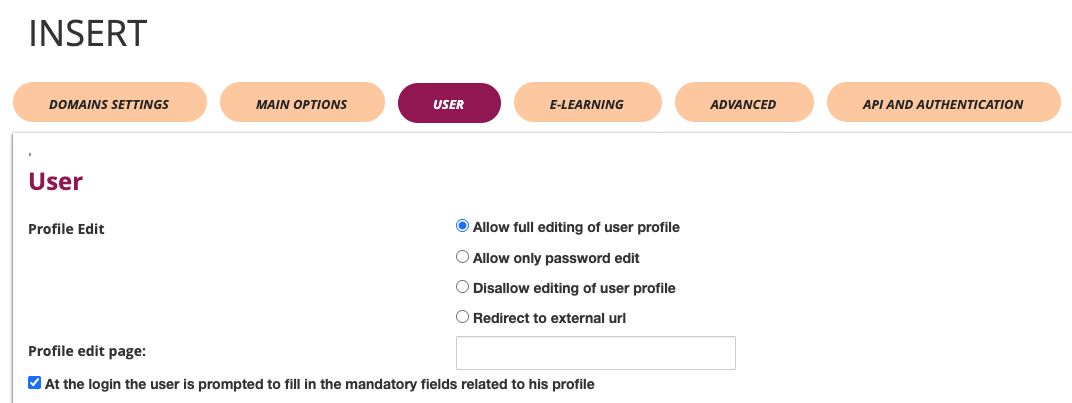 #### Password Management - Password composition: Letters and numbers requirements - Password history: Number of previous passwords to store - Minimum length: Required minimum characters - Password expiration: Days of validity (0 = no expiration) - Mandatory password change: Force change at first login 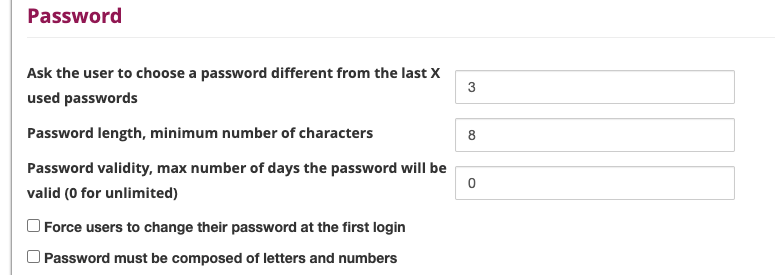 #### User Registration - Registration code: Code usage mode - Required fields: Name and Surname mandatory - Advanced mode: Use of advanced registration form - Time limit: Available hours to confirm registration - Registration type: Access control (Administrators only/Everyone) - Privacy policy: Mandatory acceptance - Registration code: Code activation for specific users 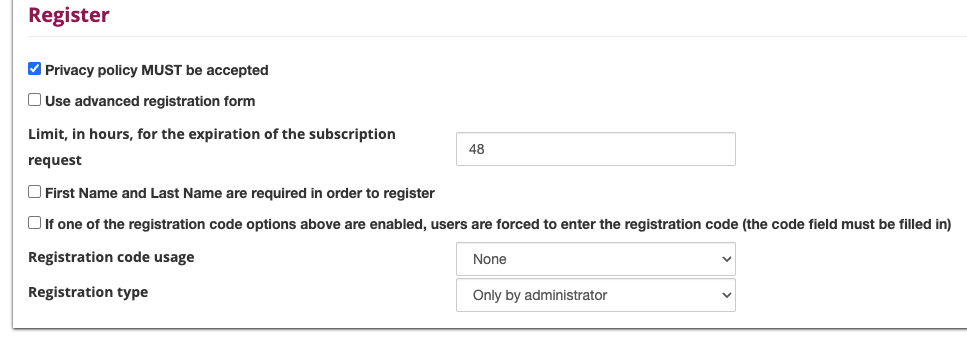 ### E-Learning #### Course Configuration - Course sorting: Display criteria in "My courses" area - By Name - By Company - By Status - Home page: Initial page selection (Dashboard) - Course list: Activation on login page - Course catalog: Display for unassigned users - Course path: Display in "My courses" tab - Redirection: Management of users not enrolled in courses 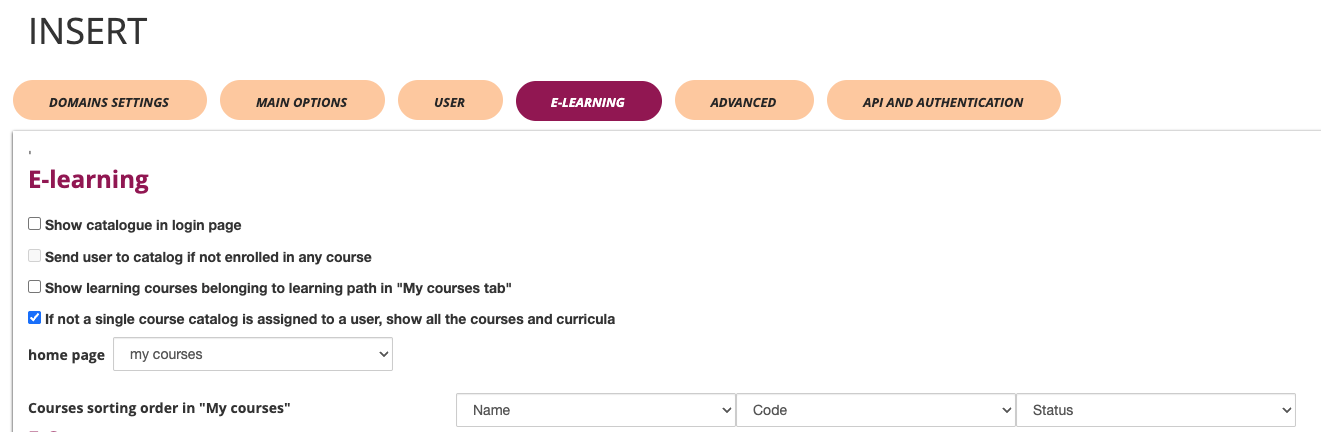 #### E-Commerce - Purchase notifications: Username or ID configuration for notifications - Currency symbol: Monetary symbol setting (e.g., €) - PayPal environment: Sandbox mode for testing or real environment - PayPal account: Account configuration for payments - PayPal currency: Currency setting (e.g., EUR) [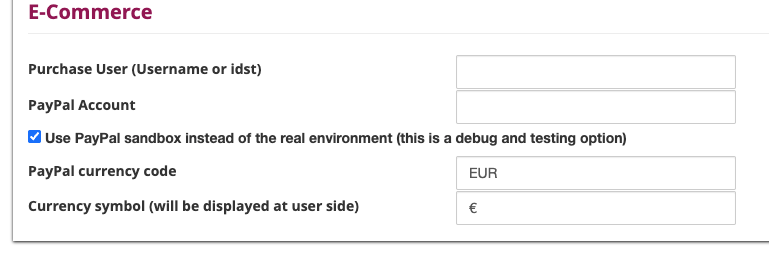](https://bookstackprod.s3.amazonaws.com/uploads/images/gallery/2025-07/SRW9syYGC0dC75hR-unnamed-11.png) ## Advanced Configurations ### Google Integration - Google Analytics: Statistics tracking activation - Google Code: Tracking code insertion 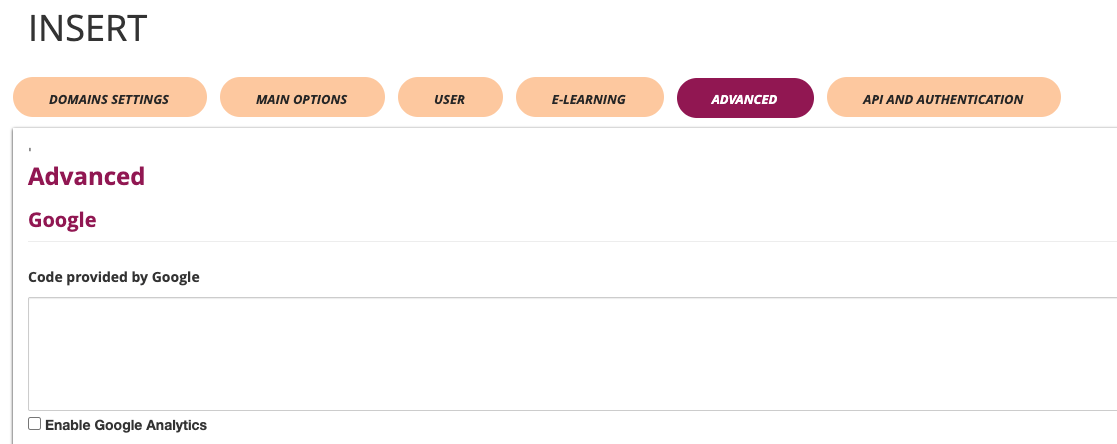 ### Security Configurations - Simultaneous access: Disabling multiple access for same username - IP control: IP consistency activation during session - Maintenance password: Password setting for maintenance mode - Site under maintenance: Maintenance mode activation - Administration session: Public session sharing with administration [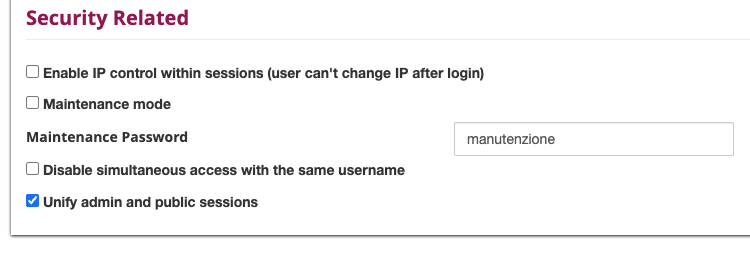](https://bookstackprod.s3.amazonaws.com/uploads/images/gallery/2025-07/N54gFXimd28mc8bS-unnamed-13.png) ## API and Authentication #### SSO Configuration**IMPORTANT NOTICE**: Unlike Forma's standard global configurations, in multidomain, **users will be authenticated based on the email field**, not the username. This allows the same person to be registered on the platform with different user accounts.
You will be able to create different SSO configurations for each domain: - **SSO Password Key**: Keyword for calculating the hash used in SSO - **Enable SSO with other applications through token**: Checkbox to enable SSO functionality with external applications ##### Allowing SSO only for domain users The plugin adds a new additional field, "Assigned Domain", to associate users to a domain. Note that: - The dropdown list is automatically populated with the list of domains available on the platform. - The SSO feature verifies that the user belongs to the corresponding domain, otherwise it prevents access. #### Forma.LMS API You will be able to create different configurations for API access for each domain**IMPORTANT NOTICE**: Providing API access to different companies in multi-client platforms is **strongly discouraged**: the system is not able to filter data by domain with **potential privacy risks**
##### Authentication Method The system supports three authentication methods: 1. **Single Access Code** - Uses a single code for all API access - Simple but less secure option 2. **Token Generation on Each Connection** *(Default)* - Generates a new token for each API session - More secure as tokens have limited lifespan - Recommended for production environments 3. **Secret Key Authentication** - Uses a permanent secret key for authentication - Balance between security and simplicity ##### API Configuration Options - **Token Lifetime (minutes)**: Set the duration for which tokens remain valid (default: 60 minutes) - **Single Access Code**: Define a unique code for API access when using single code method - **Reset token lifetime on each connection**: Checkbox to refresh token expiration time with each API call - **Secret API Code**: Configuration field for secret key authentication - **API Key**: Configuration field for API key authentication - **Enable API functionality**: Master checkbox to activate all API features for the domain [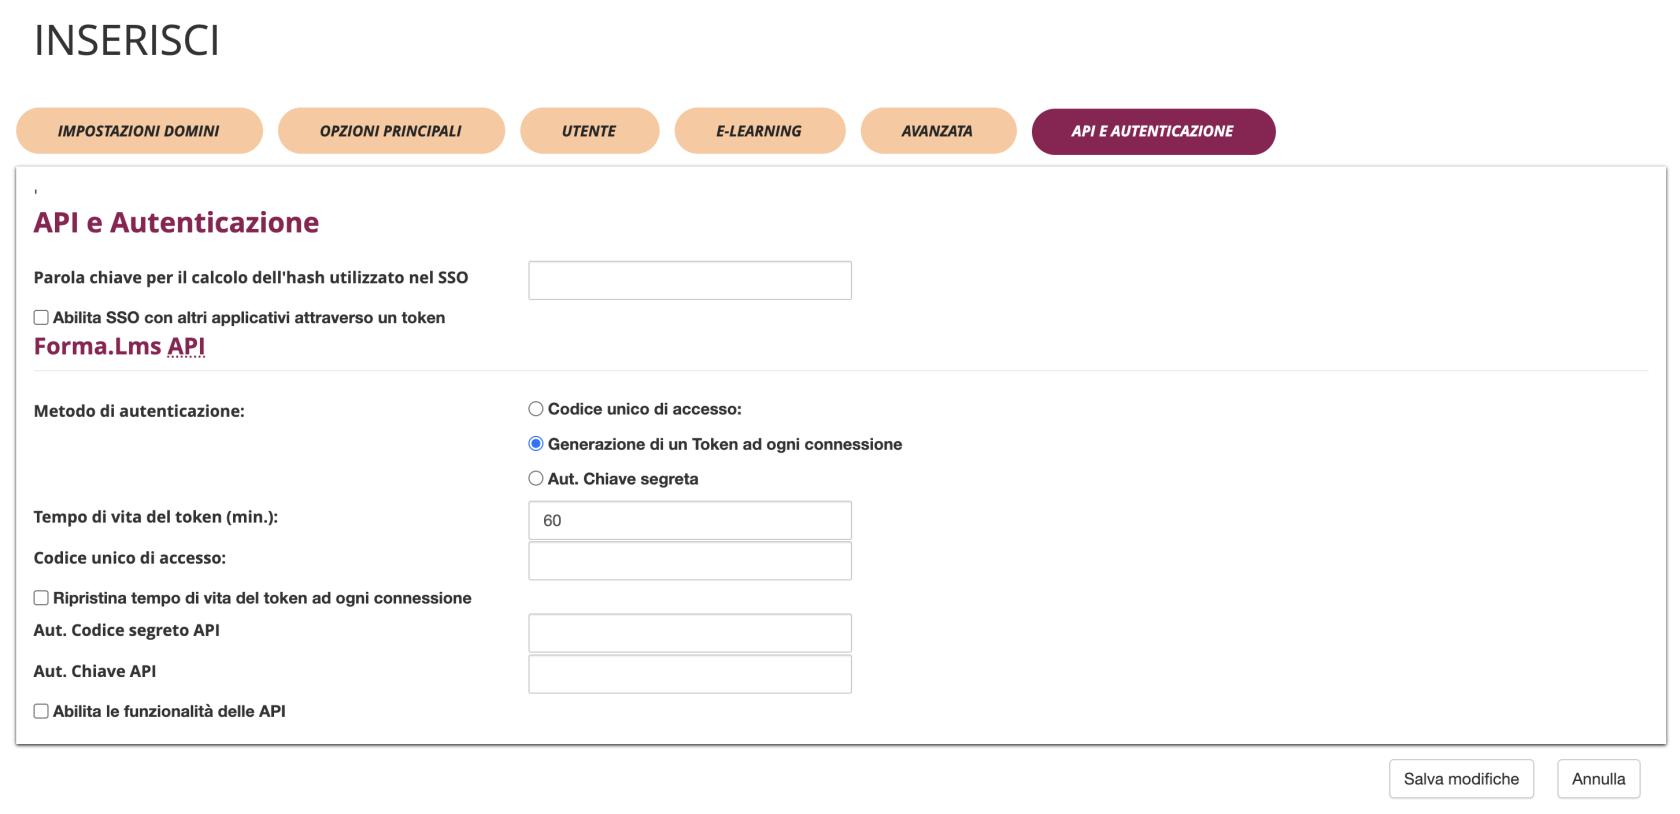](https://bookstackprod.s3.amazonaws.com/uploads/images/gallery/2025-07/bQHKauxWzLly1sVO-api-authentication.png) ## Best Practices ### Naming Convention - Use descriptive names for profiles (e.g., "PROFILE-1") - Maintain consistency in nomenclature - Include client or project references ### Template Management - Use dedicated templates for each client - Test templates before activation - Maintain backups of custom templates ### Security - Set complex passwords for maintenance - Configure IP controls when necessary - Use sandbox environment for e-commerce testing ## Troubleshooting #### Domain Not Reachable - Verify DNS configuration - Check URL correctness in domain field - Verify server accessibility #### Template Not Displayed - Check template existence in system - Verify template file permissions - Verify correct template-domain association #### Email Problems - Verify mail profile configuration - Check SMTP parameters - Test email sending from configured profile # SAML Integration # User Impersonation ## 1. Introduction The **User Impersonation plugin for Forma LMS** allows authorized administrators to temporarily access the platform as another user. The plugin is intended for support and debugging activities: an administrator can verify what a specific user sees in the LMS, reproduce access issues, and check course visibility or navigation problems without asking for the user's credentials. During impersonation, the platform shows a visible banner and prevents learning tracking from being written as the impersonated user. ## 2. Installation and Activation 1. Go to **Administration > Plugin > Plugin Management**. 2. Locate **User Impersonation** in the plugin list. 3. Click **Install** and then **Activate**. When activated, the plugin registers: - the impersonation controller; - the **Impersonation Log** menu under the management area; - the permission role used to enable impersonation actions. ## 3. Plugin Configuration No external API credentials are required. After activation, access depends on the administrator level and on the standard Forma LMS visibility rules: - **Super administrators** can impersonate standard users and administrators, but not other super administrators. - **Administrators** can impersonate visible standard users only. - **Administrators** cannot impersonate other administrators or super administrators. - **Users** cannot impersonate anyone. The plugin requires Forma LMS **4.2 or later**. ## 4. User Impersonation from User Management ### 4.1 Starting an Impersonation Session Within the user management area: 1. Open **Administration > Users > User Management**. 2. Find the user to verify. 3. Click the **Impersonate** action available on the user row. 4. Confirm the operation. After confirmation, Forma LMS switches the current session to the selected user and redirects the administrator to the LMS area. The administrator can then navigate the platform with the same visibility and permissions as the selected user. ## 5. Active Impersonation Session While impersonation is active, Forma LMS displays a red banner across the interface. The banner shows the impersonated user and includes the **Stop Impersonation** action. During the session, the plugin: - blocks learning tracking writes, so course progress is not altered; - bypasses forced password renewal for the impersonated user; - bypasses concurrent access checks, so the real user's session is not invalidated; - prevents nested impersonation sessions. ## 6. Stopping Impersonation To return to the original administrator session: 1. Click **Stop Impersonation** in the banner. 2. The plugin restores the original administrator user. 3. Forma LMS redirects back to user management. The stop action is protected by a token and the session ID is regenerated when impersonation starts and stops. If the session expires while impersonation is active, the plugin writes a timeout entry in the audit log. ## 7. Reports and History The plugin provides an **Impersonation Log** page for super administrators. The log shows: - date and time of the action; - administrator username; - impersonated username; - action type: start, stop, or timeout; - IP address. The log can be filtered by administrator and by impersonated user. ## 8. Security Notes The plugin is designed for support and troubleshooting, not for normal user activity. Main safeguards: - no impersonation of yourself; - no impersonation of super administrators; - no administrator-to-administrator impersonation for standard administrators; - CSRF-protected stop action; - session regeneration on start and stop; - visible banner during the whole session; - audit log for traceability; - tracking protection to avoid corrupting learning data.