Features Documentation
Forma CLoud plugins and extensions
- Corporate Plugins
- Audit Trail
- Course Alert
- Doko
- Landing Generator
- Lotify
- Test Charts
- Retraining
- Templedit
- Extended Domain Settings
- SAML Integration
- User Impersonation
- Videoconference
- ECM Pack
- Managing SCORM
- Dismissed
Corporate Plugins
Extend your Forma Cloud with powerful enhancements, designed for corporate training
Audit Trail
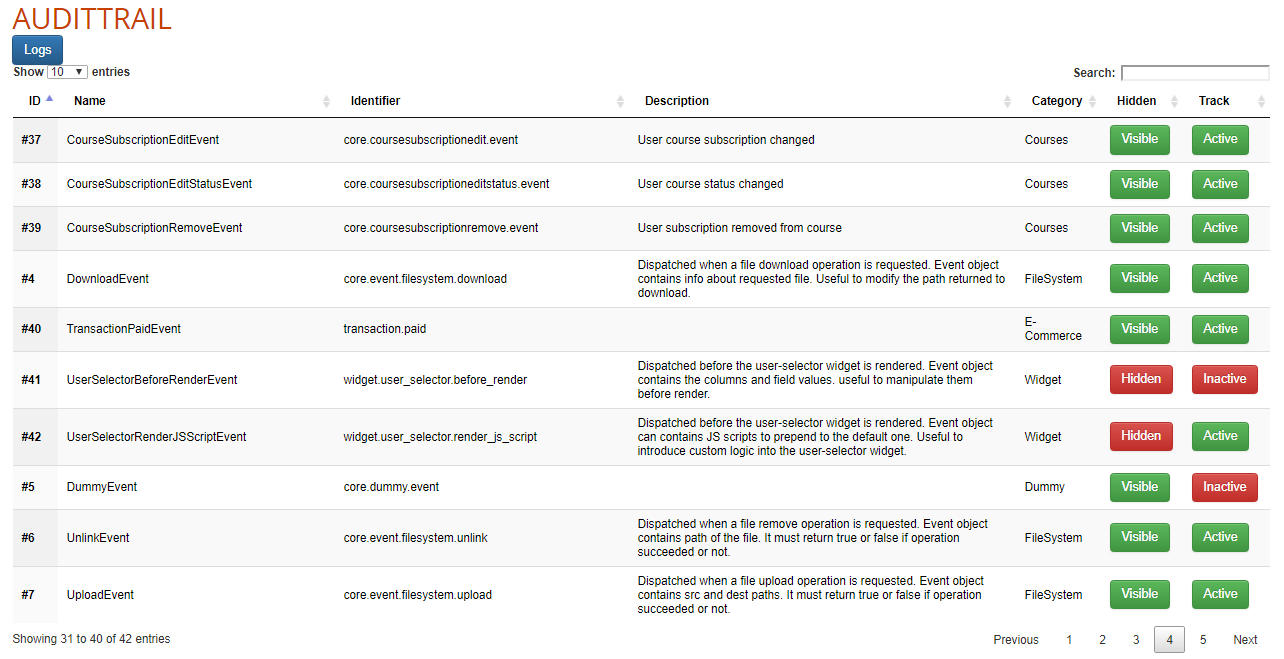
Settings
Plugin settings are available under
Admin > Settings > Plugin Manager > AuditTrail- Plugin Settings.
Here, you can activate or deactivate the logging and visibility of each event.
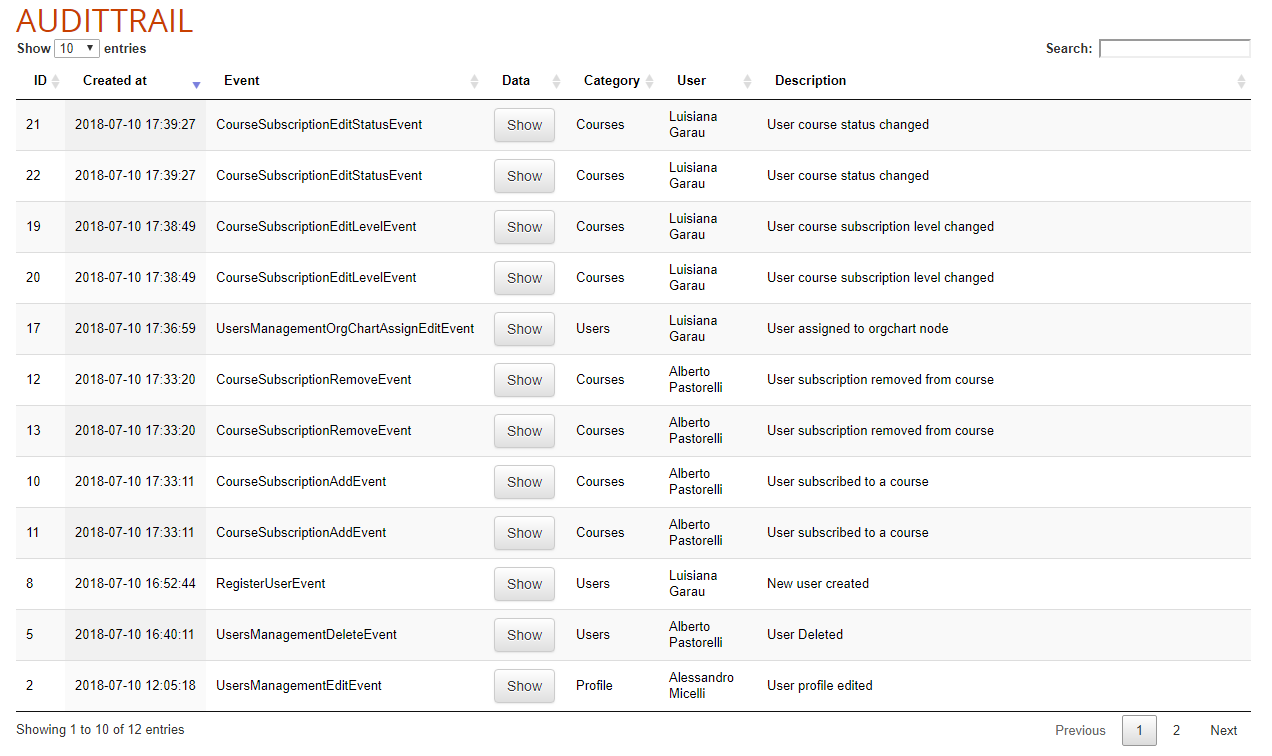
Log Report
The report of logged events is visible under
Admin > Report > Audittrail
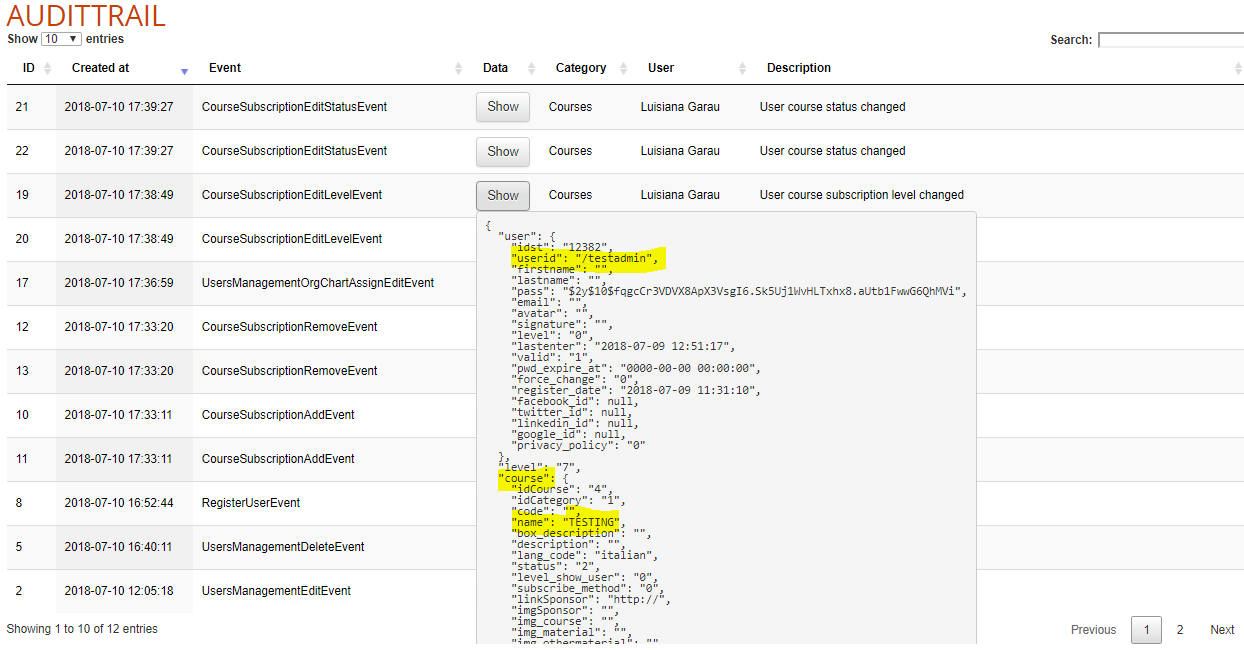
Event Details
Details for the logged event are visible, clicking on the “show” button:
Course Alert
Features Description
This plugin introduces a new notification feature to automatically send custom reminders for courses:
- Login Reminder: user has not begun the course X days after enrolling
- Completion Reminder: user has not completed the course X days after the first access
- Course Closing reminder: user has not completed the course X days before the course end date (if set)
- Course Completed: When a user completes the course, they automatically receive a notification confirming their course completion
- Certification validation reminder: this reminder is added by the "Retraining" plugin
Each reminder can be activated separately for each course.
For each reminder, it will be possible to set a standard text or a custom notification text and scheduling.
Cron Job
To allow the system to properly work you need to set up a cron job on your server calling periodically (i.e every 10 minutes) the following URL:
[platform_url]/plugins/CourseAlert/Cron/cron.coursealert.php
Reminders activation and settings
The course alert function is available for every course. From the course management page, just click on the new envelope icon to access the configuration panel:
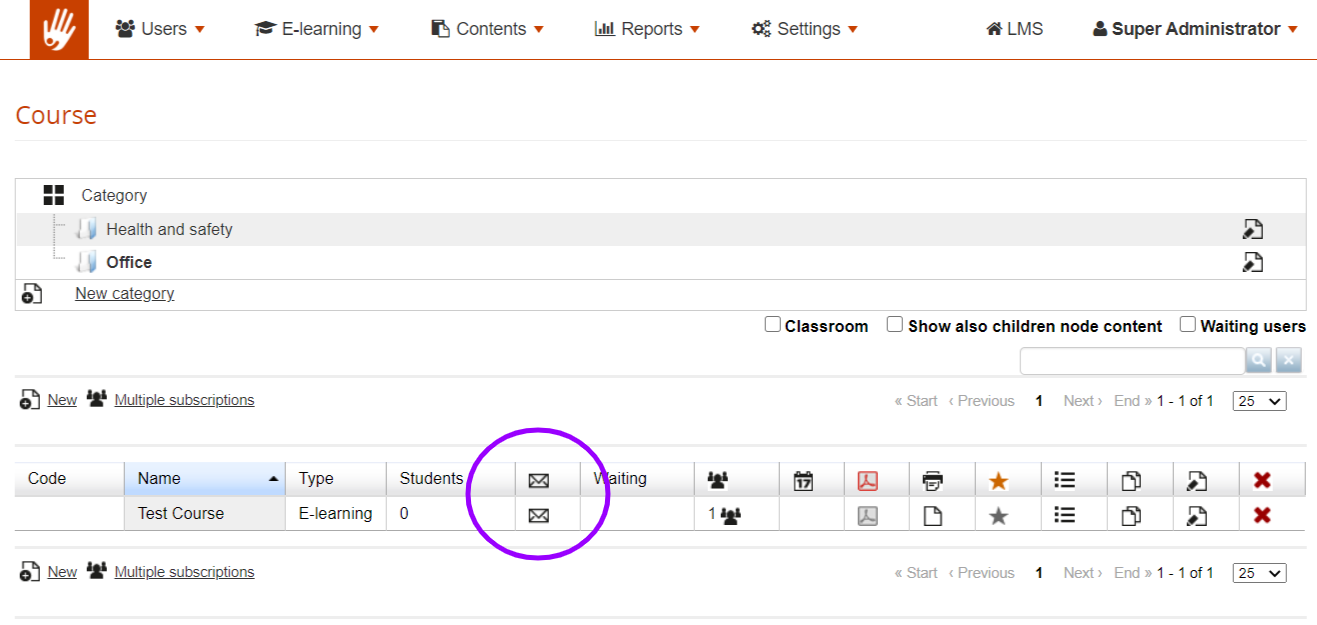
This will open a configuration panel where you’ll be able to:
- Select one or more reminder for each course
- Define to send them by e-mail and/or popup the message upon user login
- Time Settings:
- Define how many days after or before the “trigger” your reminder should be sent.
- Interval: how many days to wait before resending the notification
- Repeat: how many times the alert will be sent/shown to the user
- Reset: flag to rest upon saving the settings. All the notifications for this alert will be sent again.
- Set a custom notification text
- Notification Log: see a log of all the notifications sent to users in this course
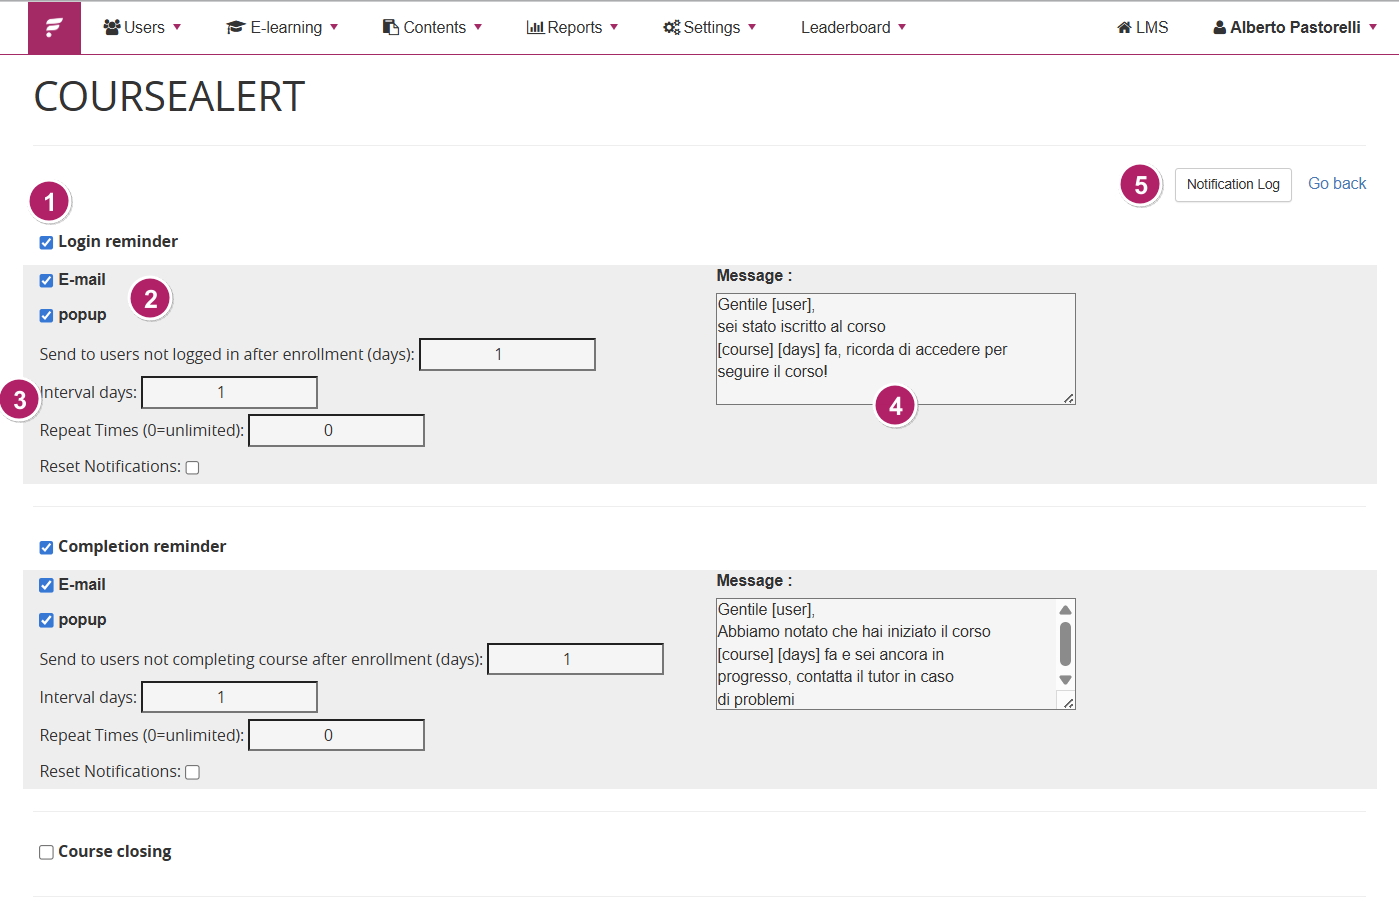
Notification text customization
Writing a custom message
The message field for each notification displays a default text (the text that has previously been set under language management): just click on the text area and start writing to enter a custom text, if you want this course to have a custom reminder.
Conventional HTML tags can be used for text formatting.
Obviously we recommend using standard text, it makes maintenance much easier.
DynamicTags
The following dynamic tags are available to customize your Course Alert notification text:
- [user]: will print the name of the user receiving the notification
- [course]: displays the course title
- [days]: displays the number of days as set in the notification settings
Edit the default message
The default text message can be edited through the standard Forma language management features. The plugin adds another set of keys, so you can find the messages you need to customize by filtering for "course alert".
Time Settings
Interval days
The Interval days parameter controls the minimum gap between two consecutive displays of the same pop-up to the same user. For example, with Interval days = 3, after clicking "Remind me later" the user will not see that pop-up again for at least 3 days. Setting Interval days = 1 means the pop-up can reappear on the following day's first login
Repeat days
Indicates how many times the alert should be re-proposed.
Note: By entering a value of 0, the system will continue to show the pop-up or send the email indefinitely until the required action is completed.
Reset Notifications
The Reset Notifications checkbox is available for each alert type in the configuration panel.
When this checkbox is selected and the configuration is saved, the system deletes the notification history (send log) for that alert type on the selected course. This means:
All users who had previously received this alert — including those who had reached the maximum number of repetitions — will be eligible to receive it again.
The repetition counter (sent_times) is cleared for all users associated with this course and alert type.
The alert cycle restarts from scratch as if no notification had ever been sent.
This is useful, for example, after updating the course content or extending the course deadline, when it makes sense to re-notify users who had already been informed.
Note: Reset Notifications only affects the selected alert type for the selected course. Other alert types and other courses are not affected.
Pop-Up Alert
When the Pop-up delivery method is enabled for an alert, the system checks at each user login whether any active alerts apply to that user. If so, the pop-up will appear at the next login.
The pop-up presents two action buttons:
- "Enter": Redirects the user directly to the course. The alert is recorded as sent and the repetition counter is incremented.
- "Remind me later": The alert is recorded as sent and the repetition counter is incremented. The pop-up will appear again at the user's next login, provided that the number of days configured in Interval days has elapsed since the last display.
Closing the pop-up (×): Dismisses the pop-up for the current session only, without incrementing the repetition counter or updating the last-send date. The pop-up will reappear at the next login unless an action is taken by clicking one of the buttons
If user is enrolled to multiple courses requiring notifications, multiple popups might be displayed at the same time:
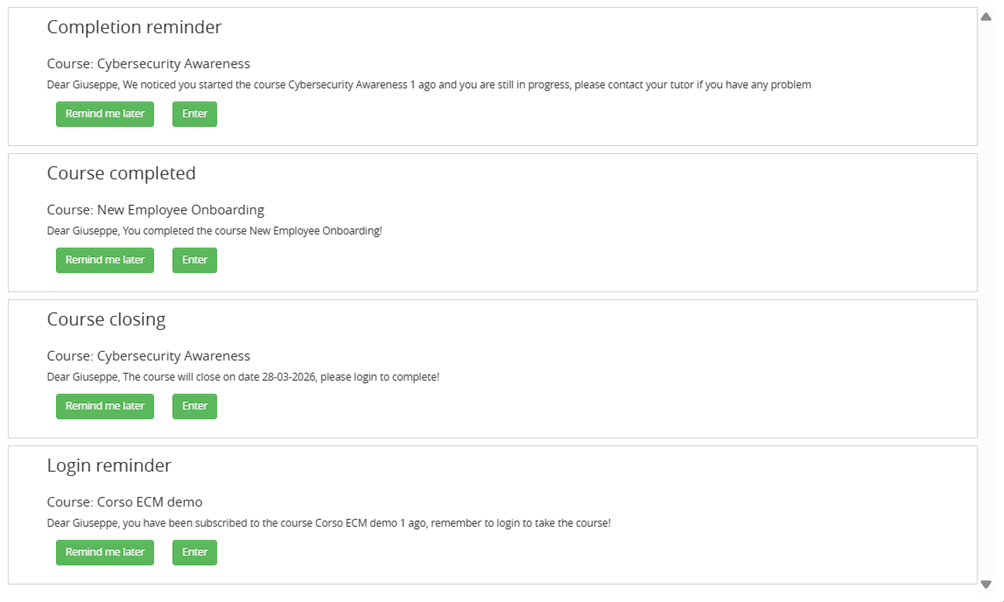
Notification Log
A log of all the notification sent to users can be accessed:
- Whithin a specific course alert settings, showing all the notifications sent for that specific course
- Whithin the plugin global settings, showing all the notifications sent for all the courses
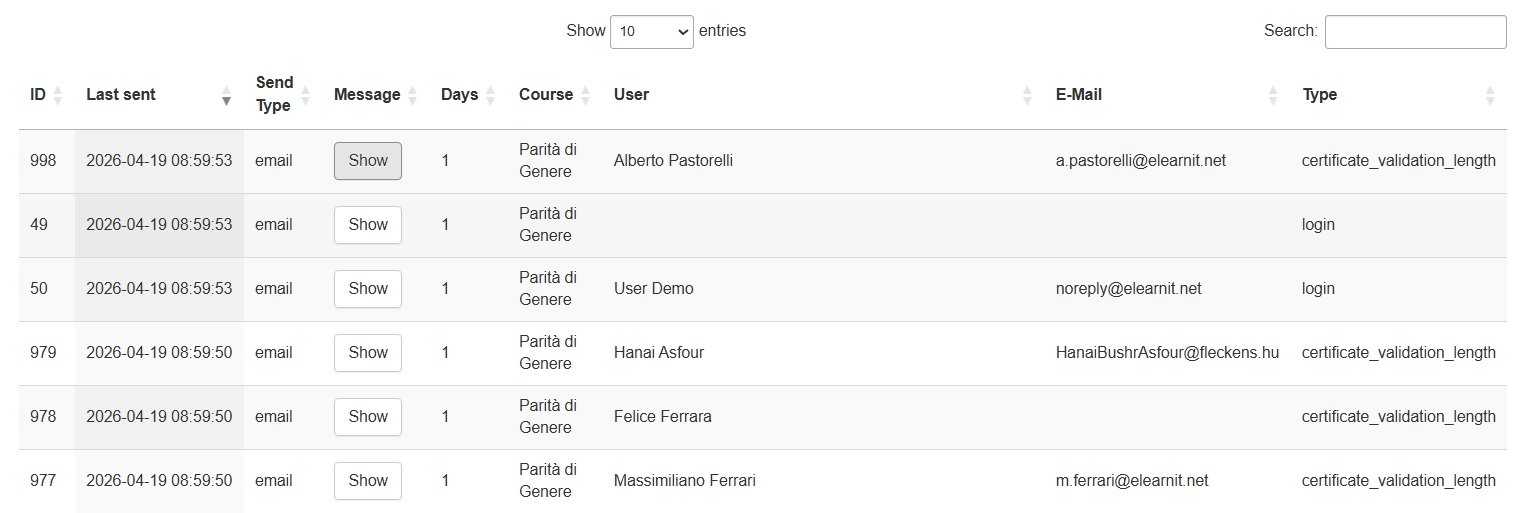
Sending Criteria
Global Sending Criteria
Before sending any notification, the system always checks:
- Active user: the user account must be active
- Active course: course status must not be archived, deleted, or suspended
- Maximum number of sends: if set to 0, sends without limit; otherwise stops at the configured number
- Minimum interval between sends: does not resend until the configured number of days has passed since the last send
Specific Sending Criteria
Login Reminder
Purpose: reach enrolled users who have never opened the course.
Users receive the notification if:
- They have never made their first access to the course
- They have no completion date recorded
- They have been enrolled for at least X days (X is configurable)
- Their enrollment date is valid
- Their enrollment status is not one of: Suspended, Pending, Deleted, Overbooking
Completion Reminder
Purpose: prompt users who have started the course but have not yet finished it.
Users will receive the notification if:
- They have made at least one access to the course
- Their enrollment status is exactly In progress (1) — no other status is accepted
- They have no completion date recorded
- Their first access was at least X days ago (X is configurable)
Course Closing Reminder
Purpose: notify enrolled users that the course has an upcoming end date.
Users will receive the notification if:
- The course has a defined end date (not empty)
- The end date is still in the future
- The end date falls within X days from today (X is configurable)
- Their enrollment status is not one of: Suspended, Pending, Completed (2), Deleted, Overbooking
Course Completed
Purpose: notify the user that they have completed the course.
Users will receive the notification if:
- They have a completion date recorded
- Their enrollment status is not one of: Suspended, Pending, Deleted, Overbooking
Certificate Expiry — Retraining (Certificate Validation Length Reminder)
Purpose: notify users that the certificate obtained upon course completion has expired, prompting them to retrain.
This notification is managed by the Retraining module and is only available when that module is active on the platform.
Users will receive the notification if:
- They have completed the course (certificate obtained)
- The certificate has a validity duration configured on the course
- The certificate validity period has elapsed since the completion date
Doko
Plugin Installation, removal and update
Global settings
Plugin settings are available under
Admin > Settings > Plugin Manager > Doko > Settings
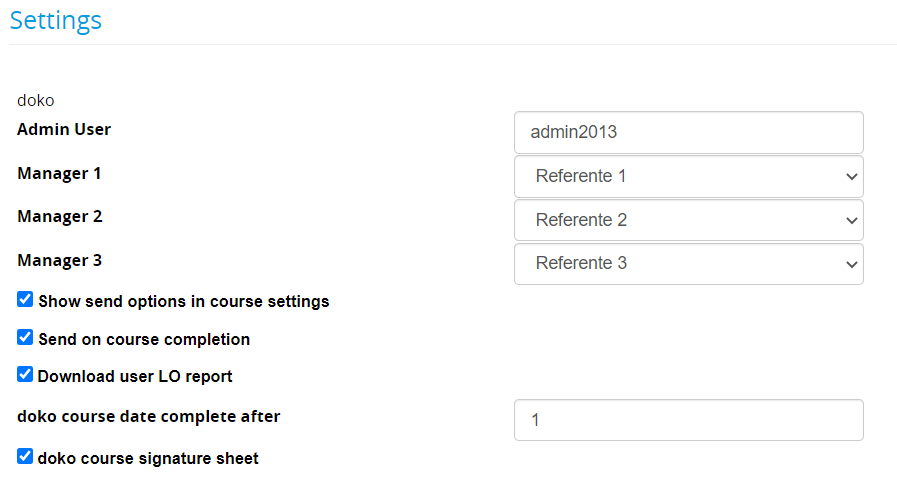
- Admin User: set a superadmin username to be used for cron automation (only needed if you are using cron to send emails)
- Manager: set up to 3 custom user fields containing extra recipient emails
- Send on course completion: a zip package containing the certificate and the selected documents will be automatically sent to the selected recipients
- Download user LO report: enables the generation of a PDF report for each user
- Doko course signature sheet: enables the creation of a signature sheet to be printed for each course
- Custom fields: select course and edition customfields to be added to signature sheets header
Using Doko
Doko “Package”
When a user completes a course, Doko creates a zip package containing several documents:
- Course Certificate
- LO Report
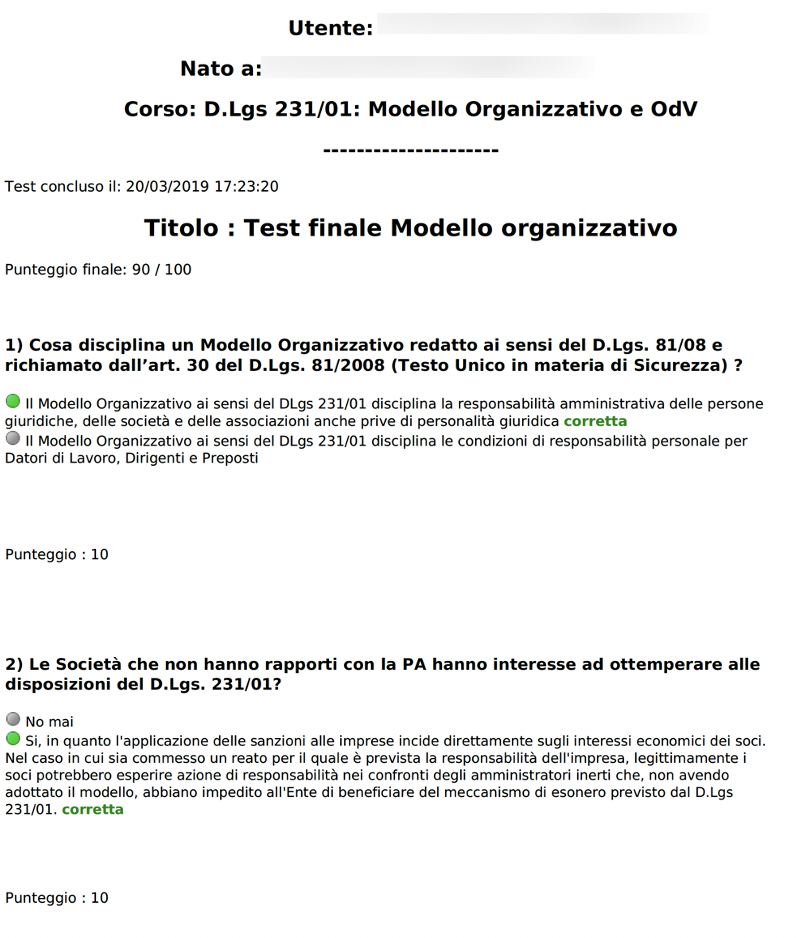
- Printout of final test answers
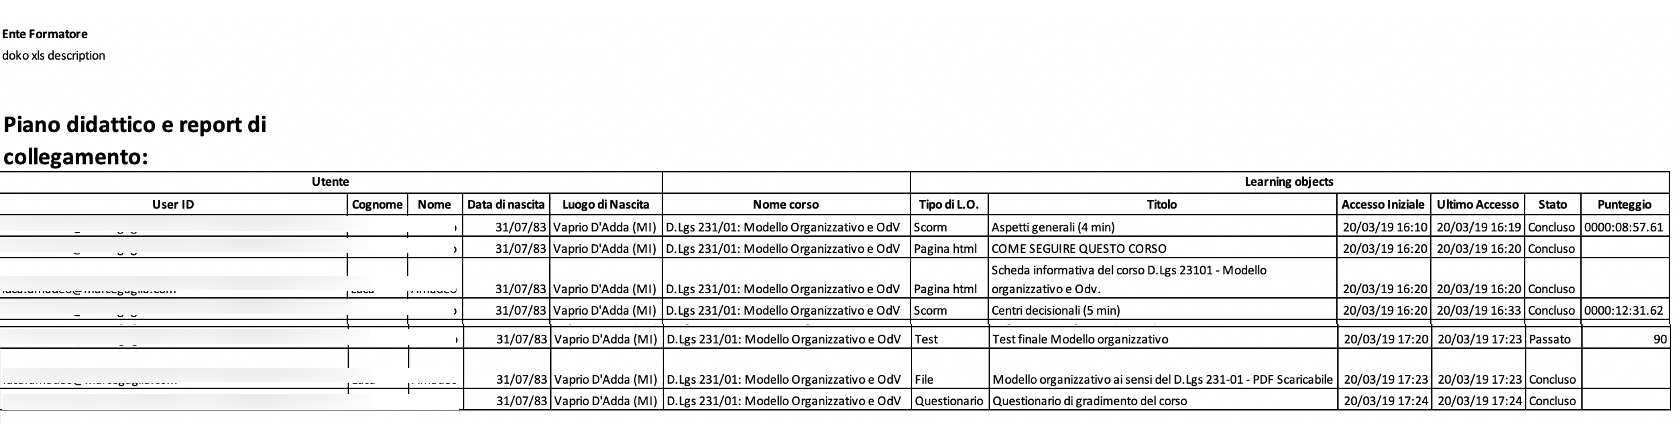
- Detailed course trackings: a XLS file reporting the details of user
[Immagine]
The package is available in two ways:
- Automatic Mailing to the student and/or his managers (See course settings)
- Manual download from the users stats page in course teacher/stats area:
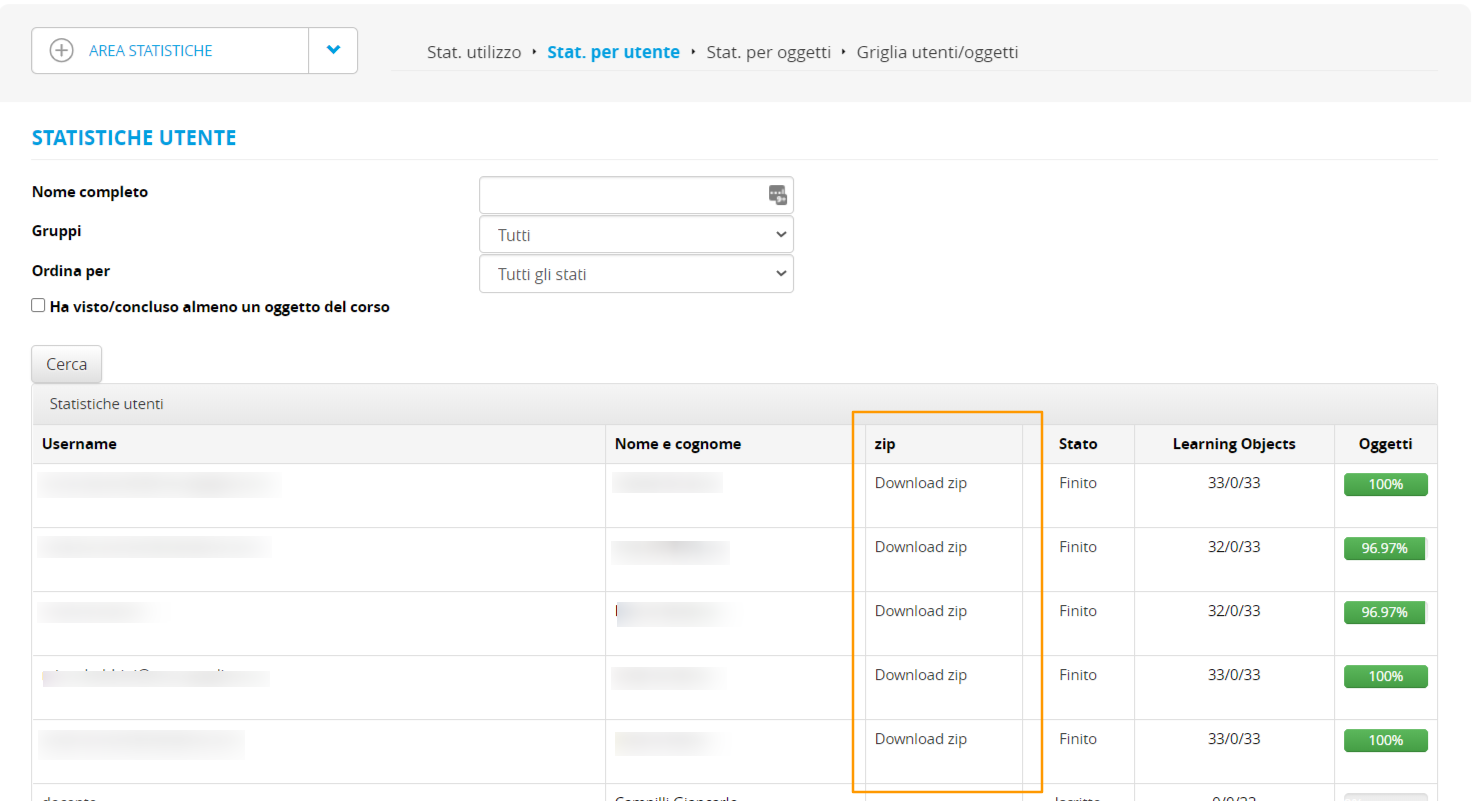
The .zip file includes:
- the certificate in a .pdf format
- the .xls reporting with the user’s tracking data (the same that can be found under the users-object grid)
- A test printout, with the detail of the answers given by the user in the final test
Course Settings
The plugin adds a new section in the course creation or editing wizard.
It’s called “course certificate delivery” and it appears under “documents upload”.
If you expand this section, these are the settings you can configure:
- e-mail settings and recipients → dropdown menu, where you can decide to send your documents to
- nobody
- student only
- student and managers (if you have set them under “configuration”)
If you send without selecting the other options, your e-mail will include the user’s certificate and the print-out of the tests completed by the user.
You can also include other documents, see below:
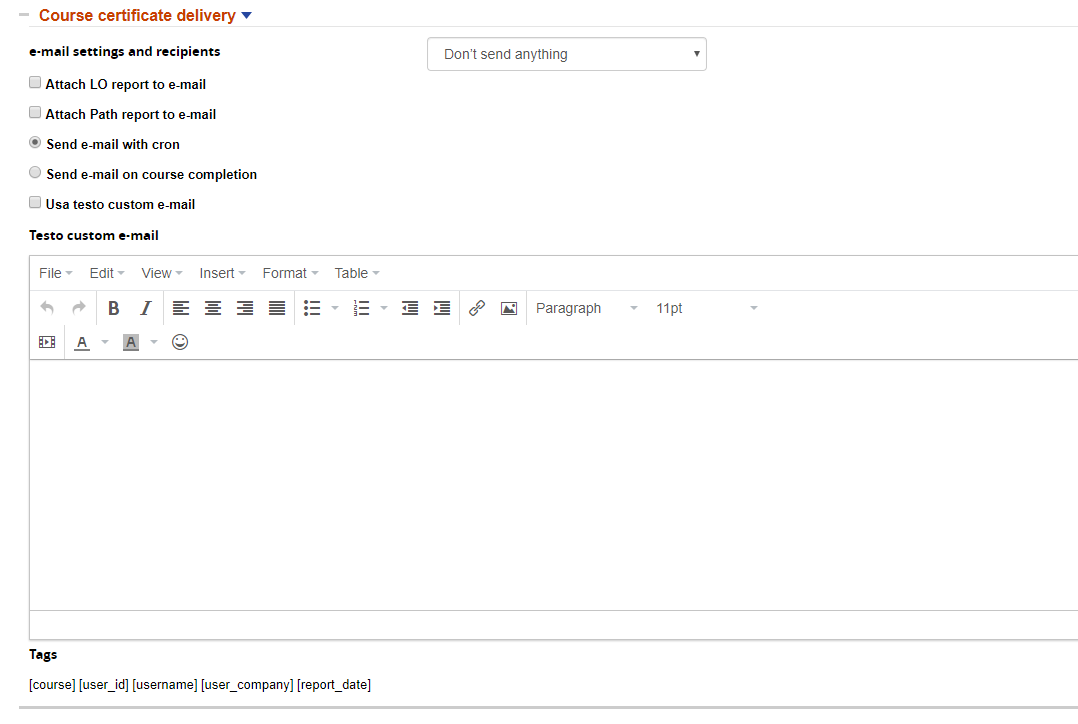
- attach LO report to e-mail → this allows you to automatically export the Excel file related to the users-object grid for that user and that course and to attach it to the e-mail
- attach Path report → it allows you to attach a PDF file with the same information as above. This is meant for financed projects, it can include static information.
Finally, the e-mail can be sent either upon course completion (once every time a course has been completed) or with a cron (once a day).
Custom Text
If you don’t flag “use custom text”, the e-mail will be sent with the text that you set under language management.
If you flag it, then you’ll be able to have a different customized text for every course. You’ll also be able to use the tags that you see in the image above, dynamically customizing the text with the user ID, the date, the company, and the course name.
LO Report
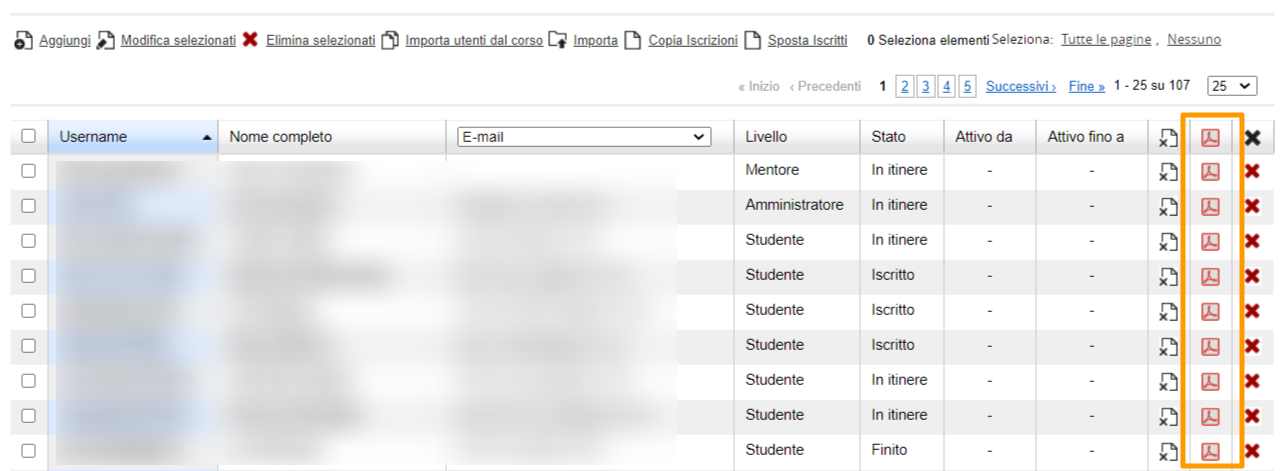
A pdf document reporting the completion status on LO, that can be printed and signed by the student
This can be inserted in the doko package, or manually generated for each student from the course subscription management page:
Signature Sheet
This feature generates a PDF document to collect students signatures in classroom courses.
The Signature Sheet can be downloaded clicking on the new icon in the course list:

Settings
By default, the signature sheet will add the course logo as a header.
You can set a custom header and footer in course settings:
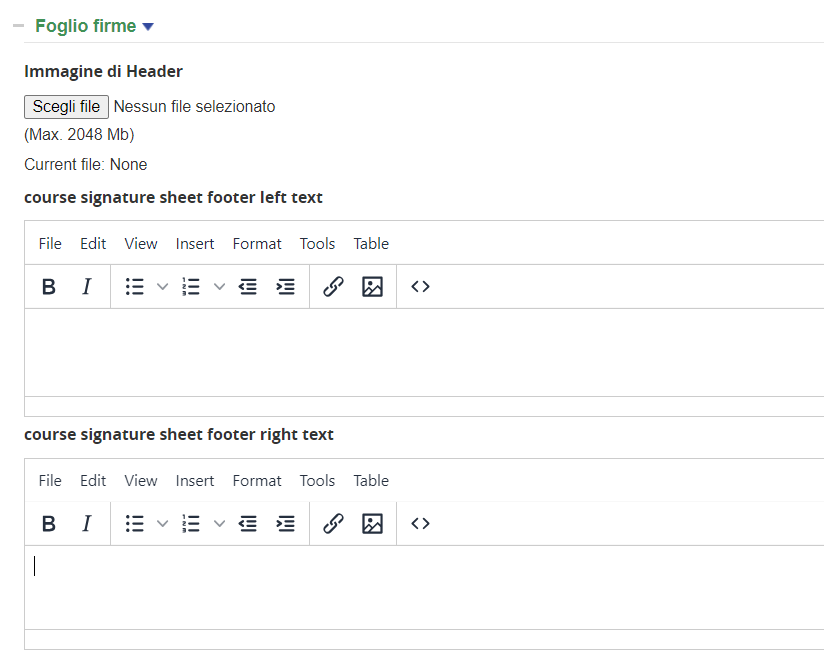
Adviced size for the header image is 720x100px
If no header image is set, course and sponsor logos will be used instead.
A default header image can be named course_signature_sheet_header_image.jpg and uploaded via FTP under /files/Doko/signature
- Header Image: upload a banner header image
- Footer Left
- Footer Right
Landing Generator
Plugin Description
The Landing Generator Plugin allows the creation of a custom login and registration page for each course, featuring:
- Dedicated URL
- Add registering users to a specific Org Chart node
- Enroll users to the course
- Choose Standard or Advanced registration, to display either the standard registration form or just the fields associated to the selected node
- Direct login to the course
- Display course and sponsor logo on the login/registration page
- Add custom styles to the page
Global Configuration
The plugin requires the Forma API’s to be enabled and fully configured under
Administrator > Settings > General Configuration > API & SSO
Check the official forma documentation for details on the API configuration
Features
Plugins features are available inside the standard menu edit form. Go to:
Admin > Elearning > Course
And click to edit your course
Plugin Settings will be available under the tab “course landing”:
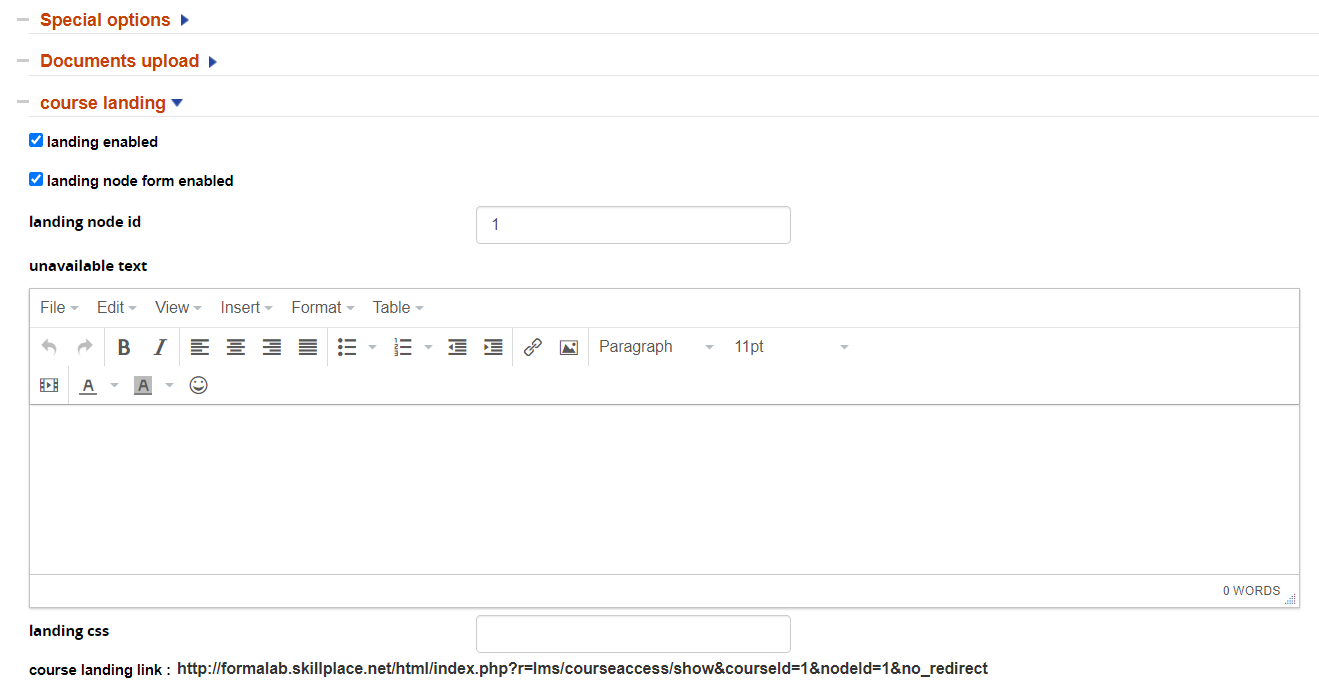
- Landing Enabled: activate or deactivate the landing page
- Landing node form enabled: use custom node fields instead of the standard registration form
- Landing node ID: insert the ID of the node to be used for user registration and field selection (see note below)
- Unavailable Text: Enter a text to be displayed when the course is closed or unavailable to user
- Landing CSS: add a stylesheet class for the landing page
- Course landing link: URL of the landing page
Notes:
- platform registration must be enabled
- to retrieve the node ID, go to user management, right-click on the “assign users” icon and copy/paste the link URL to your notepad. The node ID will be the last number in the URL, i.e: http://testing.formalms.org/testing/appCore/index.php?r=adm/usermanagement/assignuser&id=4
Multiple Templates and URL
The landing generator only creates landing pages with the default URL.
But if you simply change the part of your URL before the /index.php and replace it with the desired, different, URL it will also work with your other templates and URL’s.
[Your Platform URL]/index.php?r=lms/courseaccess/show&courseId=1&nodeId=1&no_redirect
Finally, it’s a good idea to use URL shorteners
Landing Page Layout
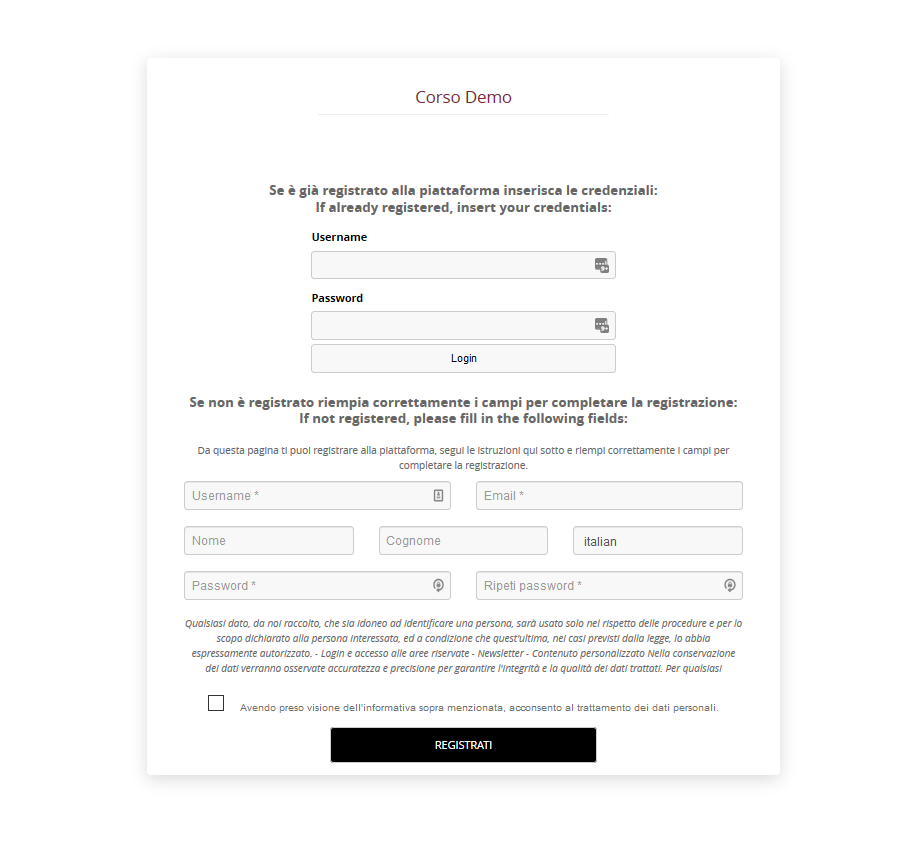
This is an example of how your login/registration page will look like.
If you inserted the course logo it will display on the left, and if you inserted the sponsor it will display on the right.
Lotify
Setup and Configuration
Plugin Settings
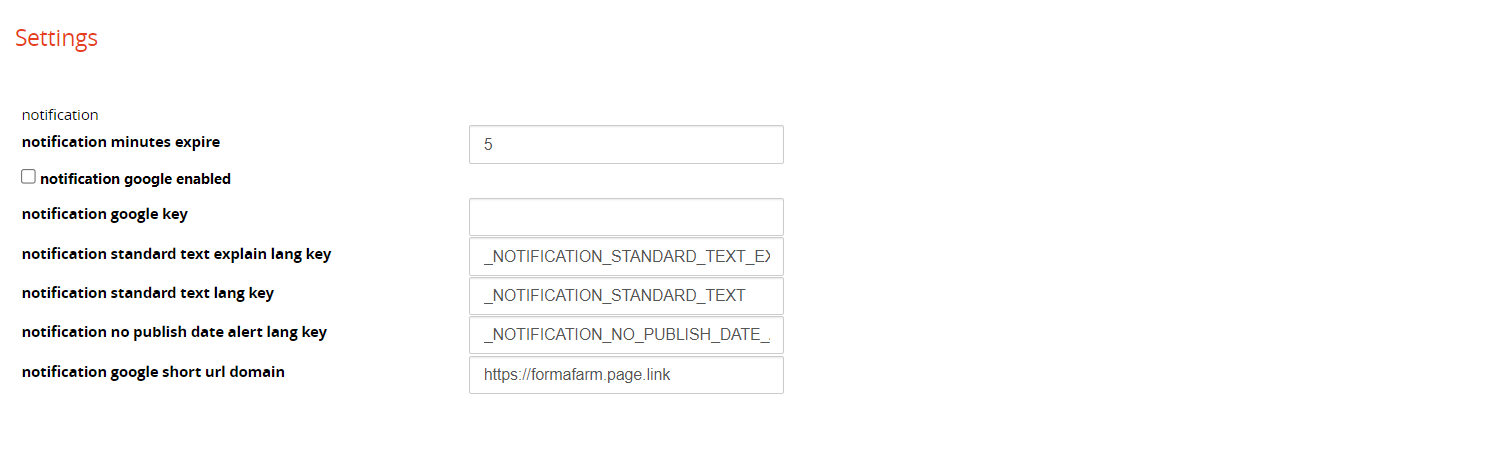
Notification minutes expire: notification expires if not sent within the amount of minutes set. Note: if set to 0 all notifications will be suspended.
Notification Google Enabled: enable the use of Google short URL services
Platform Settings
Some settings are needed on your LMS and on the plugin for the correct functioning of the shortlinks that allow direct access to the LO’s and that are sent together with the notifications:
- Enable Single Sign-On on your platform, from the settings > System settings > Forma API & SSO
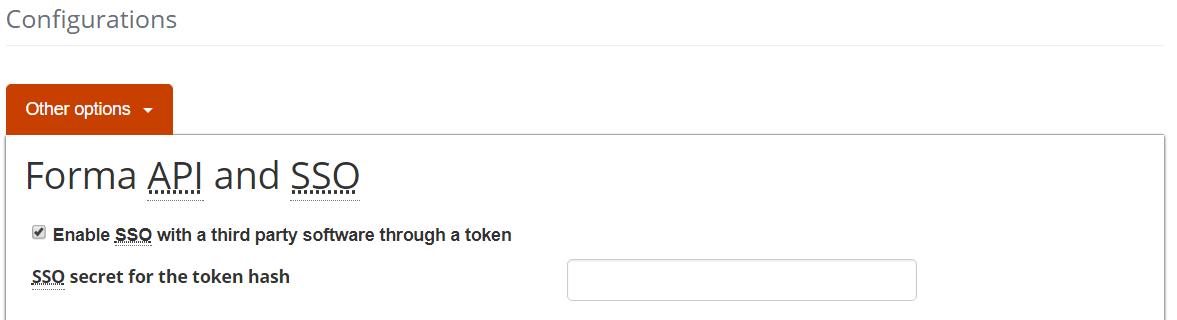
2. Insert your Google API Key in the plugin configuration panel
Configuration > Plugin Manager > Lotify - Settings.
If you don’t have an API Key, you can get one here: https://developers.google.com/maps/documentation/embed/get-api-key
Text message (SMS) Service
To enable text message (SMS) notifications, configure your LMS with the credentials of your service provider, under:
Settings > System Configuration > Settings > SMS
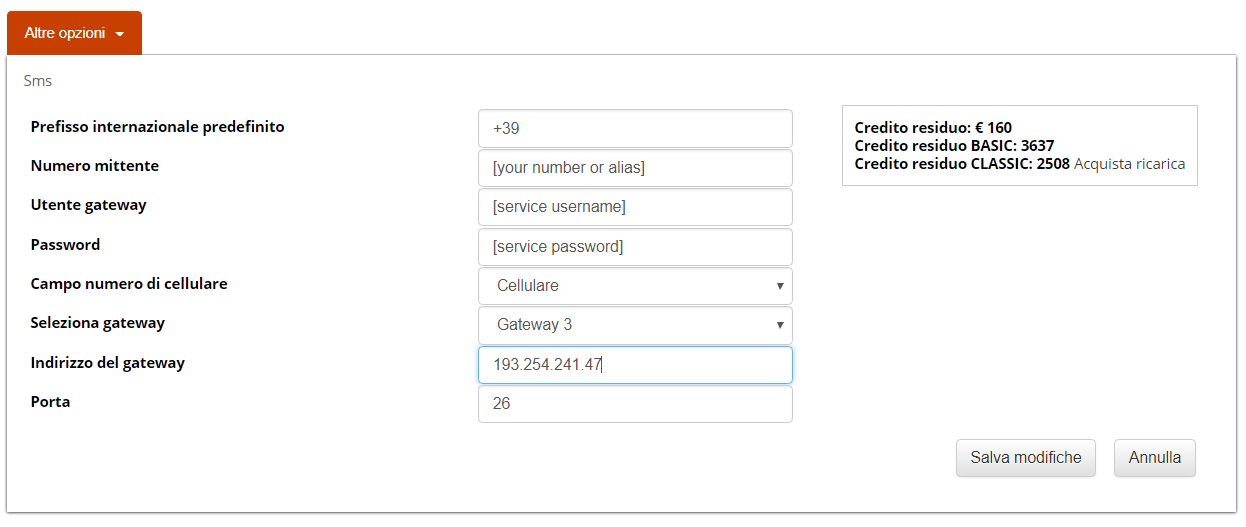
Note: Forma Lms is natively configured to work with www.skebby.it. This feature will be removed in Forma 4.x
Cron Job
You need to set up a cron job on your server, to allow the system to properly work, launching periodically this URL:
[platform_url]/plugins/Notification/Cron/cron.notification.php
Standard notification
The plugin adds a new icon to the Learning Object Management panel:
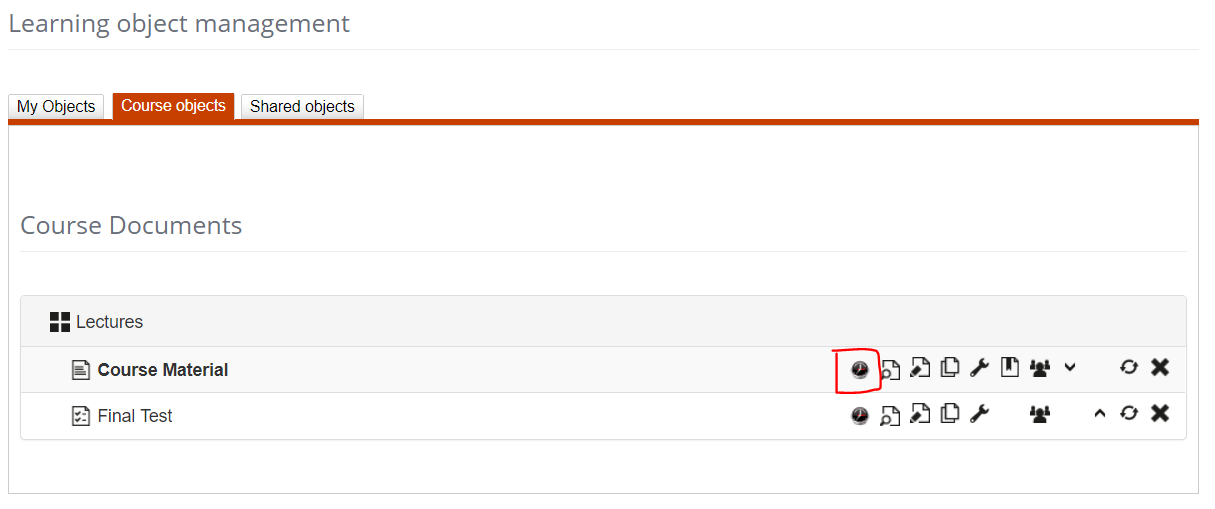
Clicking on this icon, you are taken to the settings panel where you can control the notifications for every LO:
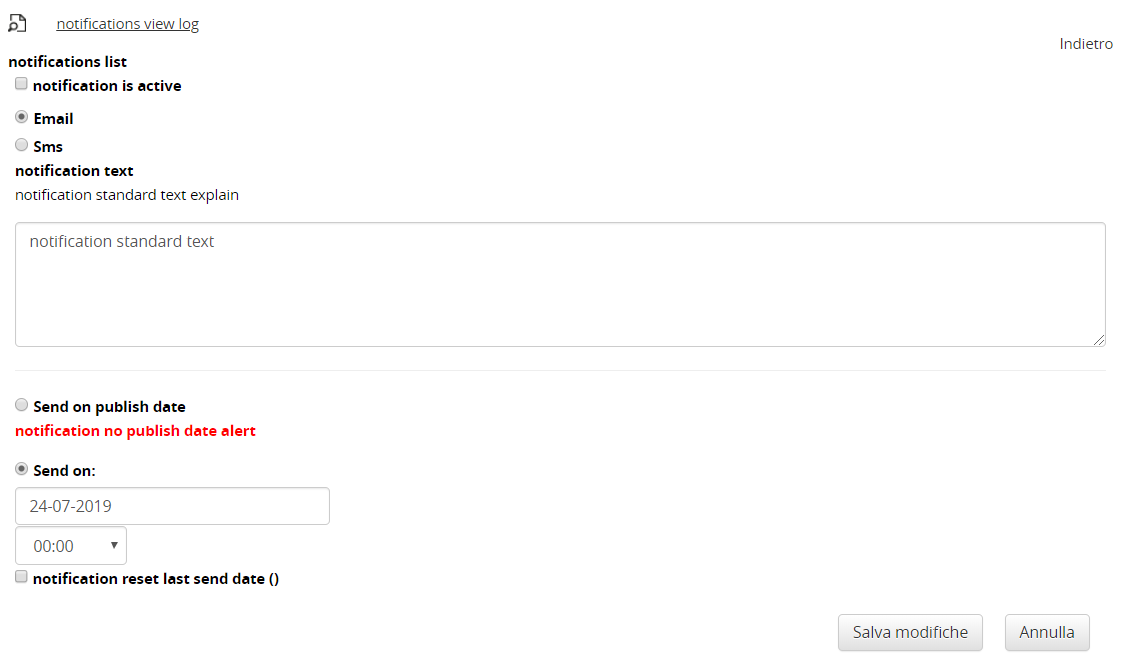
Notification View Log: from this link you’ll be able to extract a log of the notifications you sent
Notification is Active: enables the sending of the notifications for this LO.
The notifications will be sent upon the publication date you set in the properties of the object itself.
If you didn’t set a date, the notifications will be sent upon saving the form.
You can send notification either by e-mail or by SMS (text message to a mobile phone).
Notification Text: insert here the notification text. It’s possible to customize your text with the following placeholders:
[URL]: direct link to the LO, different for every user (see related paragraph)
[USERNAME]: userid
[USER_COMPLETE_NAME]: first and last name
[COURSE_NAME]: course name
Send on publish date: the notification will be sent on the day set as “start publishing date” in LO properties
Send on: lets you set the day and time for sending the message
Reset last send date: by selecting this option, upon saving, the last send date will be reset. Use this option if you want to re-send the notification to users who have already received it.
NOTE: EMAIL SENDER
The e-mail sender will be the same that you set in the general settings of your LMS for general notifications.
NOTE: SENDING CONDITIONS
Users that completed the course or the LO will be excluded by the notification
Sending a short url
The short-url inserted in the notification messages with the [URL] tag allows to directly open the object, bypassing the login to the LMS and the access to the course. The process happens in a way invisible to the user. Every link is unique for a specific user.
The link generated this way could also be used by other people who are not the user the link has been sent to.
It’s important to:
- tell users not to share the link with other users, in order not to compromise the course stats
- avoid using this method for evaluation tests, since there is a risk users would share the link with other users
- configure the LO properly, for example: make it visible just one time or until it’s completed
Advanced notification
For the TEST objects there is an advanced settings feature that allows you to manage text, planning and recipients of your notifications.
Adding a new notification
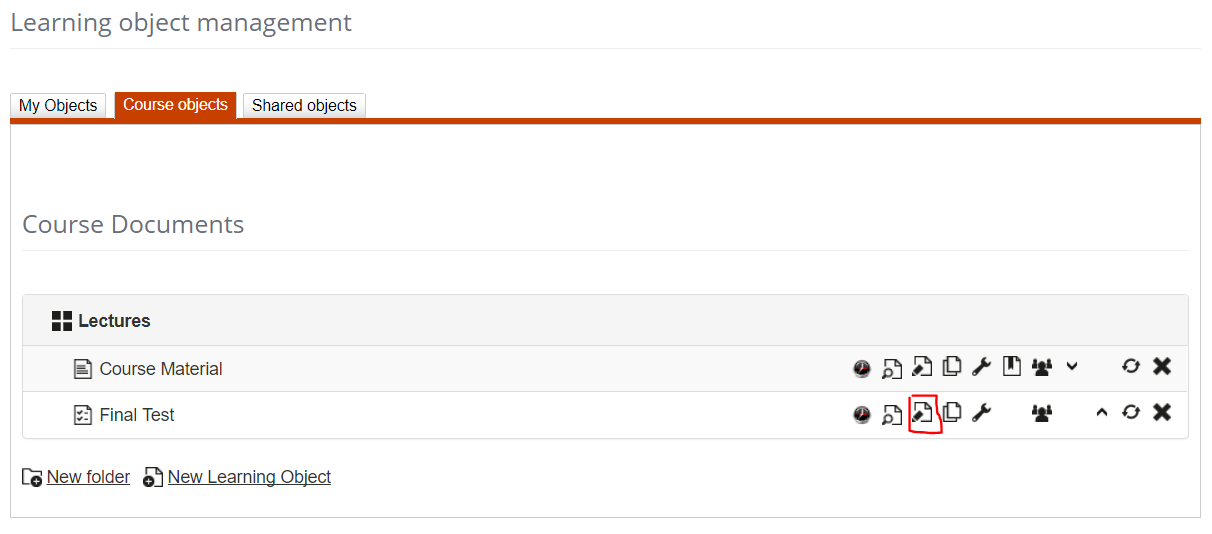
1.From “Learning Object Management” panel click on “edit test”:
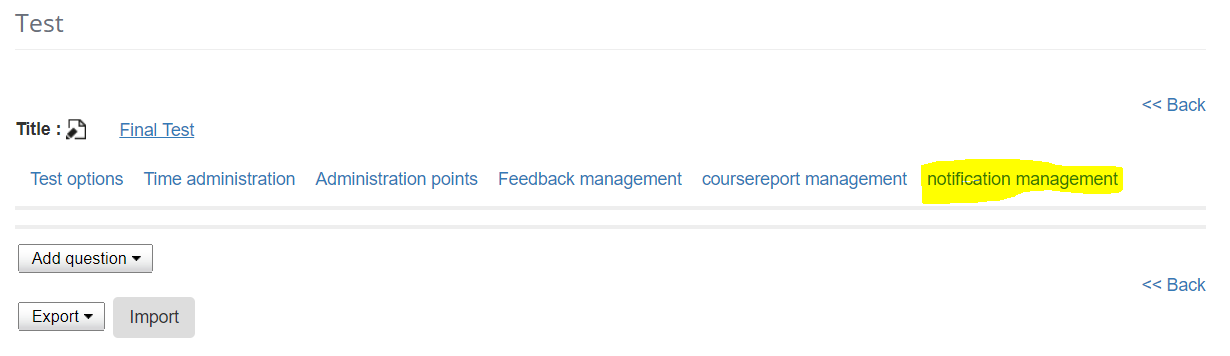
2. Click on “Notification Management”:
3. Add a new notification:
 4. Notification settings:
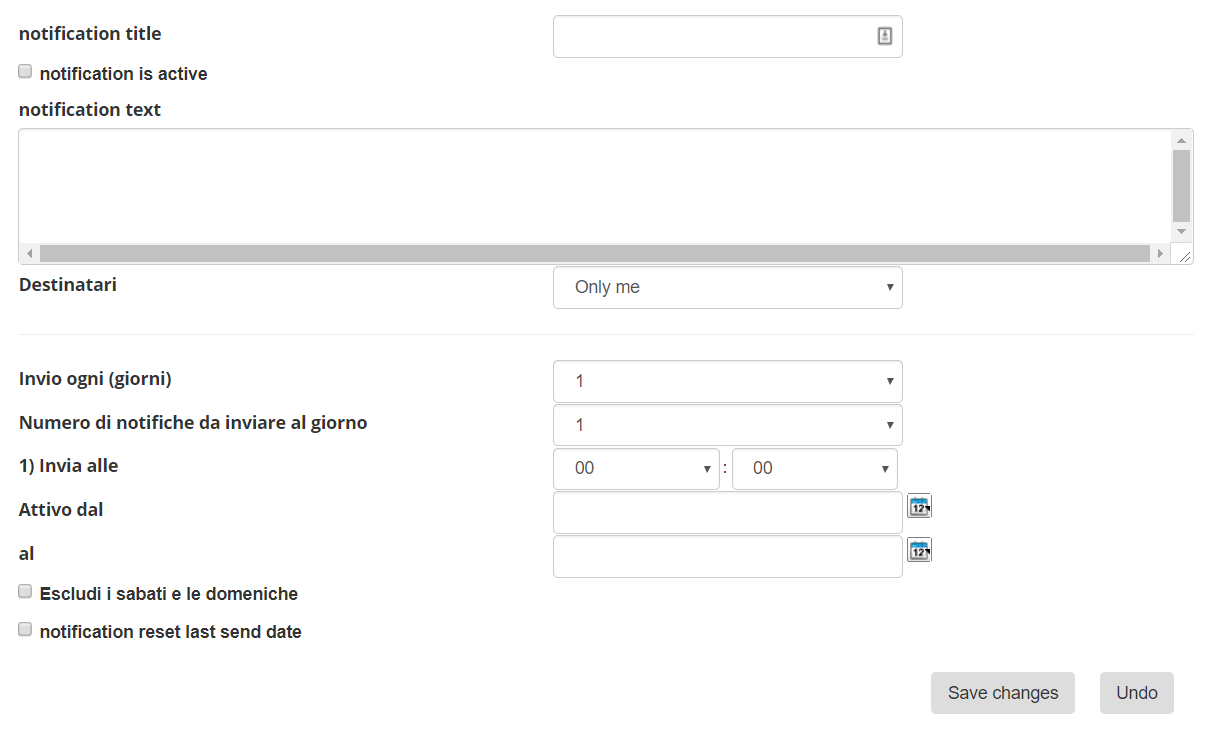
Scheduling Notifications
Lotify allows for a very flexible scheduling of notifications:
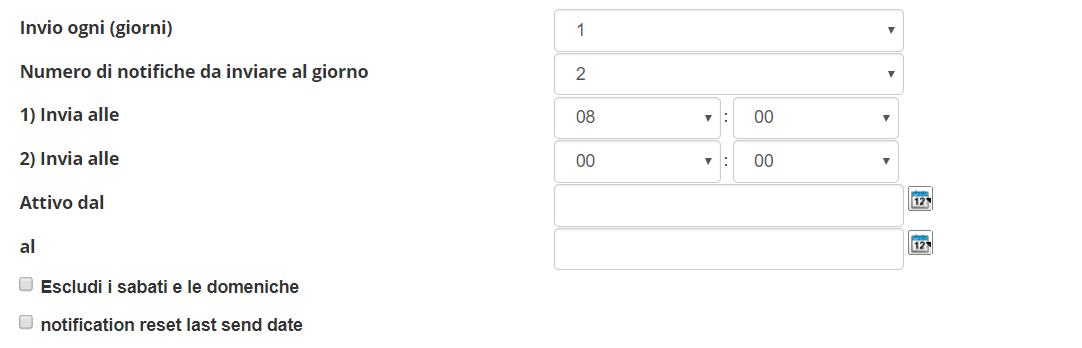
Send every: lets you choose the frequency, from 1 (every day) to 7 (every week)
How many notifications a day: self-explanatory, for every sending you have to specify a time
Time: at what time the notification will be sent
Active from – to: You can set your notifications to be sent only from a specific date to a specific date
Exclude Saturdays and Sundays: self-explanatory
Reset last send date: resets the last send date, so you can resend your notifications even to users who have already received them
Setting the recipients
When you create a new notification, you can choose if you want to send it:
- To yourself only: useful for testing or to send personal reminders
- All: sends to all users who are enrolled to the course
- Selected: after saving the notification, you’ll be able to choose the recipients

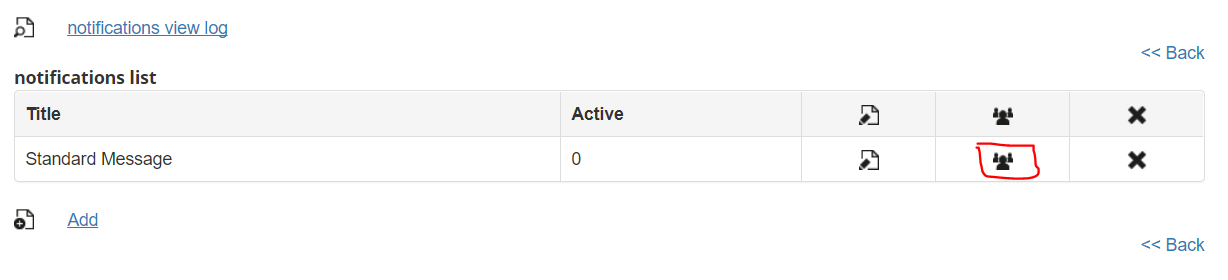
This option is only available upon creating a notification. Then you’ll be able to edit it from the user's icon:
Troubleshooting
A User didn’t receive a notification
- Verify that in the user profile there is an active e-mail address and/or a correct mobile phone number
- Check the user status on course and learning object: only users with status “subscribed”, “In progress” or without a completion date will receive the notifications
- Check the plugin setting for “notification minutes expire” is not set to 0 (zero)
- Verify if the notification log has some errors (see paragraph 2.1)
Resend a notification to a user
If a user didn’t receive a notification or has canceled it by mistake, it’s not possible to resend it directly from the system, but you can do as follows:
- Access the notification settings panel (see 2.1 and 2.2)
- Open the notification log. The log lists all the cron call, sorted by time. Look for the notification text you want to resend and copy it. Please find the right user and the right text, because short-urls are personal
- Send the user the text you copied with a direct e-mail or text message
The system asks for a password
If the user is asked for a password after clicking on the shortlink, it might be that the user was set to force the change of password upon first access. In that case, inform the user about how to reset password or give him a new one.
Send Conditions
Notifications are NOT sent in these cases:
- Course is in status canceled, closed or under construction
- User completed the course
Test Charts
Description
The plugin extends the standard functionality of the “Evaluation Register” module in LMS format, integrating:
-
Export functions for the details of the answers provided by users
-
Category charts, showing test results for all users, aggregated by question category
These exports will allow further statistical analysis activities on the answers provided to the tests administered on the platform
Export answers details
The plugin“TestChart”adds, by clickingon the histogram in the Evaluation Register two LINKS:

Aggregated answers
Aggregate responses: which reports the aggregated data of the answers provided by all the users who took the test

Detailed Responses
Detailed Answers: where for each individual user the question, the answer provided and the score obtained are reported, for all the questions in the test

Export Detailed answers to individual questions
Export the list of all answers given by users to the specific question.
The file can be integrated with data from additional personal data fields, based on the selection set in the export configurations for each test.
Charts for question categories
The plugin integrates statistics from answers to tests with a new “Statistics by Category” tab, which shows a graph of correct answers aggregated by question category

Export and chart configuration
In the test configuration, the plugin adds the Link: Test Chart Management, which allows you to configure the data of the .csv file that is extracted


Retraining
Plugin Retraining
Courses that belong to mandatory training, such as all safety-related courses, have an expiry date. After that date, participants are required to complete the course again. Managing this process can be quite complex, but the Retraining plugin makes it simple and automated.
1. Sets the course validity period
2. Automatically checks conditions the validity of a course for each user has expired or is about to expire
3. Resets the user’s status on the course
4. Sends a reminder to users X days before the expiry date
5. Maintains the certificate history
1. How to set the validity days of a course
Go to Administration/Elearning/Courses
and click the Edit icon for the course in which you want to set the validity days

In the “Time Options” section, enter the number of validity days. For example, if a course is valid for one year, enter 365.

2. How to check course validity for each user from the reports.
When creating a report, simply add the “time before expiring” field
to the fields to be displayed in the table.
In the newly created report, a column will appear showing the days remaining until course expiry for each user

3. How to reset the user’s status
When a user needs to retake the course, the administrator can manually reset their status by clicking the appropriate icon.
Go to Administration/Elearning/Courses
and click the enrolled users icon for the course whose users’ status you want to reset.
Click the “Reset” icon 
When the pop-up opens, click the OK button

4. How to send a reminder to users X days before the course expiry date
Retraining integrates with Course Alert to notify users by adding a dedicated reminder:
Enabling notifications:
The configuration panel of Course Alert (and the specific integration for Retraining) allows you to precisely define how, when and how many times a user should be prompted.
A. Selecting the Sending Mode
For each type of reminder (e.g. "Certificate validity reminder"), the administrator can choose one or both channels:
· E-mail: Sends a message to the user's email inbox.
· Pop-up: Activates a blocking alert within the platform at the time of login.

Defining Scheduling Fields
The numeric fields determine the notification lifecycle:
● Send to users after X days: Defines the timing of the first send relative to the triggering event (e.g. after receiving a certificate or after enrolment).
● Interval days: Specifies how much time must pass between one send (or pop-up display) and the next. This avoids overwhelming the user if they do not act immediately.
● Repetition days (or Number of repetitions): Indicates how many times the system should re-present the alert.
Technical note: Setting this value to 0, the system will perform an infinite send until the user completes the required actiona.
● Reset Notifications: If checked, allows the send cycle to be re-initialised for users who have already received reminders previously.
Pop-up Notification
The introduction of the pop-up system transforms a simple passive notification (email) into a guided and immediate action. This feature is designed to maximise the renewal rate of expiring courses.
Display (Entry Phase):
- · Trigger Event: The pop-up appears immediately after the user’s Login on the platform.
- · Frequency: If the user does not complete the required action, the pop-up will reappear on subsequent logins based on the "Interval days" and "Number of repetitions" settings configured in the Course Alert panel
Dynamic Interaction (Selection Phase)
Once the pop-up is displayed (e.g. "Certificate validity reminder"), the user has two main options: 
By clicking "Retake the course",

- · Warning Message: A second confirmation level appears: "Do you confirm you want to retake the course? Your previous results will be saved". This reassures the user that their certificate history will be preserved.
- · Automatic Reset: Upon clicking "Confirm", the plugin resets the user's completion status on the specific course.
Once confirmed, the pop-up displays the final button:
Advantage: The user goes from login to course access in just 3 clicks.
5. Certificate History
Each user, in their own Certificate Area, will be able to generate and download all certificates obtained upon course completion (even when the previous year’s completion status has been reset)

Templedit
Template Management
Templedit section is located in Administration (gear wheel) > Settings> templedit.
From this page you can see a standard template, and you can create new templates, edit and update the existing ones.
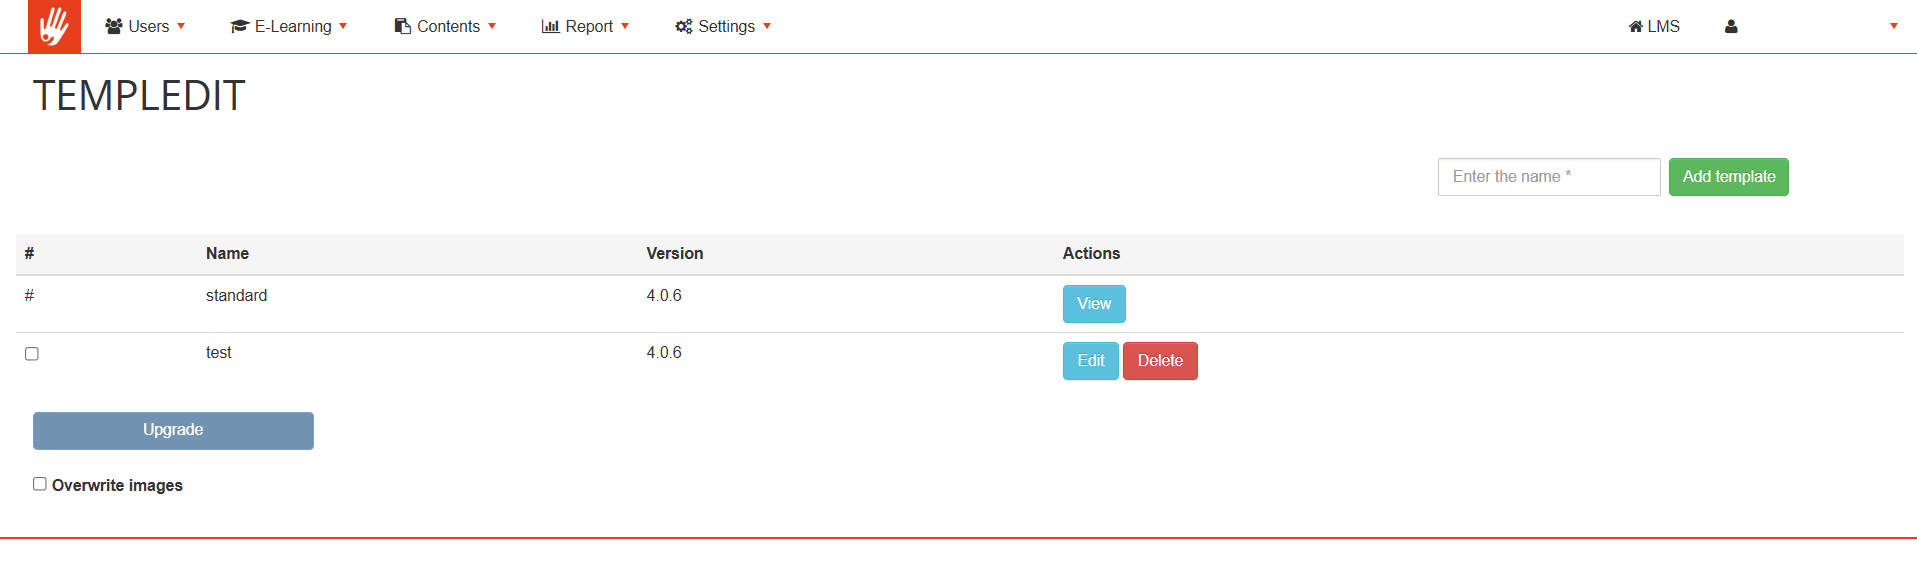
Add new template: enter the name of new template and press the "Add template" button: a copy of the standard template is created, ready to be modified.
Update Templates: in some cases, platform upgrades will require to updated some template core files. Use this button to update your templates to the latest versions while maintaining your style anche images changes.
Overwrite Images: selecting this option when updating a template, also the template images folder will be owervritten. Useful if you manually replaced template icons.
Setting your platform standard template
Last step, to set the created or modified template as the default template you need to go to: administration (gear wheel) > settings> system configuration > settings.
In the Main Options tab open the "Default Template" drop-down menu and select the desired template.
Template Settings
Once created, you can configure your template by clicking on edit, you will then be able to:
· Set the basic colors of the template (see legend below)
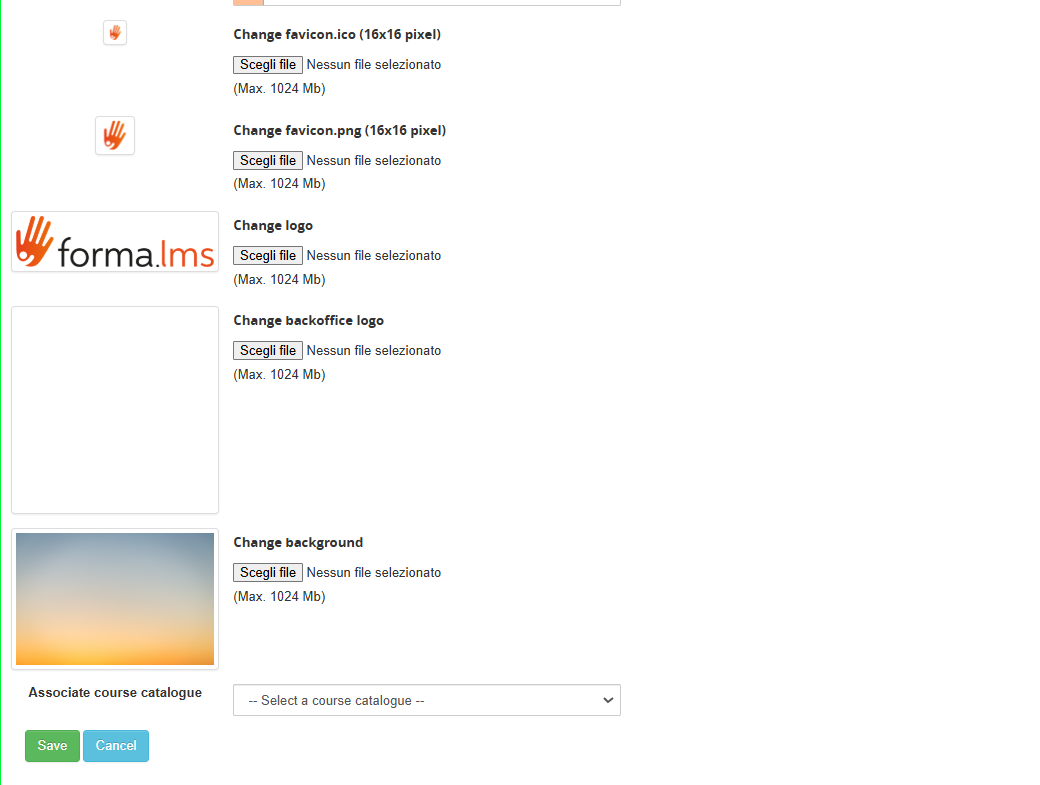
· Upload logo, cover image and favicon
· Edit the custom.css file: all styles in this file will overwrite the standard classes and colors set in templedit.
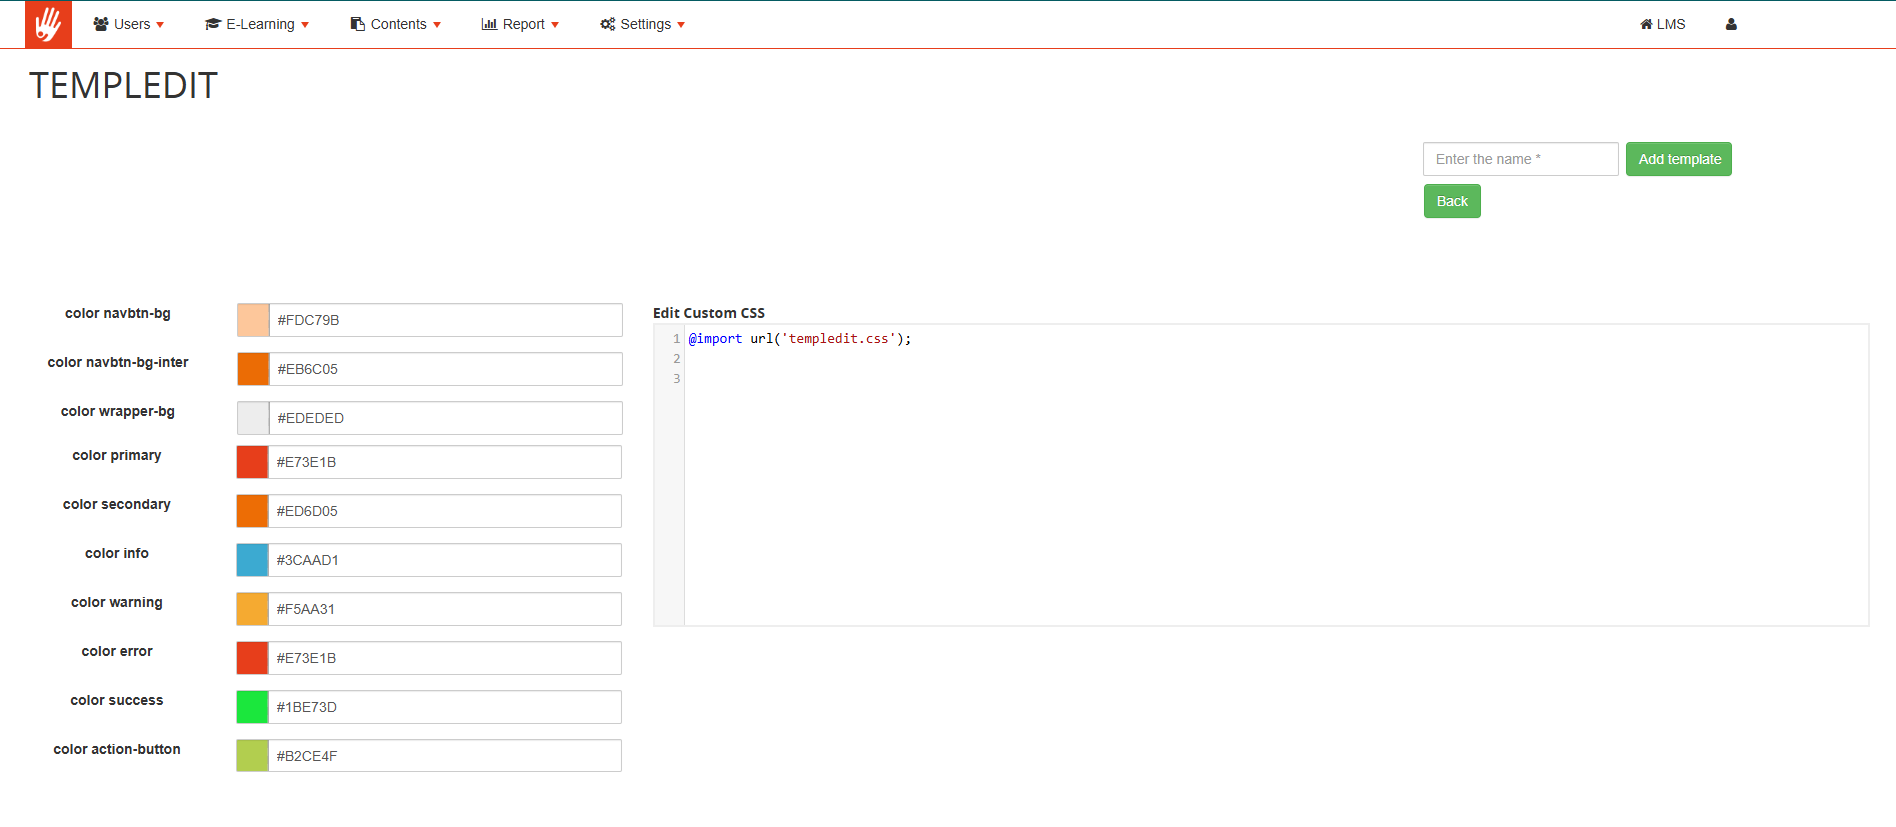
Note: do not remove the first line @import url('templedit.css'); which is added when you first save the template
Color Legend
Below is a small legend of the color entries that can be set to help the user set their own style.
We have set the various fields with different colors to make their display clear.
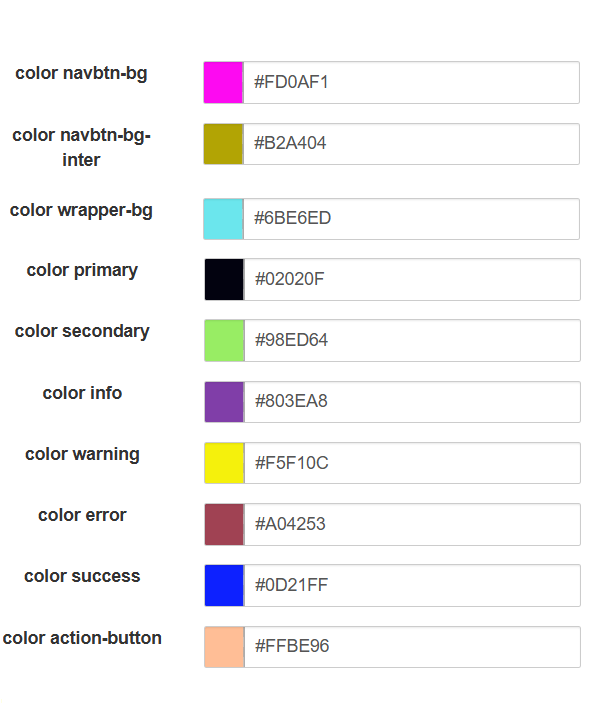
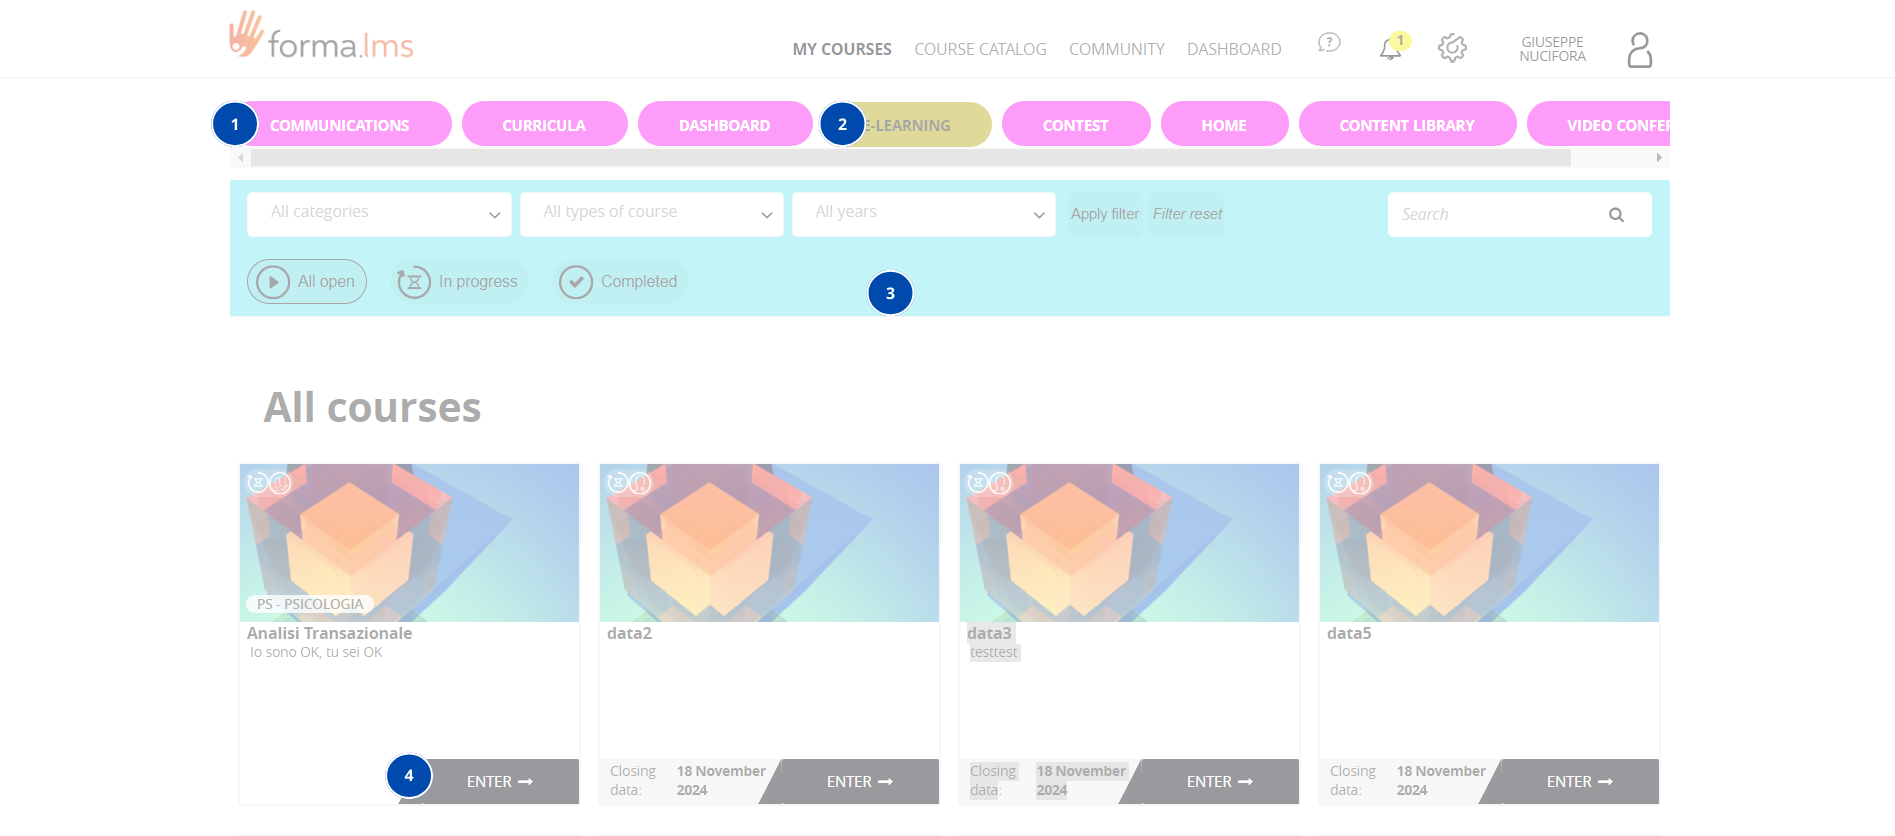
The legend above is intended to guide the user in setting up their own style for the platform, the images used serve as examples and it is possible to find any tabs, banners, etc. in other parts of the platform.
Extended Domain Settings
The "Extended Domain Settings" plugin is an advanced tool for multi-domain management of the e-learning platform. It allows you to configure and manage multiple platform instances under different domains, each with their own customized settings.
The plugin extends the standard domain settings with most of the options you have for the global platform configuration, this way each domain will behave as an independent platform. For each of your client you will be able to setup different registration modes, home-page settings, SSO token, and much more
Plugin Configuration
Access to Configuration
The plugin is accessible through the administration panel:
-
Access the administrative panel
-
Navigate to the "System Configuration" section
-
Select "Domain Settings"

By default domains will inherit the global platform settings, and any configuration change made to a specific domain will override the default ones
Domain Profile Management
Creating New Domain Profile
To create a new domain profile:
-
Click on the "Insert" button (green)
-
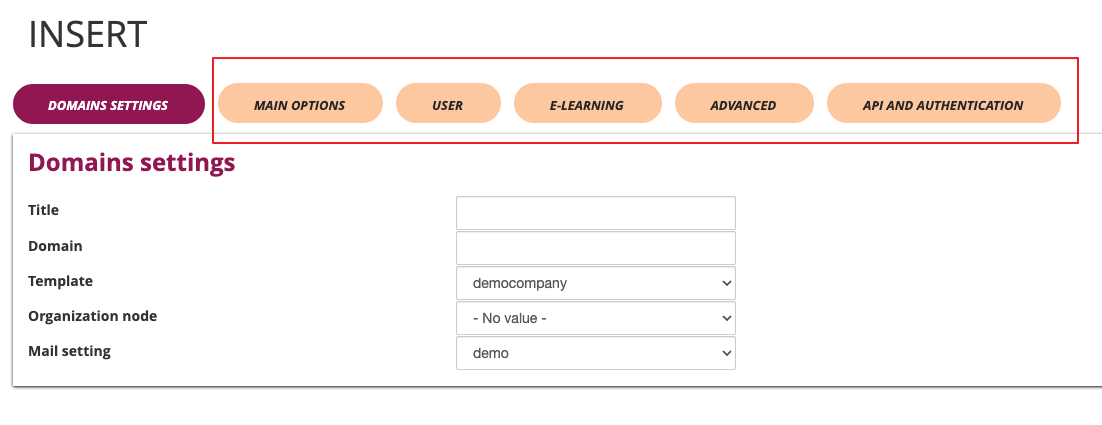
Fill in the required fields:
- Title: Profile identifier
- Domain: Complete domain URL
- Template: Select the appropriate template for this domain
- Organizational node: Associate a specific orgchart node for the users that will self-register to this domain
- Mail Profile: Configure specific email settings for this domain


To add a new domain to your Forma Cloud check our Email & DNS settings documentation
Edit an Existing Domain Profile
To modify an existing profile:
-
Locate the profile in the list
-
Click on the "Edit" button (blue)
-
Update the necessary fields
-
Click "Save changes" to confirm

Profile Deletion
To delete a profile:
-
Locate the profile in the list
-
Click on the "Delete" button (red)
-
Confirm the operation

Advanced Configuration
Domain Settings
Title and Branding
- Title: Platform name customization
- Domain: Main URL configuration
- Template: Graphic layout selection
- Organizational node: Associated hierarchical structure
- Mail Profile: Specific email configuration

Main Options
Language and Localization
- Default language: Main language selection (e.g., Italian)
- Page title: Browser title customization
- Site properties: Copyright and property information

User Management
Access Configuration
- Required checkboxes: Definition of mandatory fields for the profile
- Profile edit URL: Configuration path for profile modifications
- Profile edit options:
- Allow complete modification
- Allow only password modification
- Disable profile modifications
- Redirect to external page

Password Management
- Password composition: Letters and numbers requirements
- Password history: Number of previous passwords to store
- Minimum length: Required minimum characters
- Password expiration: Days of validity (0 = no expiration)
- Mandatory password change: Force change at first login

User Registration
- Registration code: Code usage mode
- Required fields: Name and Surname mandatory
- Advanced mode: Use of advanced registration form
- Time limit: Available hours to confirm registration
- Registration type: Access control (Administrators only/Everyone)
- Privacy policy: Mandatory acceptance
- Registration code: Code activation for specific users

E-Learning
Course Configuration
- Course sorting: Display criteria in "My courses" area
- By Name
- By Company
- By Status
- Home page: Initial page selection (Dashboard)
- Course list: Activation on login page
- Course catalog: Display for unassigned users
- Course path: Display in "My courses" tab
- Redirection: Management of users not enrolled in courses

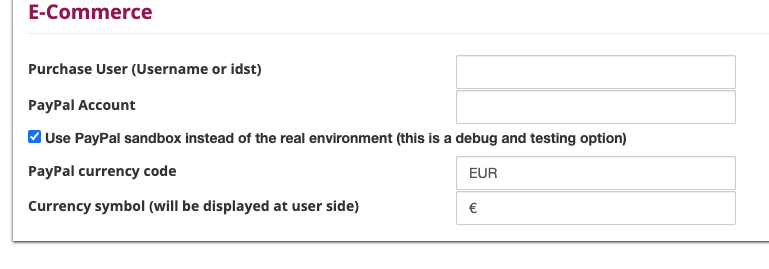
E-Commerce
- Purchase notifications: Username or ID configuration for notifications
- Currency symbol: Monetary symbol setting (e.g., €)
- PayPal environment: Sandbox mode for testing or real environment
- PayPal account: Account configuration for payments
- PayPal currency: Currency setting (e.g., EUR)
Advanced Configurations
Google Integration
- Google Analytics: Statistics tracking activation
- Google Code: Tracking code insertion

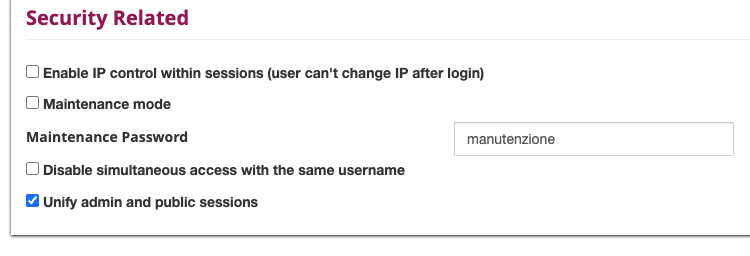
Security Configurations
- Simultaneous access: Disabling multiple access for same username
- IP control: IP consistency activation during session
- Maintenance password: Password setting for maintenance mode
- Site under maintenance: Maintenance mode activation
- Administration session: Public session sharing with administration
API and Authentication
SSO Configuration
IMPORTANT NOTICE: Unlike Forma's standard global configurations, in multidomain, users will be authenticated based on the email field, not the username. This allows the same person to be registered on the platform with different user accounts.
You will be able to create different SSO configurations for each domain:
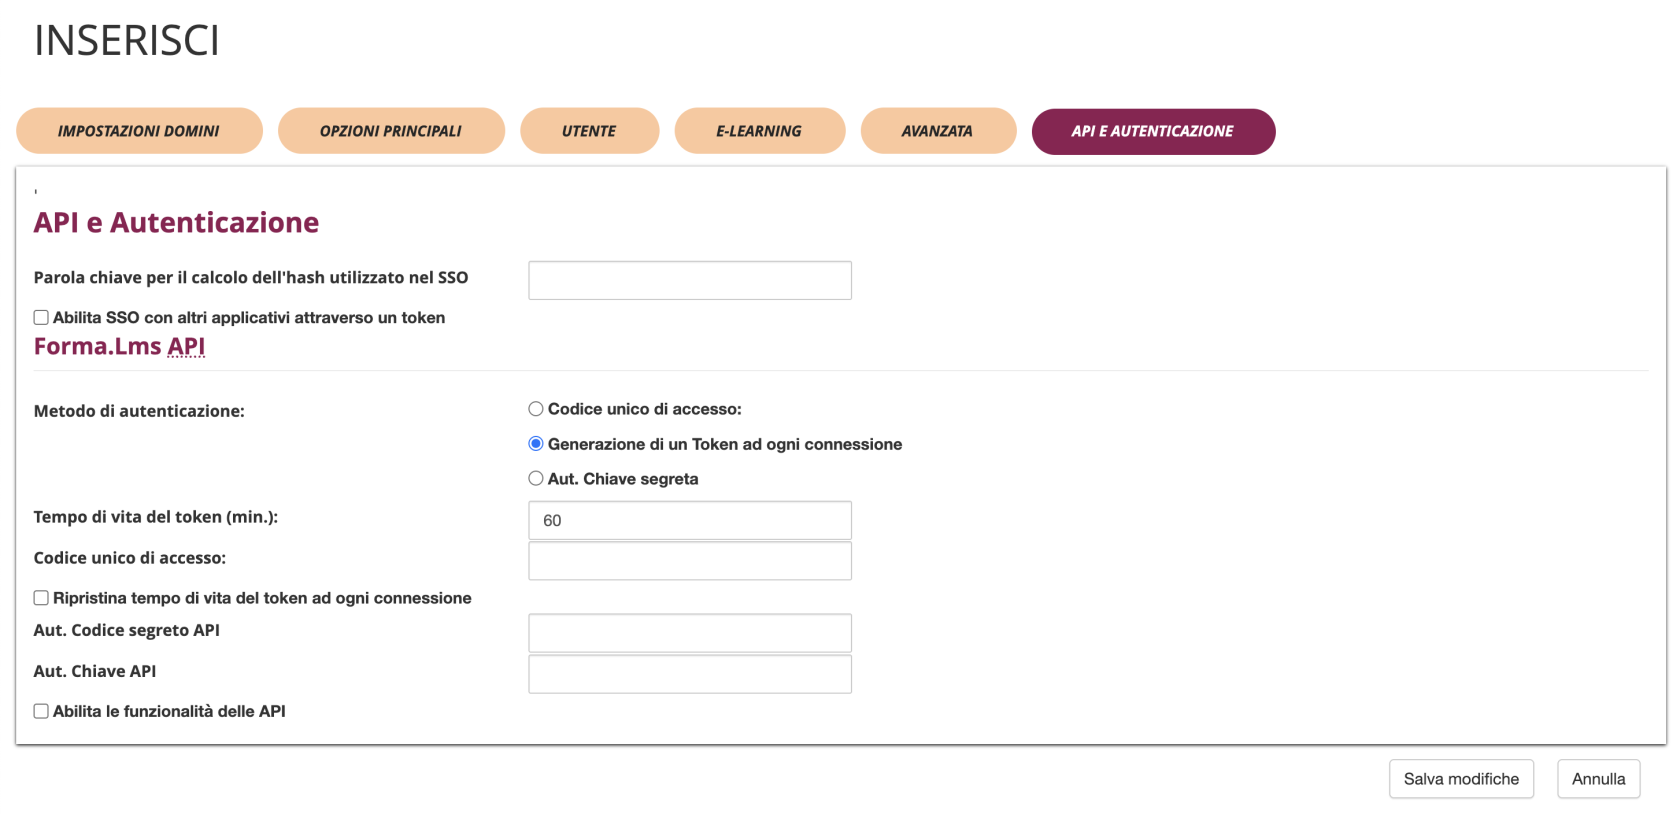
- SSO Password Key: Keyword for calculating the hash used in SSO
- Enable SSO with other applications through token: Checkbox to enable SSO functionality with external applications
Allowing SSO only for domain users
The plugin adds a new additional field, "Assigned Domain", to associate users to a domain. Note that:
- The dropdown list is automatically populated with the list of domains available on the platform.
- The SSO feature verifies that the user belongs to the corresponding domain, otherwise it prevents access.
Forma.LMS API
You will be able to create different configurations for API access for each domain
IMPORTANT NOTICE: Providing API access to different companies in multi-client platforms is strongly discouraged: the system is not able to filter data by domain with potential privacy risks
Authentication Method
The system supports three authentication methods:
- Single Access Code
- Uses a single code for all API access
- Simple but less secure option
- Token Generation on Each Connection (Default)
- Generates a new token for each API session
- More secure as tokens have limited lifespan
- Recommended for production environments
- Secret Key Authentication
- Uses a permanent secret key for authentication
- Balance between security and simplicity
API Configuration Options
- Token Lifetime (minutes): Set the duration for which tokens remain valid (default: 60 minutes)
- Single Access Code: Define a unique code for API access when using single code method
- Reset token lifetime on each connection: Checkbox to refresh token expiration time with each API call
- Secret API Code: Configuration field for secret key authentication
- API Key: Configuration field for API key authentication
- Enable API functionality: Master checkbox to activate all API features for the domain
Best Practices
Naming Convention
- Use descriptive names for profiles (e.g., "PROFILE-1")
- Maintain consistency in nomenclature
- Include client or project references
Template Management
- Use dedicated templates for each client
- Test templates before activation
- Maintain backups of custom templates
Security
- Set complex passwords for maintenance
- Configure IP controls when necessary
- Use sandbox environment for e-commerce testing
Troubleshooting
Domain Not Reachable
- Verify DNS configuration
- Check URL correctness in domain field
- Verify server accessibility
Template Not Displayed
- Check template existence in system
- Verify template file permissions
- Verify correct template-domain association
Email Problems
- Verify mail profile configuration
- Check SMTP parameters
- Test email sending from configured profile
SAML Integration
User Impersonation
1. Introduction
The User Impersonation plugin for Forma LMS allows authorized administrators to temporarily access the platform as another user.
The plugin is intended for support and debugging activities: an administrator can verify what a specific user sees in the LMS, reproduce access issues, and check course visibility or navigation problems without asking for the user's credentials.
During impersonation, the platform shows a visible banner and prevents learning tracking from being written as the impersonated user.
2. Installation and Activation
- Go to Administration > Plugin > Plugin Management.
- Locate User Impersonation in the plugin list.
- Click Install and then Activate.
When activated, the plugin registers:
- the impersonation controller;
- the Impersonation Log menu under the management area;
- the permission role used to enable impersonation actions.
3. Plugin Configuration
No external API credentials are required.
After activation, access depends on the administrator level and on the standard Forma LMS visibility rules:
- Super administrators can impersonate standard users and administrators, but not other super administrators.
- Administrators can impersonate visible standard users only.
- Administrators cannot impersonate other administrators or super administrators.
- Users cannot impersonate anyone.
The plugin requires Forma LMS 4.2 or later.
4. User Impersonation from User Management
4.1 Starting an Impersonation Session
Within the user management area:
- Open Administration > Users > User Management.
- Find the user to verify.
- Click the Impersonate action available on the user row.
- Confirm the operation.
After confirmation, Forma LMS switches the current session to the selected user and redirects the administrator to the LMS area.
The administrator can then navigate the platform with the same visibility and permissions as the selected user.
5. Active Impersonation Session
While impersonation is active, Forma LMS displays a red banner across the interface.
During the session, the plugin:
- blocks learning tracking writes, so course progress is not altered;
- bypasses forced password renewal for the impersonated user;
- bypasses concurrent access checks, so the real user's session is not invalidated;
- prevents nested impersonation sessions.
6. Stopping Impersonation
To return to the original administrator session:
- Click Stop Impersonation in the banner.
- The plugin restores the original administrator user.
- Forma LMS redirects back to user management.
The stop action is protected by a token and the session ID is regenerated when impersonation starts and stops.
If the session expires while impersonation is active, the plugin writes a timeout entry in the audit log.
7. Reports and History
The plugin provides an Impersonation Log page for super administrators.
The log shows:
- date and time of the action;
- administrator username;
- impersonated username;
- action type: start, stop, or timeout;
- IP address.
The log can be filtered by administrator and by impersonated user.
8. Security Notes
The plugin is designed for support and troubleshooting, not for normal user activity.
Main safeguards:
- no impersonation of yourself;
- no impersonation of super administrators;
- no administrator-to-administrator impersonation for standard administrators;
- CSRF-protected stop action;
- session regeneration on start and stop;
- visible banner during the whole session;
- audit log for traceability;
- tracking protection to avoid corrupting learning data.
Videoconference
Integrating Forma Cloud with external videoconference services
GoToWebinar
The plugin allows the integration between the FormaLms eLearning platform and the GoToWebinar video conferencing cloud service.
The version of API used for integration is the “GoToWebinar API Reference V2”.
Event creation
[immagine]
The following information is required when creating and editing an event.
- Event title
- Description (not mandatory)
- Day
- Time
- Duration
[immagine]
The user who creates the event will receive an email informing them that they have already registered for the event with the role of co-organizer.
Please note: due to a restriction of the GoToWebinar service it’s not possible to create “immediate” new sessions, but you must always set a starting time that starts in a few minutes from now, or the classroom will not be created.
Delete Event
You can only delete an event if it’s not expired
Enroll users to an event
The participants who can be selected for a GoToWebinar event are among the users enrolled in the course with which the video conferencing function is associated.
Creation of the Co-organizers
The users with whom it is possible to associate the role of co-organizer are selected from the users registered for the event.
Session recording
For a past event, it is possible to withdraw from the GoToWebinar cloud, the related link associated with the virtual classroom registration. A virtual classroom event begins when the co-organizer authorizes the start.
Once the event is over or when the co-organizer leaves the session, the registration processing phase begins. The registration link is available when registration processing is complete. When you have the link of the session, you can publish it in the “Registrations” section in the “Past events” tab.
The participant will have the opportunity to view the registration link, directly from the list of their expired events.
Report
The report allows you to track participation to the single session, displaying login and logout date and session duration.
Please note: the event session begins when the co-organizers authorizes the event start.
Key Meeting
The plugin allows the integration between the FormaLms eLearning platform and the Key Meeting video conferencing cloud service: it allows instructors to create virtual rooms directly from courses and manage registrations in sync between the Forma database and the KeyMeeting room.
Plugin Settings
General Plugin settings are available from the administration plugins management section, where you have to fill in the API URL, your username and the API key and Secret Key provided by Keymeeting.
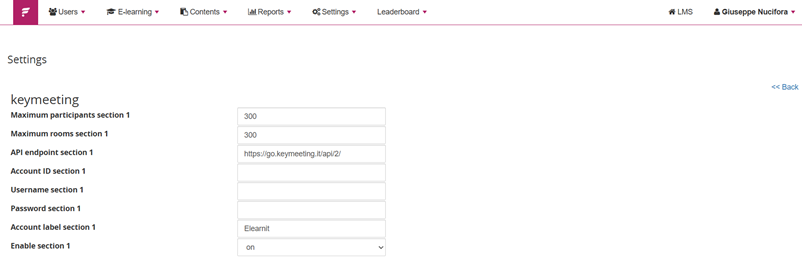
How to fill in the settings
- max participant: this is the maximum number of participants in Forma. Of course, regardless of what you put here, it’s your KeyMeeting account that manages this threshold
- max room: same as above: you can decide the maximum amount of learners in a room in Forma, but it’s KeyMeeting that manages this.
- API endpoint> it’s always https://go.keymeeting.it/api/2/ (unless KeyMeeting changes it).
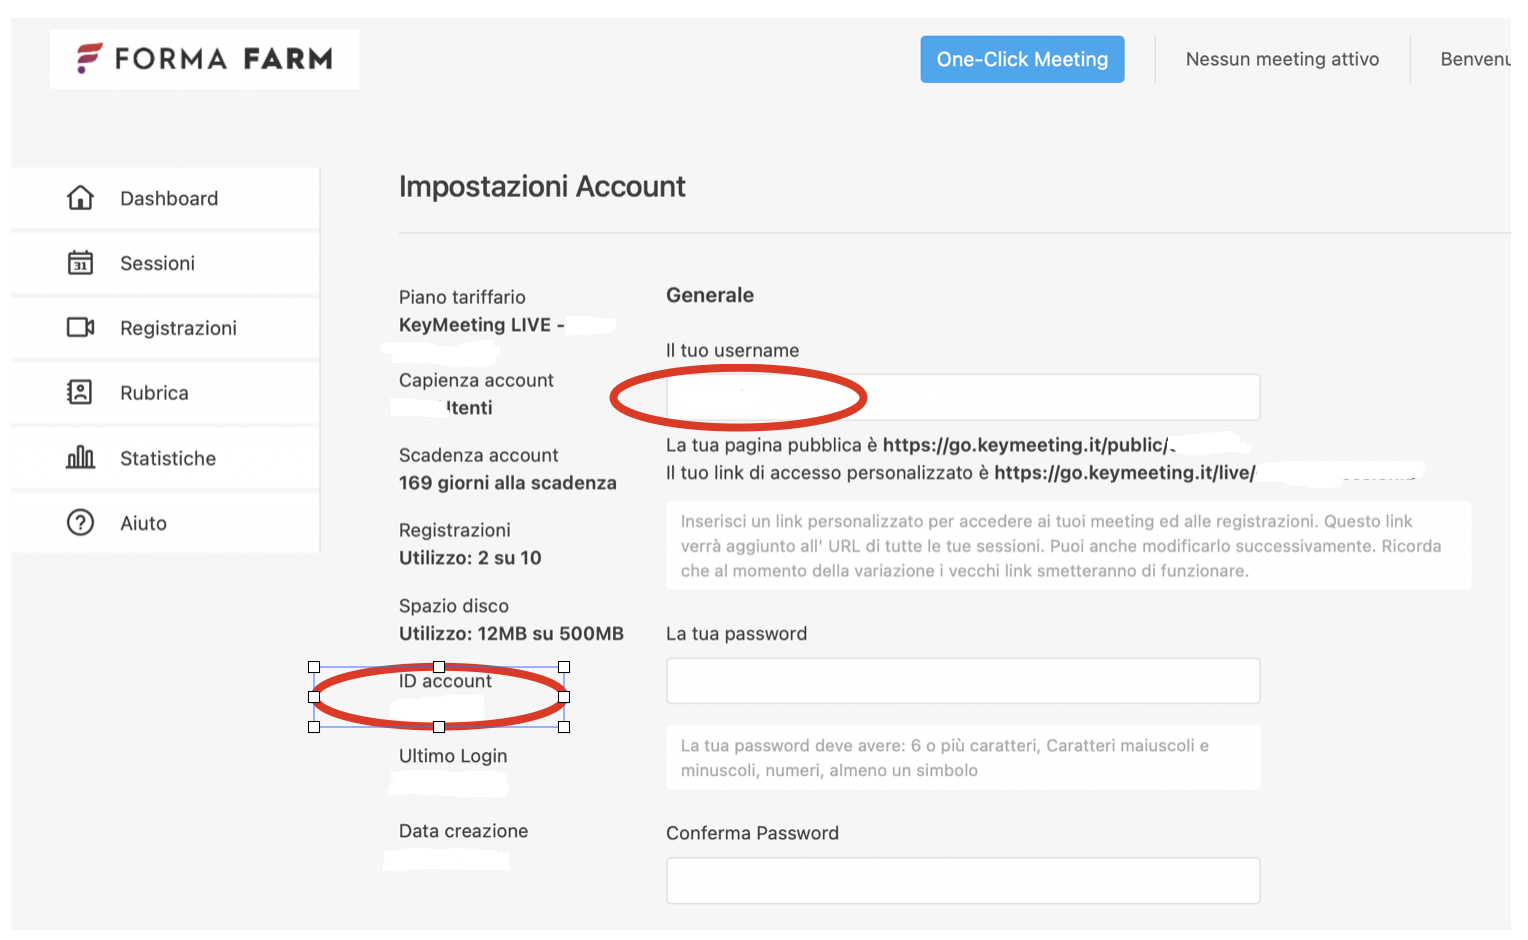
- Account ID: you are supposed to insert your username in numeric form, KeyMeeting should give you that number. See below
- Username: it’s the user name you are using to log in to your KeyMeeting account
- Password: it’s the password of your KM account
- Description: it’s a descriptive label
- Enabled: it should be set to “on”.
You can find your Account ID here, on your Keymeeting control panel:
Managing Events
Event creation
KeyMeeting events will be created and managed from the “Video Conference” module in course teacher area, usually it should be located in the Student Area or Collaborative area: as a Teacher you must be able to manage events, but students must be able to attend.
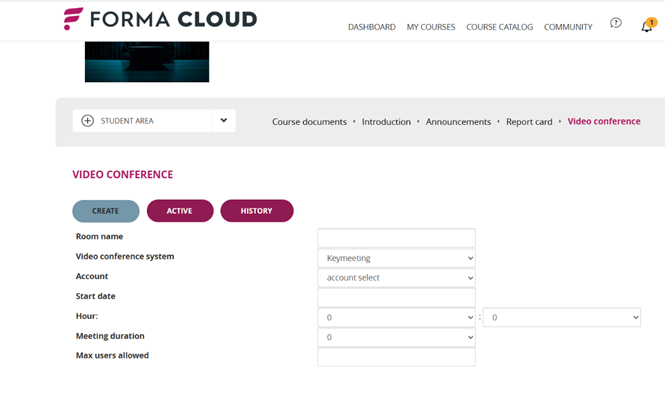
The following information is required when creating and editing an event.
- Event Title: Add a title for the webinar
- Videoconferencing System: if multiple service providers are available, choose “Conference Keymeeting”
- Account: if multiple service accounts are available, choose the desired one
- Start Date: Date of the webinar
- Hour: Time of the new webinar
- Meeting Duration: duration in hours
- Max users allowed: max number of allowed participants
Role of the host
The meeting host is the Forma Lms account who creates the meeting, regardless if he’s a course administrator or a teacher (it depends on the menu permissions). It’s recommended to keep Keymeeting’s credentials handy, in order to launch the meeting if requested.
Deleting an event
You can only delete an event if it’s not expired
Enroll users to an event
The participants who can be selected for an event are among the users enrolled in the course with which the video conferencing function is associated.
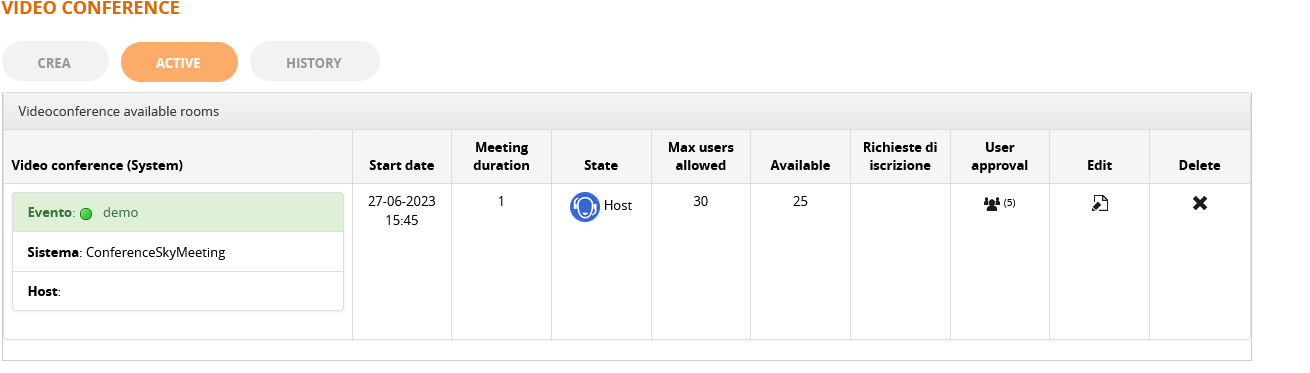
- In the event list, click the "User Approval".
- A table will appear showing all users enrolled in the course.
- Selection: Select the row of the users to be enabled.
- Confirm: By clicking "Confirm", the system:
- Saves the booking.
- Sends the data to KeyMeeting to generate unique access links.
- (Optional) Sends the invitation email with the direct link.
Please note that only users with an associated and unique email can be enrolled. Click on “user approval” to enrol users.
Accessing an event with Single Sign On
Users will be able to access a meeting both from within a course or, if enabled, from the "videoconference tab" in the MyCourses area
Enter an event from the course
From the “active” TAB, learners will be able to access the meeting in SSO, without having to insert user and password. They just have to click on the Keymeeting icon
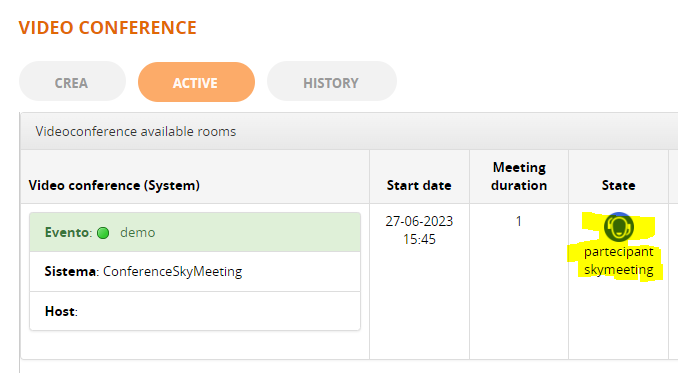
Videoconference TAB
If you enable the videoconference TAB you will also see the live events, the calendar and the past events on the top menu. You will also be able to access the meeting from there.
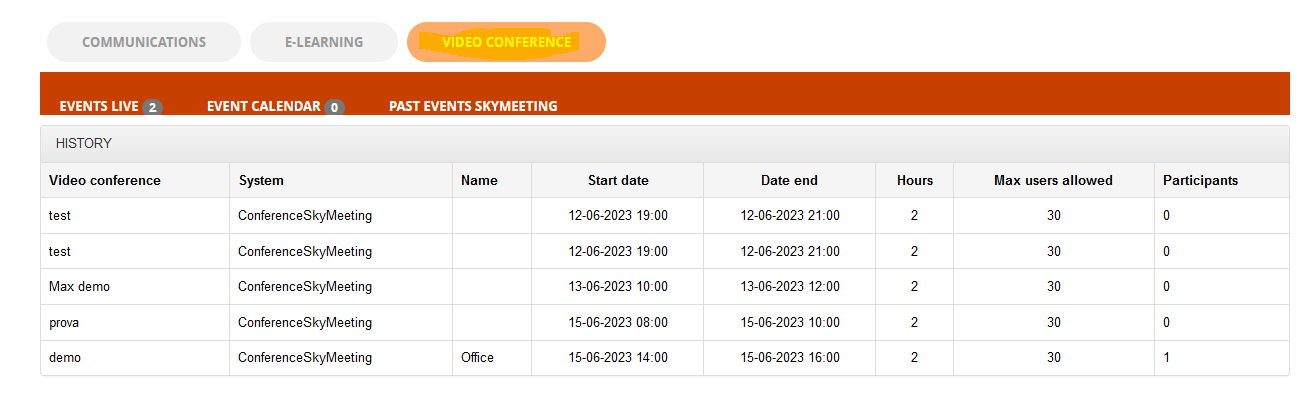
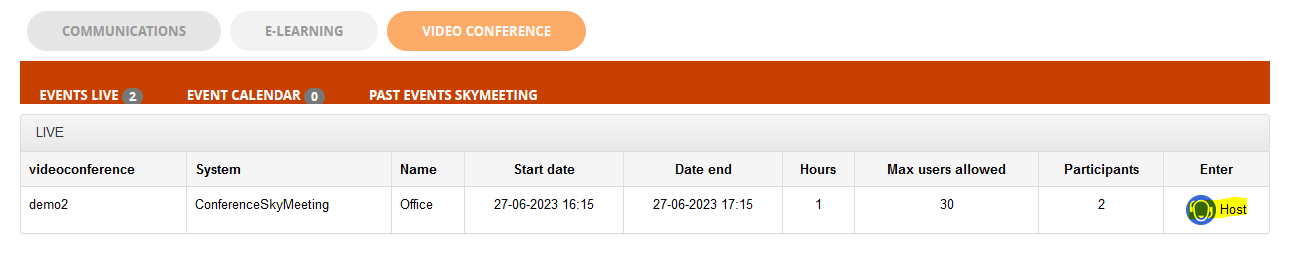
Report
The report allows you to track participation to the single session, displaying login and logout date and session duration. The log will be visible in the “History” button.
At the end of the event, in the History area of the Video Conference module, the administrator can view:
- List of attendees.
- Connection duration per individual user.
- Any error logs or activity tracking entries.
ECM Pack
Add-on features designed for the italian ECM training
Agenas
1 Configuration
1.2 Plugin Configuration
Plugin settings are available under
Admin > Settings > Plugin Manager > Agenas- Settings.
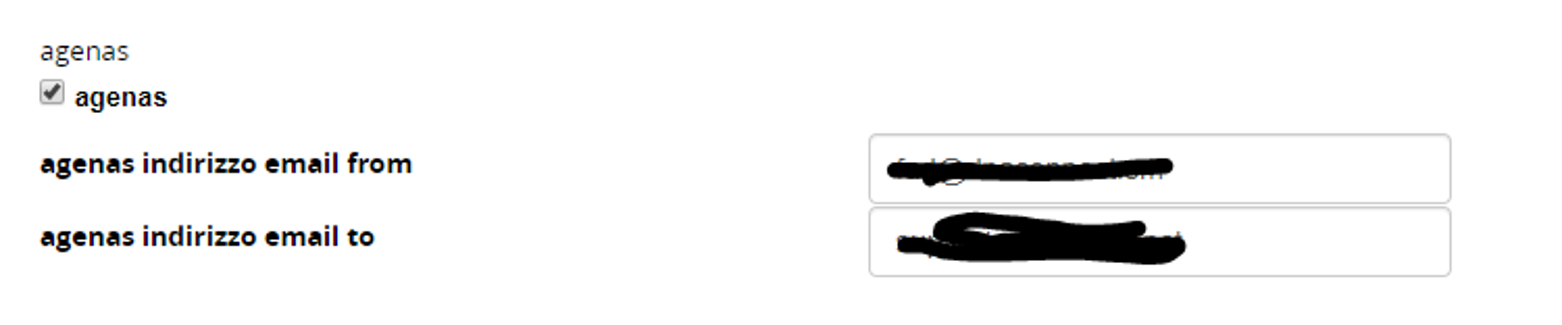
- Please flag “agenas” to enable the plugin
- insert the “from” email address
- insert the “to” email address (Agenas’ email address)
1.3 Plugin Removal
To remove the plugin, go to
settings > plugin manager
- Click “Deactivate”
- Click “Uninstall”
- Click “Plugin Purge”
1.4 Reinstalling and updating the Plugin
To update or reinstall the plugin
- Follow the uninstallation procedure
- Go to:
Settings > System Configuration > Advanced > click “Clear Twig Cache”
2 Using Agenas plugin
2.1 Creating a Customer Satisfaction test.
The plugin lets you use the Customer Satisfaction test to enable users to send a copy of their questionnaire to Agenas.
Please add a regular Forma Lms test. Add the description and, in the bottom left area, you will find a checkbox. Flag the “gradimento” checkbox to enable using the test as an ECM Customer Satisfaction test.
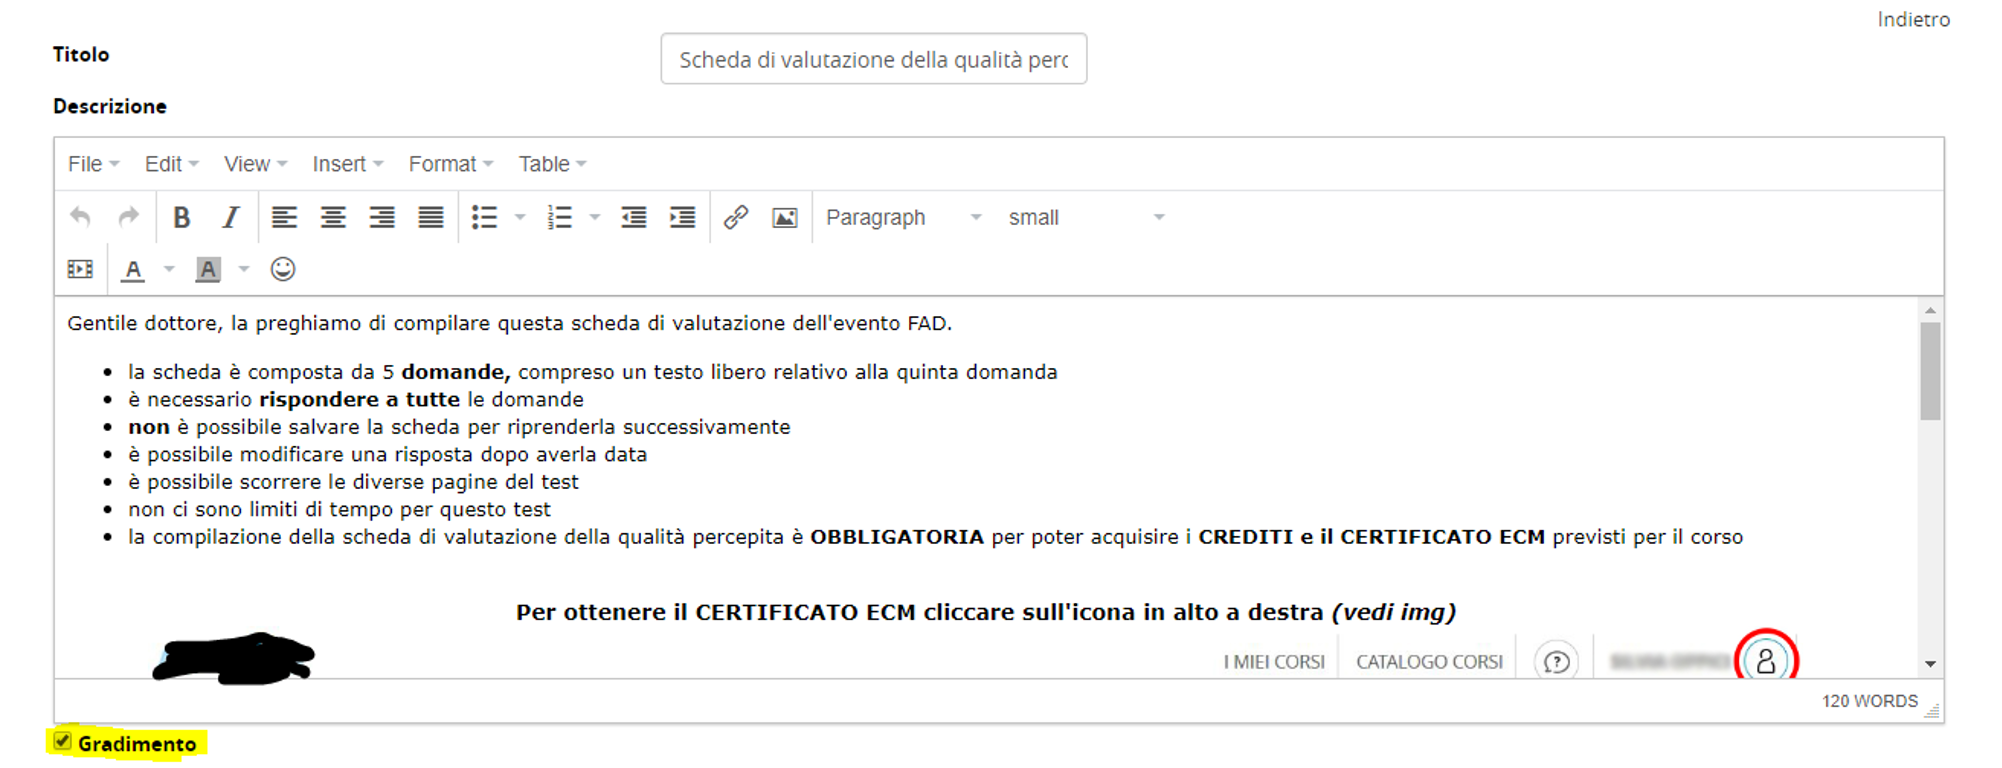
Then insert the 5 questions requested by Agenas. All of them need to be SC questions. You should also inser an ET (extended text) question to let users insert some examples of commercial bias, and a TL (title) element to tell users that in the following screen they will be able to send the test to Agenas.
Question 5 is the one where you should insert the reference to the sponsor, if applicable.
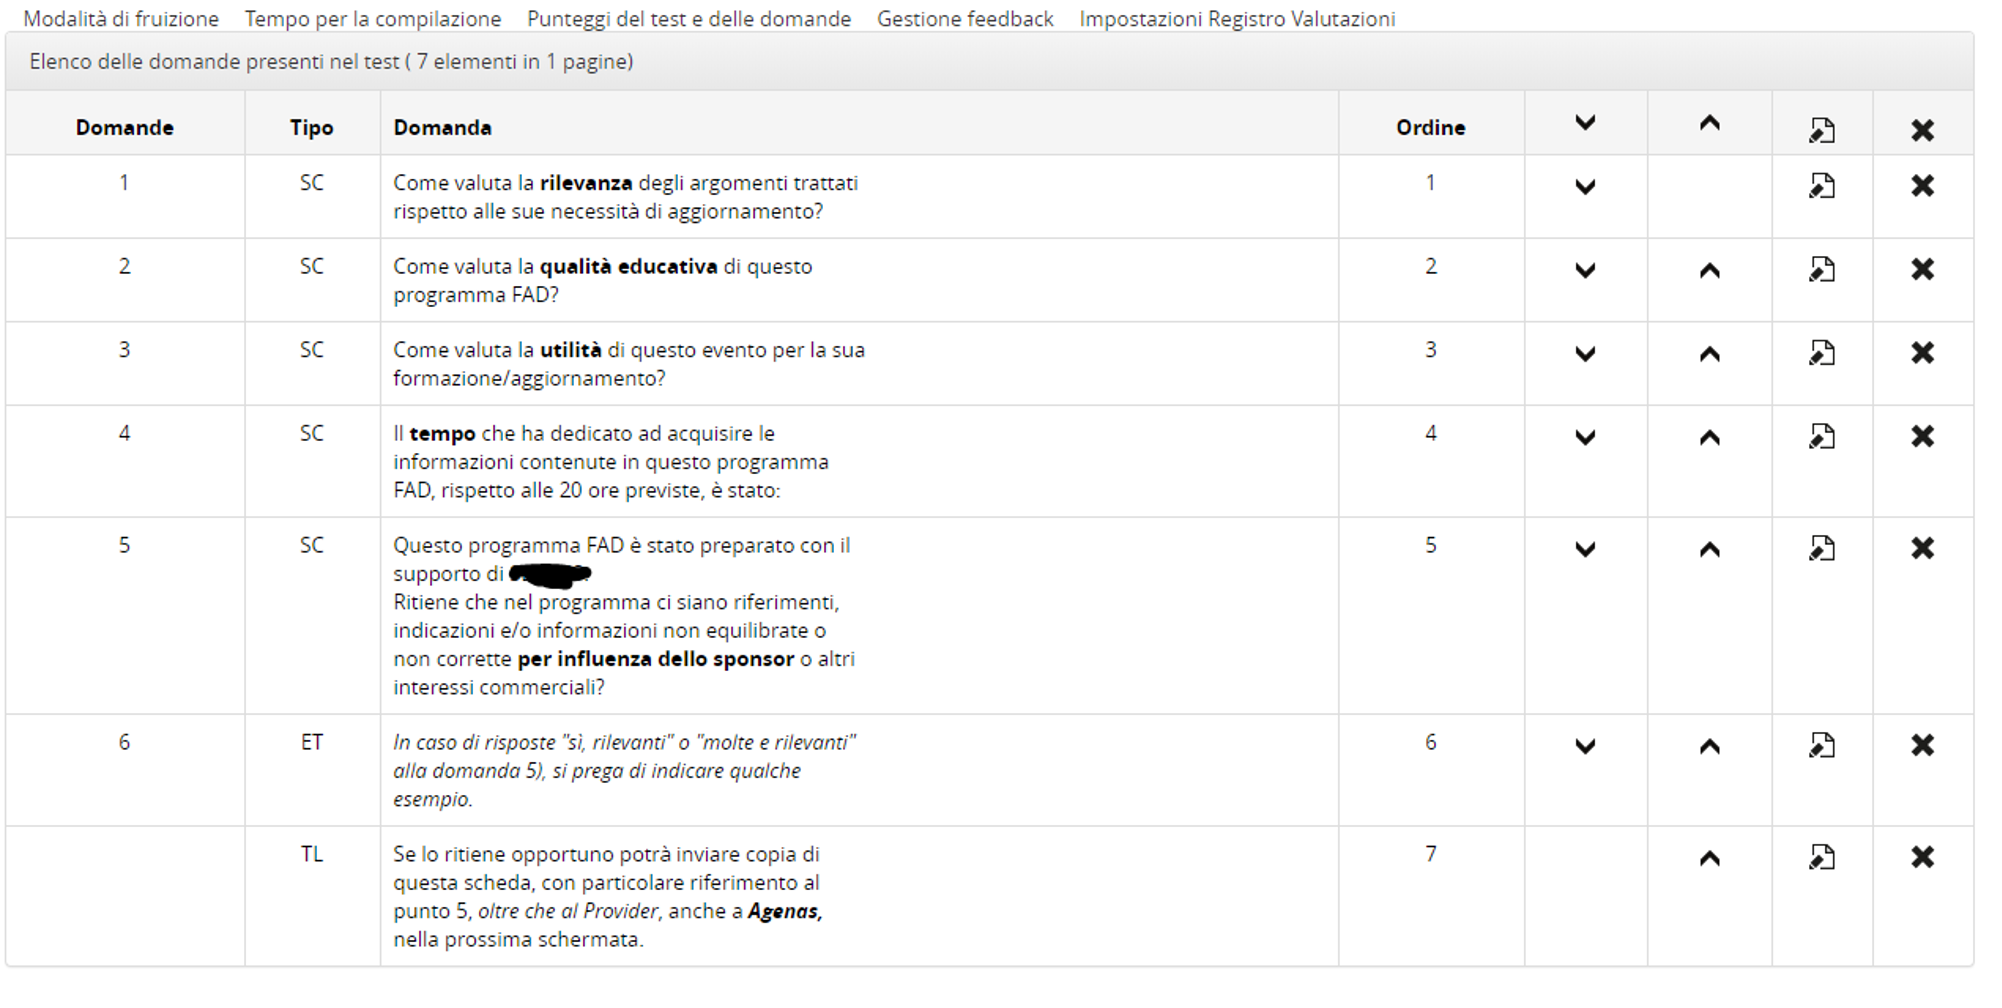
Remember: even if there is no right or wrong question, you are still supposed to insert a “correct” answer.
Please remember to set a “0” passmark (in the score management section)
Also remember (test option) to:
- not to show the score at the end
- not to show the automatic test information
That’s all.
2.2 What the user will see
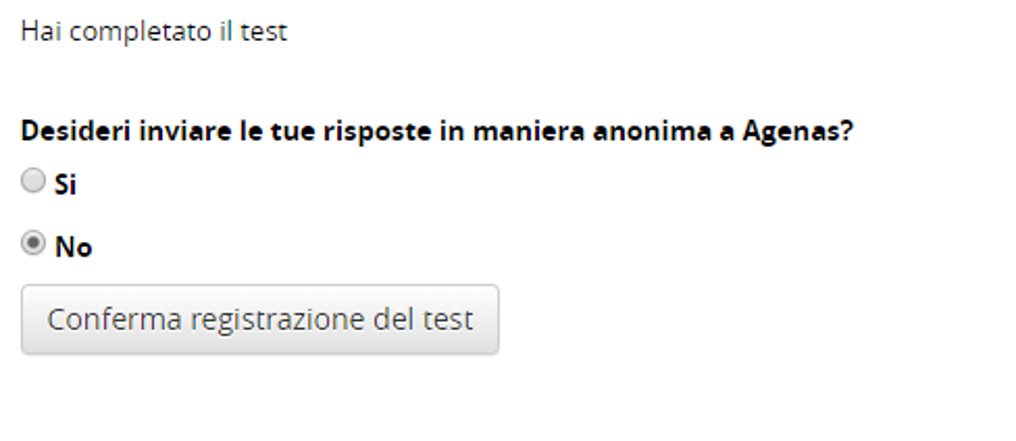
After completing the test, the user will be prompted in this screen, with the preselected “no”. He is supposed to click on “conferma registrazione del test”.
Managing SCORM
Gestire lo SCORM in Forma Cloud
Best practices and troubleshooting in managing with SCORM objects
Informazioni Generali
Cos'è lo SCORM
SCORM significa Modello di Riferimento per Oggetti di Contenuto Condivisibile ed è una raccolta di specifiche tecniche che consente lo scambio di contenuti digitali in maniera indipendente dalla piattaforma.
Un pacchetto SCORM è un archivio .zip che contiene:
-
il file imsmanifest.xml, che descrive la struttura del corso
-
risorse multimediali e pagine HTML (gli asset)
-
metadati per il tracciamento (tempo, punteggio, stato).
Versioni supportate: SCORM 1.2 e SCORM 2004.
Lo SCORM quindi non specifica un formato di file che possa rappresentare l'oggetto didattico: qualsiasi formato può essere incluso in un pacchetto SCORM, a seconda del fatto che l'oggetto sia preposto a comunicare con un LMS o ad essere un oggetto di un supporto che non comunica con la piattaforma di e-learning. Se questo oggetto è programmato per comunicare con la piattaforma prende il nome di SCO, se invece è un oggetto di supporto prende il nome di ASSET. Un asset ad esempio è un’immagine o un video contenuto all’interno delle cartelle dello SCORM.
Standard e Authoring supportati in Forma Cloud
SCORM: Forma supporta SCORM nei formati 1.2 e 2004
Qualunque oggetto SCORM che rispetti questi standard dovrebbe funzionare correttamente, ma in alcuni casi si sono riscontrate anomalie dovute agli strumenti di authoring utilizzati per generare il pacchetto. Ad oggi vengono caricati e fruiti regolarmente oggetti SCORM realizzati con i seguenti tools:
- Articulate Storyline
- Articulate Rise
- Articulate Studio
- iSpring Presenter
- iSpring Libri
- iSpring Pagine
- Camtasia
- ScormHero
- ......
Best Practices
Checklist prima del caricamento
-
Verifica la struttura: testa il pacchetto con SCORM Cloud o Rustici Validator.
-
Nome del file: evita sempre spazi e caratteri speciali (accenti, apici, virgolette, parentesi ecc.), è una buona pratica in generale per qualunque file da elaborare e gestire su un applicativo web ;). A questo proposito, si veda questa guida alla gestione dei nomi file per gli oggetti SCORM.
-
Compressione: tutti i file devono essere nella radice dello zip, in particolare il manifest non deve mai essere in una sottocartella
-
Peso massimo: il peso massimo consentito per il caricamento di files in Forma Cloud è di 1 GB. In ogni caso, se il tuo file supera i 300 o 400 mb ti consigliamo di provare la procedura di caricamento via FTP
-
Backup: conservare sempre una copia del pacchetto originale.
Importante: il nome del file è una cosa diversa dal titolo del corso. Nell’attributo titolo del tuo SCORM puoi usare gli apostrofi, e se proprio non ne puoi fare a meno pure le parentesi.
Configurazione oggetto SCORM prima della pubblicazione
Prima di pubblicare un oggetto SCORM da caricare in Forma LMS, è necessario definire correttamente i criteri di tracciamento, poiché influenzano la modalità di monitoraggio del corso in piattaforma. In fase di esportazione, è possibile scegliere tra:
- Completamento del corso basato sulla visualizzazione dei contenuti (es. esempio 90% o 100% delle slide visualizzate dall'utente)
- impostare lo stato su completed / incomplete
- Completamento del corso in base a un test contenuto nello scorm: basata sul punteggio ottenuto
- Impostare lo stato su passed / failed
Nota
Le ulteriori opzioni dipendono dal tool di authoring utilizzato (es. Articulate, Captivate, ecc.), ma ai fini dell’integrazione con Forma LMS, i parametri sopra indicati sono essenziali per garantire un corretto tracciamento.
Caricamento su Forma Lms
Puoi scaricare un pacchetto SCORM su Forma Cloud all'interno di qualsiasi corso come per gli altri materiali didattici. Se hai dubbi puoi fare riferimento alla documentazione ufficiale di Forma LMS.
Quando carichi un oggetto SCORM, Forma fa due cose:
-
crea una cartella (sotto files/appLms/scorm) che si chiamerà come il titolo del tuo oggetto zippato, più dei codici che indicano l’ID dell’utente e altre informazioni tecniche. Ricorda questa cosa, ti servirà nella sezione “caricamento via FTP” e in altre domande frequenti.
-
all’interno della cartella, tutti gli asset (i file che erano contenuti nel pacchetto) vengono decompressi.
Cos’è il checkbox “Lista completa oggetti”?
Questo checkbox appare in basso a sinistra in fase di caricamento dello scorm. Ignoralo, nel 99,99% dei casi non ti serve.
Va usato solo nel caso di SCORM “multiSCO”, ossia uno SCORM fatto da tanti SCORM.
Test di Fruizione
Prima di aprire il corso ai tuoi utenti, esegui sempre un test completo di fruizione:
- aprire il corso come utente
- Eseguilo per intero provando eventuali interazioni
- Verifica che il tracciamento sia corretto e il modulo risulti completato
Puoi controllare se il tuo SCORM ha dei problemi di fruizione o di tracciamento anche prima di caricarlo su Forma, usando il servizio gratuito SCORM Cloud: https://app.cloud.scorm.com/. Questo servizio ti dirà se il tuo oggetto viene riprodotto e tracciato correttamente rispetto allo standard SCORM. Tuttavia non necessariamente ti dice se è stato pubblicato correttamente per Forma Lms, si veda infatti il paragrafo precedente.
Troubleshooting
Problemi al caricamento o al lancio dell'oggetto
Errore: imsmanifest.xml non trovato
Se al caricamento (Area Docente – Gestione oggetti didattici – Carica nuovo – SCORM – Sfoglia – Carica content package) il sistema ti dice che non trova quel file (è un alert giallo) , vuol dire che non c’è 😊.
I motivi possono essere due:
-
Non è uno SCORM. Chi ha pubblicato il file non ha pubblicato uno SCORM ma qualcosa d’altro.
-
Soluzione: ripubblicare nel modo corretto
-
-
È stato zippato “male”, ossia dentro allo zip non ci sono direttamente gli asset come in Figura 1 e non c’è il “manifest”, ma dentro allo zip c’è una cartella e dentro alla cartella ci sono gli asset. Questo accade tipicamente quando anziché fare comprimere in automatico dal tool di authoring - cosa che tutti i tool fanno normalmente - l'utente decide di comprimere manualmente in seguito, ed erroneamente comprime una cartella di troppo.
-
Soluzione: comprimere il file in maniera corretta.
-
Errore: quota exceeded
Se al caricamento il sistema restituisce l’alert giallo “quota exceeded” vuol dire che hai raggiunto il “peso” massimo che hai impostato in piattaforma per i corsi. Di default su Forma Lms è 500 mb. Niente paura: è un’impostazione che puoi modificare, dalle configurazioni generali di Forma Lms / elearning. Puoi inserire la dimensione che ritieni giusta. Questa impostazione si applica a tutta la piattaforma.
Errore: Timeout o 500
Se durante il caricamento il ristema risponde con errori di timeout o errrori 500, significa che non è in grado di completare l'inserimento dello zip in piattaforma, generalmente potrebbe dipendere da 2 tipi di problemi:
- Errori nel file imsmanifest XML
- Asset del corso in formati non accettai: ad esempio video con mimetipe particolari
In questi casi, testare prima l'oggetto su scormcloud come indicato sopra
Problemi durante la fruizione
Di seguito elenchiamo alcune possibili problematiche durante la fruizione dell’utente, con le relative cause e soluzioni.
Il corso non si apre
Corso non si apre → popup bloccati o cache da pulire.
Completamento dell’oggetto (spunta verde / arancione)
L’oggetto SCORM, una volta completato, dovrebbe presentare la spunta verde.
Se un utente sostiene di averlo visto tutto senza ottenere la spunta verde, le cause (e relative soluzioni) possono essere molteplici.
In linea generale, è opportuno poter intervenire sul sorgente del corso, perché le opzioni di pubblicazione possono influire sul completamento.
Cause possibili
-
L’utente NON lo ha veramente fruito tutto: questo lo si può scoprire verificando se tutti i capitoli o le sezioni risultano completati. Purtroppo l’unico modo di saperlo è impersonare l’utente. Soluzione: dire all’utente di completare tutto, segnalando le parti mancanti.
-
l’utente ha fruito tutto ma NON ha passato un eventuale test finale: se l’opzione di completamento era basata sul test, un punteggio insufficiente risulta in un mancato completamento. Soluzione: superare il test finale
-
l’utente ha perso la connessione a internet, o si è sloggato dalla piattaforma per inattività, mentre era all’interno dello SCORM, per cui pensa di averlo completato ma la piattaforma non lo ha riscontrato.
Risposte da dare allo sviluppatore
-
Disallineamento tra opzioni di completamento e opzioni di pubblicazione “giuste” per Forma LMS. Nello standard SCORM possono esserci varie coppie di opzioni, ogni LMS (Moodle, Docebo, Forma Lms) ha le sue preferenze. Per Forma LMS queste sono le opzioni da raccomandare:
-
Se completamento per numero slide >> indicate allo sviluppatore di scegliere l’opzione “Completed / Incomplete”
-
Se completamento in base a superamento del test >> va indicata l’opzione “Passed / Failed”
-
Problemi di “segnalibro”
L’utente rientra nell’oggetto e NON viene portato nel punto in cui era rimasto (nella slide o nella sezione in cui era uscito).
In questo caso, la ragione è quasi sicuramente che l’oggetto
-
è molto lungo (più di 50 slide)
-
è stato pubblicato per SCORM 1.2 anzichè 2004, 4° edizione
Lo standard 1.2 ha dei problemi coi dati di “segnalibro” in corsi molto lunghi. In un caso come questo la soluzione è ripubblicare il corso per SCORM 2004.
Lancio lo SCORM e non funziona
Innanzitutto dobbiamo capire cosa significa esattamente “non funziona”. Ci possono essere comportamenti diversi con cause diverse.
Non trova le risorse
Se lanci lo SCORM e lo “SCORM player” si apre con una pagina di errore in cui dice che non trova gli asset, questo vuol dire che la cartella creata da Forma al caricamento esiste ancora, ma è vuota. Probabilmente qualche collega ha cancellato gli asset che vi erano contenuti.
Soluzione: ricarica SOLO gli asset nella cartella, via FTP. Si veda sezione apposita. La buona notizia è che probabilmente non hai perso il tracciamento.
Lo SCORM si apre, ma non riproduce i video che contiene
Se i video sono “embeddati” da YouTube o Vimeo o simili, controlla
-
i permessi di visualizzazione dei video su YT, Vimeo o sul servizio di streaming che stai usando
-
controlla col tuo fornitore di Forma Lms se nelle politiche di sicurezza della tua piattaforma sono abilitati i video YT o simili.
Altri problemi:
-
- Progressione non salvata → chiusura non corretta del player.
-
Tempo non tracciato → parametri SCORM errati o browser incompatibile.
Caricare gli SCORM via FTP
Caricare gli oggetti Scorm via FTP
Questo è un metodo alternativo di caricamento che può essere utilizzato in due casi, sia per il primo caricamento che per la sostituzione.
Perché usare questo metodo?
Ci sono due motivazioni principali per usare questo metodo:
-
Il file è troppo pesante. Il caricamento via browser, specie in presenza di connessioni lente o di scorm molto pesanti (ad esempio, centinaia di MB o qualche GB), non è il metodo più efficace. Si rischia che la piattaforma vada in timeout, magari una volta arrivati al 90%, e di dover ricominciare da capo.
-
Sostituzione degli asset. L’altro motivo tipico è quando un corso è già iniziato, gli utenti ne stanno già fruendo, ma ci si accorge che lo scorm ha dei refusi o qualche contenuto da sostituire. In questo caso, il caricamento via FTP è l’unico modo per aggiornare i contenuti dello scorm senza perdere il tracciamento.
Caricamento iniziale
1. Creare un file zippato con solo il manifest
Il primo step è creare un pacchetto SCORM che contenga solo il manifest, ossia l’indice del corso.
Occorre individuare il file manifest nella cartella in cui abbiamo pubblicato il corso. L’esempio sotto è la tipica cartella di output di uno scorm realizzato con Storyline:

|
Comprimiamo questo file e magari nominiamolo con un nome “parlante”. Tecnicamente, anche questo è un pacchetto scorm. |

2. Caricare il manifest in piattaforma
A questo punto, carichiamo il nostro “mini-scorm” in piattaforma con le solite modalità:
-
Nuovo oggetto didattico>carica oggetti scorm>nuovo>scegli file>carica content package
-
Il file si caricherà in un istante, tanto peserà 2kb
-
A questo punto è presente tra gli oggetti del corso, sia pure come indice “vuoto”
3. Caricamento degli asset del corso
Andiamo nel nostro account FTP e raggiungiamo la cartella che è stata creata in automatico dalla piattaforma.
Si tratterà
-
Dell’ultima in ordine cronologico
-
Con un nome uguale al nome del pacchetto .zip appena caricato, preceduto da un prefisso

Entriamo nella cartella, e carichiamo via FTP tutti i file contenuti nella cartella in locale dentro a cui abbiamo pubblicato il corso tranne appunto il manifest (perché lo abbiamo appena caricato da solo).
Una volta completato il caricamento, il gioco è fatto. Il nostro Learning Object (LO) a questo punto è correttamente fruibile in piattaforma.
Sostituzione di scorm già esistenti
La sostituzione degli scorm avviene allo stesso modo, con l’esclusione del primo step:
-
Ripubblichiamo il nostro scorm dopo le correzioni
-
Non abbiamo bisogno di ricaricarlo in piattaforma, né di creare il pacchetto .zip con il solo manifest
-
Raggiungiamo la cartella in cui il LO è contenuto, cancelliamo tutto tranne il manifest.
-
Carichiamo tutti i file del nostro scorm tranne il manifest
Naturalmente quando cancelliamo i file vecchi il LO sarebbe inaccessibile, per cui possiamo valutare di chiudere temporaneamente il corso finché non abbiamo ricaricato i file aggiornati. L’operazione solitamente dura pochi minuti.
Come individuare la cartella in cui è contenuto uno SCORM?
Lancia lo SCORM, vai su “strumenti di sviluppo” del tuo browser e potrai individuare il nome della cartella che stai cercando. A seconda del browser (Edge, Chrome, Firefox…) la sezione potrebbe essere raggiungibile con percorsi diversi, ma con CTRL + MAIUSC + I dovrebbe aprirsi in automatico

Dismissed
Archived pages and instructions for features and pliugins no more supproted
Prestashop
1. Installation and Configuration
The Forma Lms / Prestashop plugin is actually 2 separate plugins.
One to be installed to Prestashop, one to be installed to Forma Lms.
You can install them in no particular order, but they have to be both fully installed and configured for it to work properly.
1.1 Install the plugin to Prestashop
Login to your Prestashop e-commmerce site as Administrator, install the “commerce.zip” plugin to PrestaShop “modules” section.
After installing it, look for Forma Lms Commerce in the “modules” section

and click on “configure”
You need to provide 2 settings:
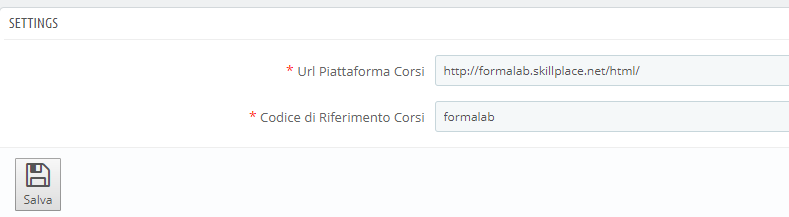
Insert the URL of your Forma Lms installation, and choose a code that you will use to link courses between the 2 environments. You can choose any code you like, you will have to use the same code in Forma as a “prefix” to the course code. More on that later.
1.2 Plugin Install to Forma Lms
The plugin is called “formalmscommerce.zip”.
You can install the plugin by uploading the zip package from the menu
Admin > settings > plugin manager
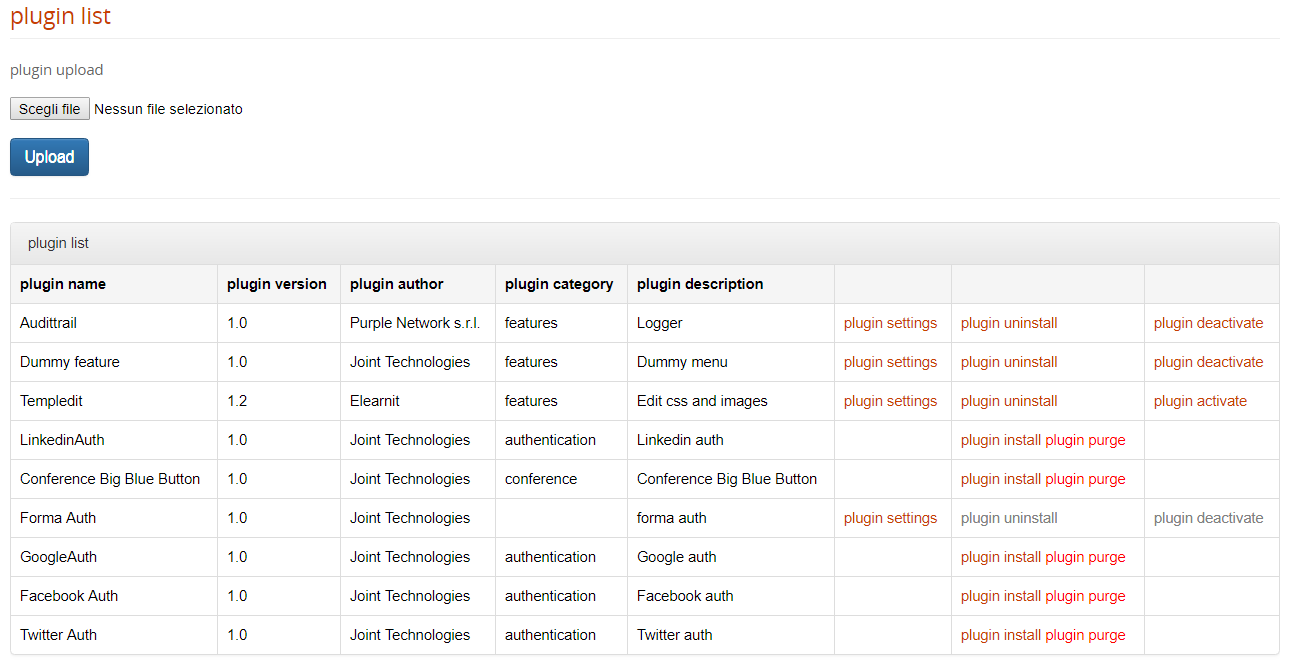
- Select the zip file from your computer and click upload
- Click “plugin Install”
- Click su “plugin activate”
1.3 Enable the Forma Lms API’s
Go to the administration section, then click on
Settings > system configuration > settings > API and Authentication
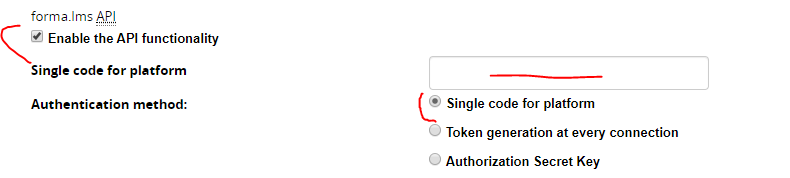
- enable the API functionality
- select the radio button “Single code for platform”
- Leave the related field blank
1.4 Plugin Removal
To remove the plugin, go to settings > plugin manager and:
- Click “Deactivate”
- Click “Uninstall”
- Click “Plugin Purge”
1.5 Reinstalling and updating the Plugin
To update or reinstall the plugin
- Follow the uninstallation procedure
- Go to:
Settings > System Configuration > Advanced > click “Clear Twig Cache”
3. Reinstall it, following the installation instructions
2 Using the Prestashop plugin
2.1 Creating a course and linking it to Prestashop
Create a course in your Forma Lms installation, and use the same prefix that you have chosen in Prestashop
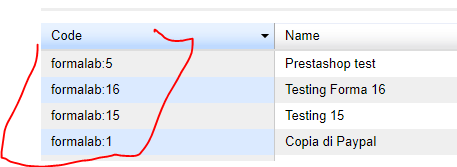
After the prefix, please insert a colon and a unique ID. The resulting code will link the course in Forma to the related product in Prestashop.
For example, formalab:1
2.2 Creating a product in Prestashop and linking it to Forma
In Prestashop, from “Catalogue” go to “Products”.
- add new product
- select “virtual product” and add the name, as well as the same code that you have set in Forma Lms. The prefix plus the unique ID number.
- then complete the configuration just like in the regular Prestashop workflow.
2.3 How to buy a course
Once everything is set up in Prestashop and Forma, you’re ready to start selling courses on your Prestashop e-commerce website.
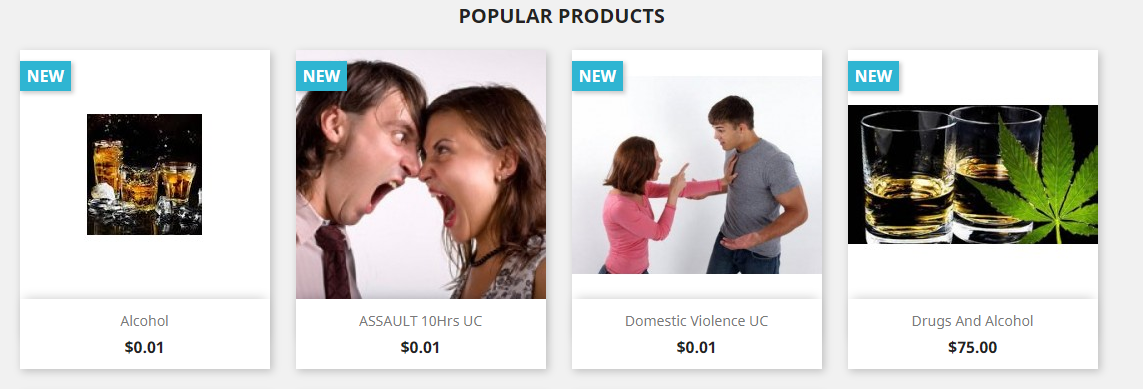
The user chooses a product, then proceeds to check out.
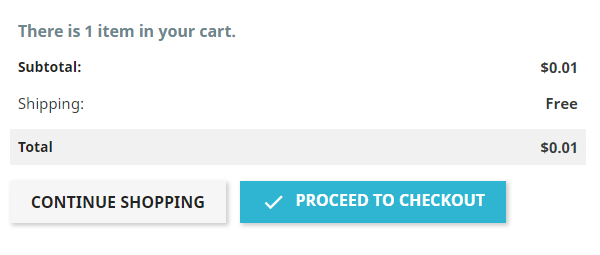
If the user already has an account, he just pays.
If not, he’ll register a new account and will receive an automatic e-mail with his credentials.
After registering, the user will also be registered to Forma Lms.
If the user pays with credit card, the order status will automatically be “Accepted” and he will automatically be enrolled to the same course in Forma Lms.
If the payment is with wire transfer, you will need of course to manually accept his payment and “update status” in order for the Prestashop to Forma workflow to be closed.
Plugin Installation
General procedures for plugin installation, update, and removal
Please note that since January 2025 Forma Cloud plugins are not available anymore for public download. This page is kept as a reference only for legacy users.
Plugin installation
You can install the plugin by uploading the installation zip package from the Forma LMS plugin manager. Log in your Forma installation as super-administrator and browse to:
admin > settings > plugin manager
- Select the zip file from your computer and click upload. The plugin will now be listed in the available plugins table.
- Click “plugin Install”
- Click on “plugin activate”
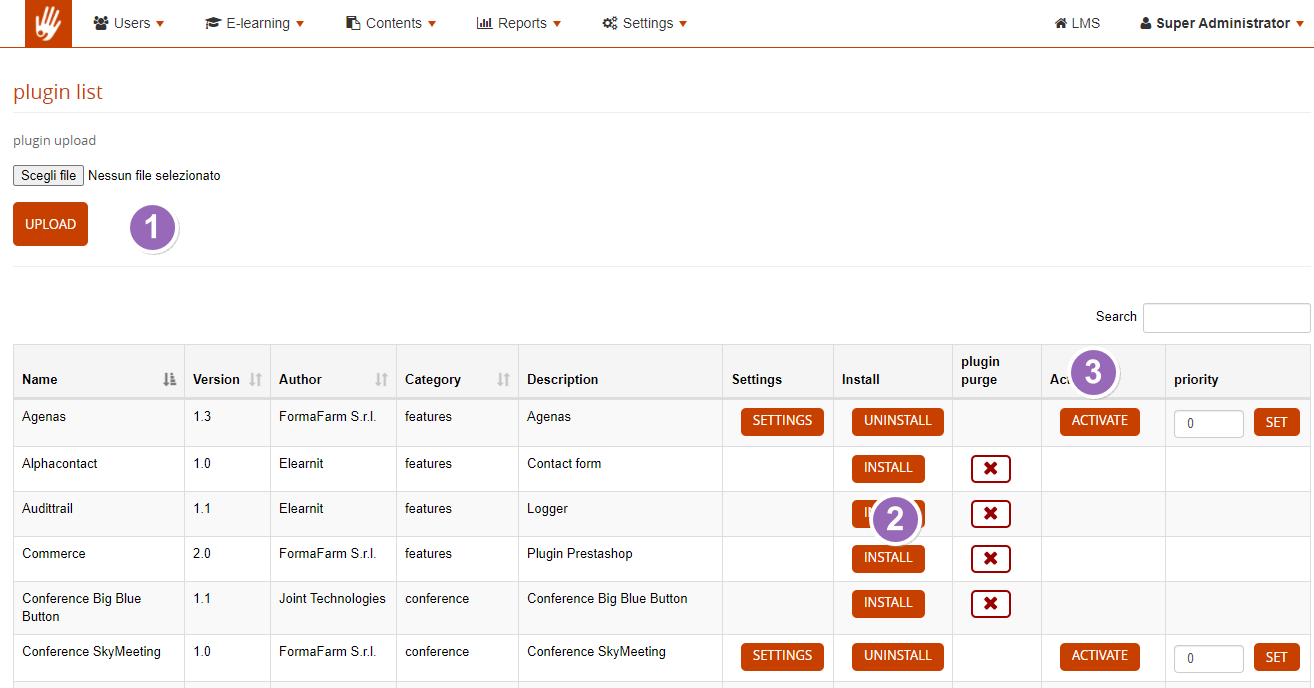
Plugin removal
To remove the plugin, go to settings > plugin manager and::
- Click “Deactivate”
- Click “Uninstall”
- Click “Plugin Purge”
Plugin Update
To update or reinstall the plugin:
- Follow the uninstall procedure
- Go to Settings > System Configuration > Advanced > click “Clear Twig Cache”
What happens if I installed the wrong version and my Lms crashes?
Never mind, you can always disable a plugin from your DB by setting to 0 the value of the “active” field in the core plugins table. This is the query you have to launch from the SQL panel of phpMyAdmin to modify the field:
UPDATE `core_plugin` SET `active` = 0 WHERE `name` = 'Coursealert';Of course this is an example based on Coursealert. Replace the value with the name of the plugin you want to disable.
Translations
Plugin translations can be edited and managed via the standard Forma language manager.
Just search for some word or filter by the selected plugin, and translate as for any other Forma label.