# Lotify

## Setup and Configuration

### Plugin Settings

[![image.png](https://bookstackprod.s3.amazonaws.com/uploads/images/gallery/2024-07/scaled-1680-/NjpG5ZcVlzWWPCmv-image.png)](https://bookstackprod.s3.amazonaws.com/uploads/images/gallery/2024-07/NjpG5ZcVlzWWPCmv-image.png)

**Notification minutes expire**: notification expires if not sent within the amount of minutes set. Note: if set to 0 all notifications will be suspended.

**Notification Google Enabled**: enable the use of Google short URL services

### Platform Settings

Some settings are needed on your LMS and on the plugin for the correct functioning of the shortlinks that allow direct access to the LO’s and that are sent together with the notifications:

1. Enable Single Sign-On on your platform, from the settings &gt; System settings &gt; Forma API &amp; SSO

[![image.png](https://bookstackprod.s3.amazonaws.com/uploads/images/gallery/2024-07/scaled-1680-/GZaOMRnSFZ5s8yZU-image.png)](https://bookstackprod.s3.amazonaws.com/uploads/images/gallery/2024-07/GZaOMRnSFZ5s8yZU-image.png)

  2. Insert your Google API Key in the plugin configuration panel

<span style="background-color: rgb(206, 212, 217);">*Configuration &gt; Plugin Manager &gt; Lotify - Settings.*</span>

If you don’t have an API Key, you can get one here: [https://developers.google.com/maps/documentation/embed/get-api-key](https://developers.google.com/maps/documentation/embed/get-api-key)

### Text message (SMS) Service

To enable text message (SMS) notifications, configure your LMS with the credentials of your service provider, under:

<span style="background-color: rgb(206, 212, 217);">*Settings &gt; System Configuration &gt; Settings &gt; SMS*</span>

[![image.png](https://bookstackprod.s3.amazonaws.com/uploads/images/gallery/2024-07/scaled-1680-/XdAJk1zRqh0lUL5Z-image.png)](https://bookstackprod.s3.amazonaws.com/uploads/images/gallery/2024-07/XdAJk1zRqh0lUL5Z-image.png)

Note: Forma Lms is natively configured to work with [www.skebby.it](http://www.skebby.it/). This feature will be removed in Forma 4.x

### Cron Job

You need to set up a cron job on your server, to allow the system to properly work, launching periodically this URL:

<span style="background-color: rgb(206, 212, 217);">*\[platform\_url\]/plugins/Notification/Cron/cron.notification.php*</span>

## Standard notification

The plugin adds a new icon to the Learning Object Management panel:

[![image.png](https://bookstackprod.s3.amazonaws.com/uploads/images/gallery/2024-07/scaled-1680-/VESfbzcqvx6lkJ47-image.png)](https://bookstackprod.s3.amazonaws.com/uploads/images/gallery/2024-07/VESfbzcqvx6lkJ47-image.png)

Clicking on this icon, you are taken to the settings panel where you can control the notifications for every LO:

[![image.png](https://bookstackprod.s3.amazonaws.com/uploads/images/gallery/2024-07/scaled-1680-/NmqwzeAbcohhYvpN-image.png)](https://bookstackprod.s3.amazonaws.com/uploads/images/gallery/2024-07/NmqwzeAbcohhYvpN-image.png)

**Notification View Log**: from this link you’ll be able to extract a log of the notifications you sent

**Notification is Active**: enables the sending of the notifications for this LO.

The notifications will be sent upon the publication date you set in the properties of the object itself.

If you didn’t set a date, the notifications will be sent upon saving the form.

You can send notification either by e-mail or by SMS (text message to a mobile phone).

**Notification Text**: insert here the notification text. It’s possible to customize your text with the following placeholders:

\[URL\]: direct link to the LO, different for every user (see related paragraph)

\[USERNAME\]: userid

\[USER\_COMPLETE\_NAME\]: first and last name

\[COURSE\_NAME\]: course name

**Send on publish date**: the notification will be sent on the day set as “start publishing date” in LO properties

**Send on**: lets you set the day and time for sending the message

**Reset last send date**: by selecting this option, upon saving, the last send date will be reset. Use this option if you want to re-send the notification to users who have already received it.

<p class="callout info">**NOTE: EMAIL SENDER**  
The e-mail sender will be the same that you set in the general settings of your LMS for general notifications.</p>

<p class="callout info">**NOTE: SENDING CONDITIONS**  
Users that completed the course or the LO will be excluded by the notification</p>

### Sending a short url

The short-url inserted in the notification messages with the \[URL\] tag allows to directly open the object, bypassing the login to the LMS and the access to the course. The process happens in a way invisible to the user. Every link is unique for a specific user.

The link generated this way could also be used by other people who are not the user the link has been sent to.

It’s important to:

- tell users not to share the link with other users, in order not to compromise the course stats
- avoid using this method for evaluation tests, since there is a risk users would share the link with other users
- configure the LO properly, for example: make it visible just one time or until it’s completed

## Advanced notification

For the TEST objects there is an advanced settings feature that allows you to manage text, planning and recipients of your notifications.

### Adding a new notification

1.From “Learning Object Management” panel click on “edit test”:

[![image.png](https://bookstackprod.s3.amazonaws.com/uploads/images/gallery/2024-07/scaled-1680-/5Zt4dTOGqILvpOp8-image.png)](https://bookstackprod.s3.amazonaws.com/uploads/images/gallery/2024-07/5Zt4dTOGqILvpOp8-image.png)
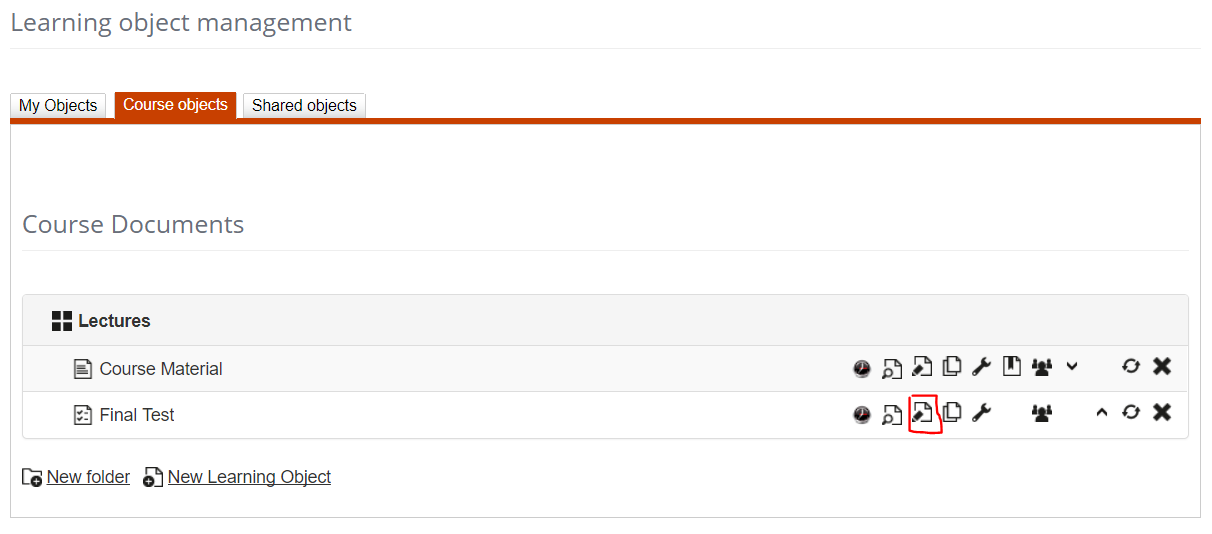
2\. Click on “Notification Management”:

[![image.png](https://bookstackprod.s3.amazonaws.com/uploads/images/gallery/2024-07/scaled-1680-/wu1QoGWkeduuP2bG-image.png)](https://bookstackprod.s3.amazonaws.com/uploads/images/gallery/2024-07/wu1QoGWkeduuP2bG-image.png)
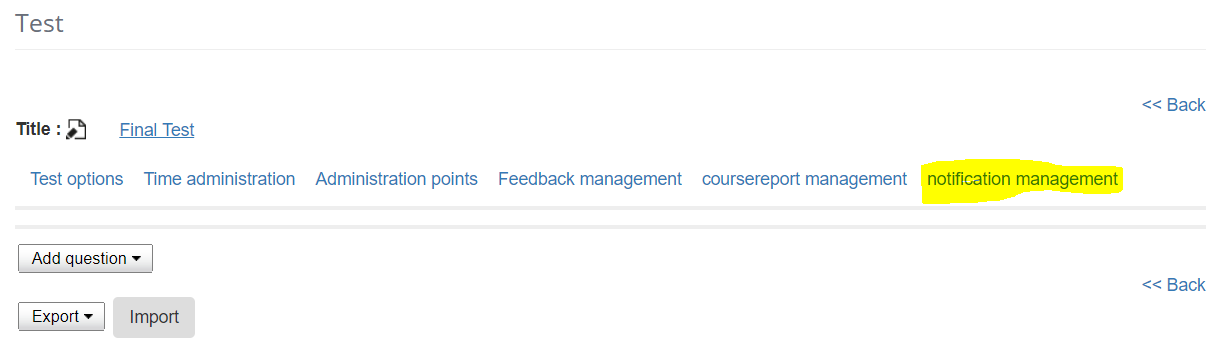
3\. Add a new notification:

[![image.png](https://bookstackprod.s3.amazonaws.com/uploads/images/gallery/2024-07/scaled-1680-/VgV7CN9RXYmVlJFO-image.png)](https://bookstackprod.s3.amazonaws.com/uploads/images/gallery/2024-07/VgV7CN9RXYmVlJFO-image.png)4. Notification settings:

[![image.png](https://bookstackprod.s3.amazonaws.com/uploads/images/gallery/2024-07/scaled-1680-/XwanzmV9N1TP9ERo-image.png)](https://bookstackprod.s3.amazonaws.com/uploads/images/gallery/2024-07/XwanzmV9N1TP9ERo-image.png)
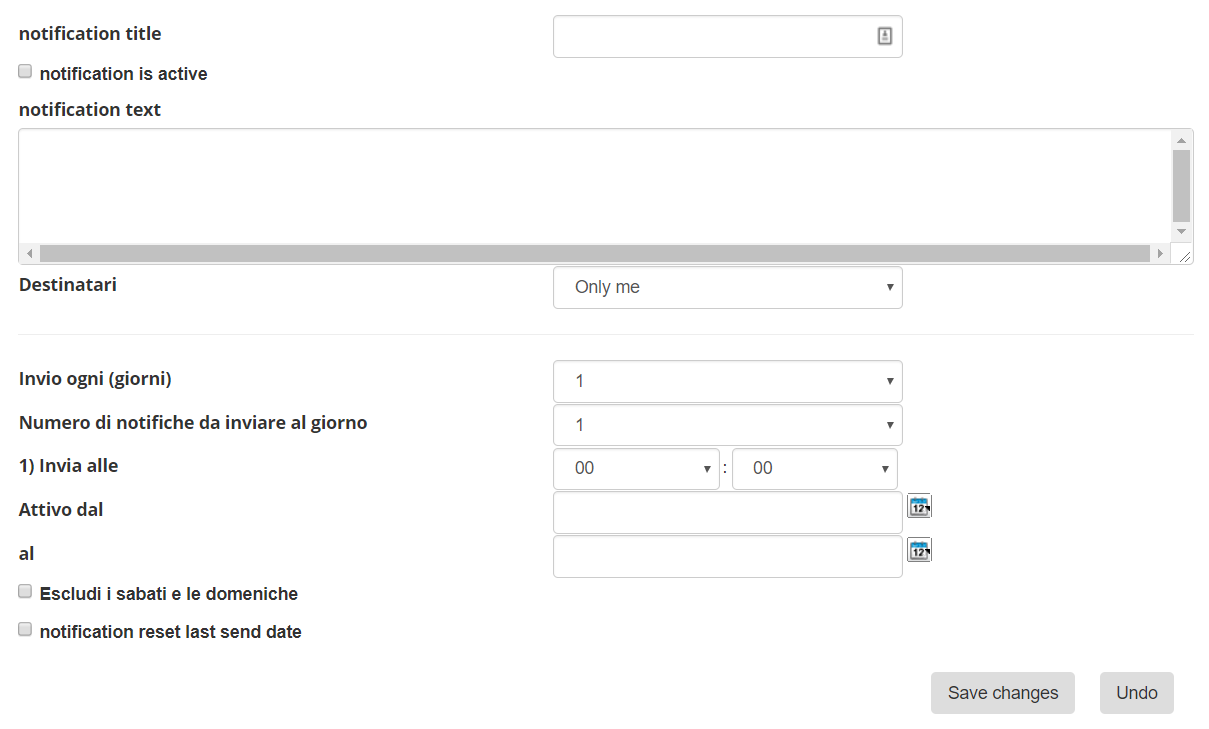
### Scheduling Notifications

Lotify allows for a very flexible scheduling of notifications:

[![image.png](https://bookstackprod.s3.amazonaws.com/uploads/images/gallery/2024-07/scaled-1680-/6CqV3sG50RkuEUPY-image.png)](https://bookstackprod.s3.amazonaws.com/uploads/images/gallery/2024-07/6CqV3sG50RkuEUPY-image.png)
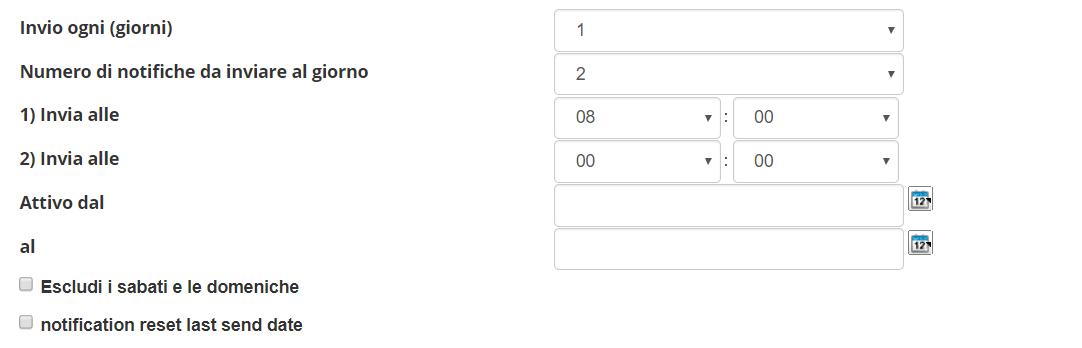
**Send every:** lets you choose the frequency, from 1 (every day) to 7 (every week)

**How many notifications a day:** self-explanatory, for every sending you have to specify a time

**Time:** at what time the notification will be sent

**Active from – to**: You can set your notifications to be sent only from a specific date to a specific date

**Exclude Saturdays and Sundays:** self-explanatory

**Reset last send date:** resets the last send date, so you can resend your notifications even to users who have already received them

### Setting the recipients 

When you create a new notification, you can choose if you want to send it:

- To yourself only: useful for testing or to send personal reminders
- All: sends to all users who are enrolled to the course
- Selected: after saving the notification, you’ll be able to choose the recipients

[![image.png](https://bookstackprod.s3.amazonaws.com/uploads/images/gallery/2024-07/scaled-1680-/6Rh7XaJ92NMpF7xM-image.png)](https://bookstackprod.s3.amazonaws.com/uploads/images/gallery/2024-07/6Rh7XaJ92NMpF7xM-image.png)

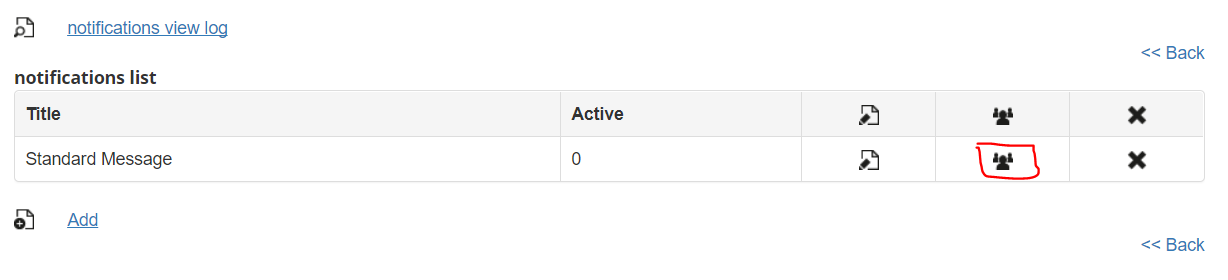
This option is only available upon creating a notification. Then you’ll be able to edit it from the user's icon:

[![image.png](https://bookstackprod.s3.amazonaws.com/uploads/images/gallery/2024-07/scaled-1680-/euN1Q2sQXjcTB1xk-image.png)](https://bookstackprod.s3.amazonaws.com/uploads/images/gallery/2024-07/euN1Q2sQXjcTB1xk-image.png)
## Troubleshooting

### A User didn’t receive a notification 

1. Verify that in the user profile there is an active e-mail address and/or a correct mobile phone number
2. Check the user status on course and learning object: only users with status “subscribed”, “In progress” or without a completion date will receive the notifications
3. Check the plugin setting for “notification minutes expire” is not set to 0 (zero)
4. Verify if the notification log has some errors (see paragraph 2.1)

### Resend a notification to a user

If a user didn’t receive a notification or has canceled it by mistake, it’s not possible to resend it directly from the system, but you can do as follows:

1. Access the notification settings panel (see 2.1 and 2.2)
2. Open the notification log. The log lists all the cron call, sorted by time. Look for the notification text you want to resend and copy it. Please find the right user and the right text, because short-urls are personal
3. Send the user the text you copied with a direct e-mail or text message

### The system asks for a password

If the user is asked for a password after clicking on the shortlink, it might be that the user was set to force the change of password upon first access. In that case, inform the user about how to reset password or give him a new one.

### Send Conditions

Notifications are NOT sent in these cases:

<div id="bkmrk-course-is-in-status-">

- Course is in status canceled, closed or under construction
- User completed the course

</div>